January 2024 - Daz 3D New User Challenge - Composition, Instancing, & Duplication
 DAZ_ann0314
Posts: 2,860
DAZ_ann0314
Posts: 2,860
New User's Challenge - January 2024
Sponsored by DAZ 3D
Are you new to the 3D World? Are you at the beginning stages of learning 3D rendering? Have you been around for a little bit but feel you could benefit from some feedback or instruction? Have you been around awhile and would like to help other members start their creative journey? Well then come and join the fun as we host our newest render challenge!
Back by popular demand (or well because we think it went well LOL), we are breaking down each month into 2 different challenges:
A Beginner Challenge and then also an Intermediate Challenge.
So which "Challenge" should you choose?
Follow the Beginner Challenge if you are:
- New to the New User Challenges
- New to Daz Studio
- Newer to 3D Rendering in General
- Or if you have not participated in the January Composition Challenge
Follow the Intermediate Challenge if you have:
- Participated in the New User Challenge for awhile
- Know the basics of Daz Studio and would like to learn more in depth topics
- Been using 3D Rendering Applications for awhile and feel comfortable with learning Intermediate Topics
- Or if you have all ready been spotlighted in the January Composition Challenge
*Please be sure to list in your post which Challenge you are participating in
Daz 3D is part of 
Connect
DAZ Productions, Inc.
7533 S Center View Ct #4664
West Jordan, UT 84084
Licensing Agreement | Terms of Service | Privacy Policy | EULA
© 2025 Daz Productions Inc. All Rights Reserved.
Comments
Beginner Challenge:
"Composition"
This is a general render challenge with the focus on how you compose your image. We are providing you with lots of great links on Composition from a variety of sources. Composition is key to pulling a viewer into your image and leading their eye to where you want them to see things. It is a fundamental skill that we, as artists, not only need to learn, but will continue to hone over the years. Read about and look at the examples, in these articles, for how composition works and how artists, from the Masters to people like you and me, put these compositional guidelines to use to make our pieces more appealing and invite the viewer to look around your image as you intended.
For those completely New to Daz Studio, we HIGHLY RECOMMEND checking out the new MASTERCLASS!
General Composition Rules:
http://design.tutsplus.com/articles/5-fundamental-skills-every-artist-should-master--psd-28054
The Golden Ratio:
https://designschool.canva.com/blog/what-is-the-golden-ratio/
http://www.hongkiat.com/blog/golden-ratio-in-moden-designs/
https://www.youtube.com/watch?v=8A3JnWzgXGk
Some Tools for DS and Bryce:
Golden Rules Camera Prop v1.5 by Jaderail
Golden Rules Composition Helpers for Bryce by David Brinnen and Horo
Artists, filmmakers and photographers share similar traits in how we present our work, so you will find that a study of the art of photography will help, which is why you see various links to photographic articles included.
Photography Composition:
http://digital-photography-school.com/5-elements-of-composition-in-photography/
http://digital-photography-school.com/5-more-elements-of-composition-in-photography/
Color can be used as a compositional element, especially when you have color contrast. Here are some fundamentals on color:
Color Fundamentals:
https://99designs.com/blog/tips/the-7-step-guide-to-understanding-color-theory/
Other Types of Contrast:
http://photoinf.com/General/NAVY/Contrast_and_Framing.htm
Examples of Composition:
http://www.pinterest.com/dawnshiree/rules-of-composition/
Examples from Netflix's The Queens Gambit (The Director of this series did an EXCEPTIONAL job applying the Rules of Composition):
Composition of The Queen's Gambit (You may need a Facebook Account for this link which directs to a post - be sure to scroll through the pictures as there are TONS of excellent examples)
This is a bit of a long read but offers excellent examples of different kinds of composition and camera angles.
The Cinematography of "The Incredibles"
I will be checking in as will the rest of the Community Volunteers to try and help with anything you all may need.
For a list of the current challenge rules, please see this thread : Challenge Rules
Closing Date: January 31st 2024
Intermediate Challenge:
"Instancing and Creating Duplicates"
This is a general render challenge with the focus on using Instancing and Duplication within a scene. We are providing you with some links on the topics from a variety of sources. Utilizinging Instancing and Duplication well is key to creating intricate scenes while saving on file sizes and processing power. It is a fundamental skill for those wishing to do large battle scenes, those wishing to create their own worlds, or those wishing to create an environment that seems full and complex.
*If participating in this Challenge, please be sure to list what item(s) within your scene you have instanced or duplicated*
General Instancing and Duplicate Creation Information:
Node Instances
1. Click on the item in the scene you wish to Instance
2. Go to Create - New Node Instance (Good for Singular Instances)
or
1. Click on the item in the scene you wish to Instance
2. Go to Create - New Node Instances (Good for adding Multiple Instances at once)
Pluses:
Doesn't use as many computer resources as loading in the items again (So it won't show as more Geometry Loaded in if you look at the Scene Info Tab)
Great for filling in a scene with items that are going to look identical while keeping the computer strain down.
Can Populate a scene fairly quickly
Minuses:
All the items will share the textures of the original item.
Node Instances are an exact copy of the original, they cannot be morphed or posed separately
Duplicate Nodes
1. Click on the Item in the Scene you with to Duplicate
2. Go to Edit - Duplicate - Duplicate Node(s)
Pluses:
Creates a copy of the Selected Item
You are able to change textures, manipulate, repose etc as if you added in a new copy
Minuses:
Doesn't Save on Computer Resources since it is basically the same as loading in a second exact copy (Rig, Bones, and All)
*Duplicate Node Hierarchies *
(Duplicates the entire node tree below the Selected Node)
Example: If you select Genesis 8 that has clothing and hair attached then it will Duplicate Genesis 8 as well as the attached hair and clothing.
1. Click on the Item in the Scene you wish to Duplicate
2. Go to Edit - Duplicate - Duplicate Node Hierarchies
Pluses:
Creates a copy of the Selected Item and all items attached to it. (Great for creating a copy of a Figure with included clothing, accessories etc)
You are able to change textures, manipulate, repose etc as if you added in a new copy
Minuses:
Doesn't Save on Computer Resources since it is basically the same as loading in a second exact copy (Rig, Bones, and All)
Generally you want to use Duplicates or regular full figures with varying poses etc in the forground of the scene and then use the instances more in the background or as scene filler where it will be less likely to notice they are the same (especially useful when using Depth of Field etc) It can also be used to help cut down computer load when you actually want or need to identical things (props etc) in the scene..such as two chairs in a livingroom, two tanks (or 20 tanks) on a battlefield, multiple candles in a scene that are all the same color, books placed on shelves, potion bottles that can be moved to various places across the scene, or things like trees and grass.
Examples of Using Instances and/or Duplication within Daz Studio:
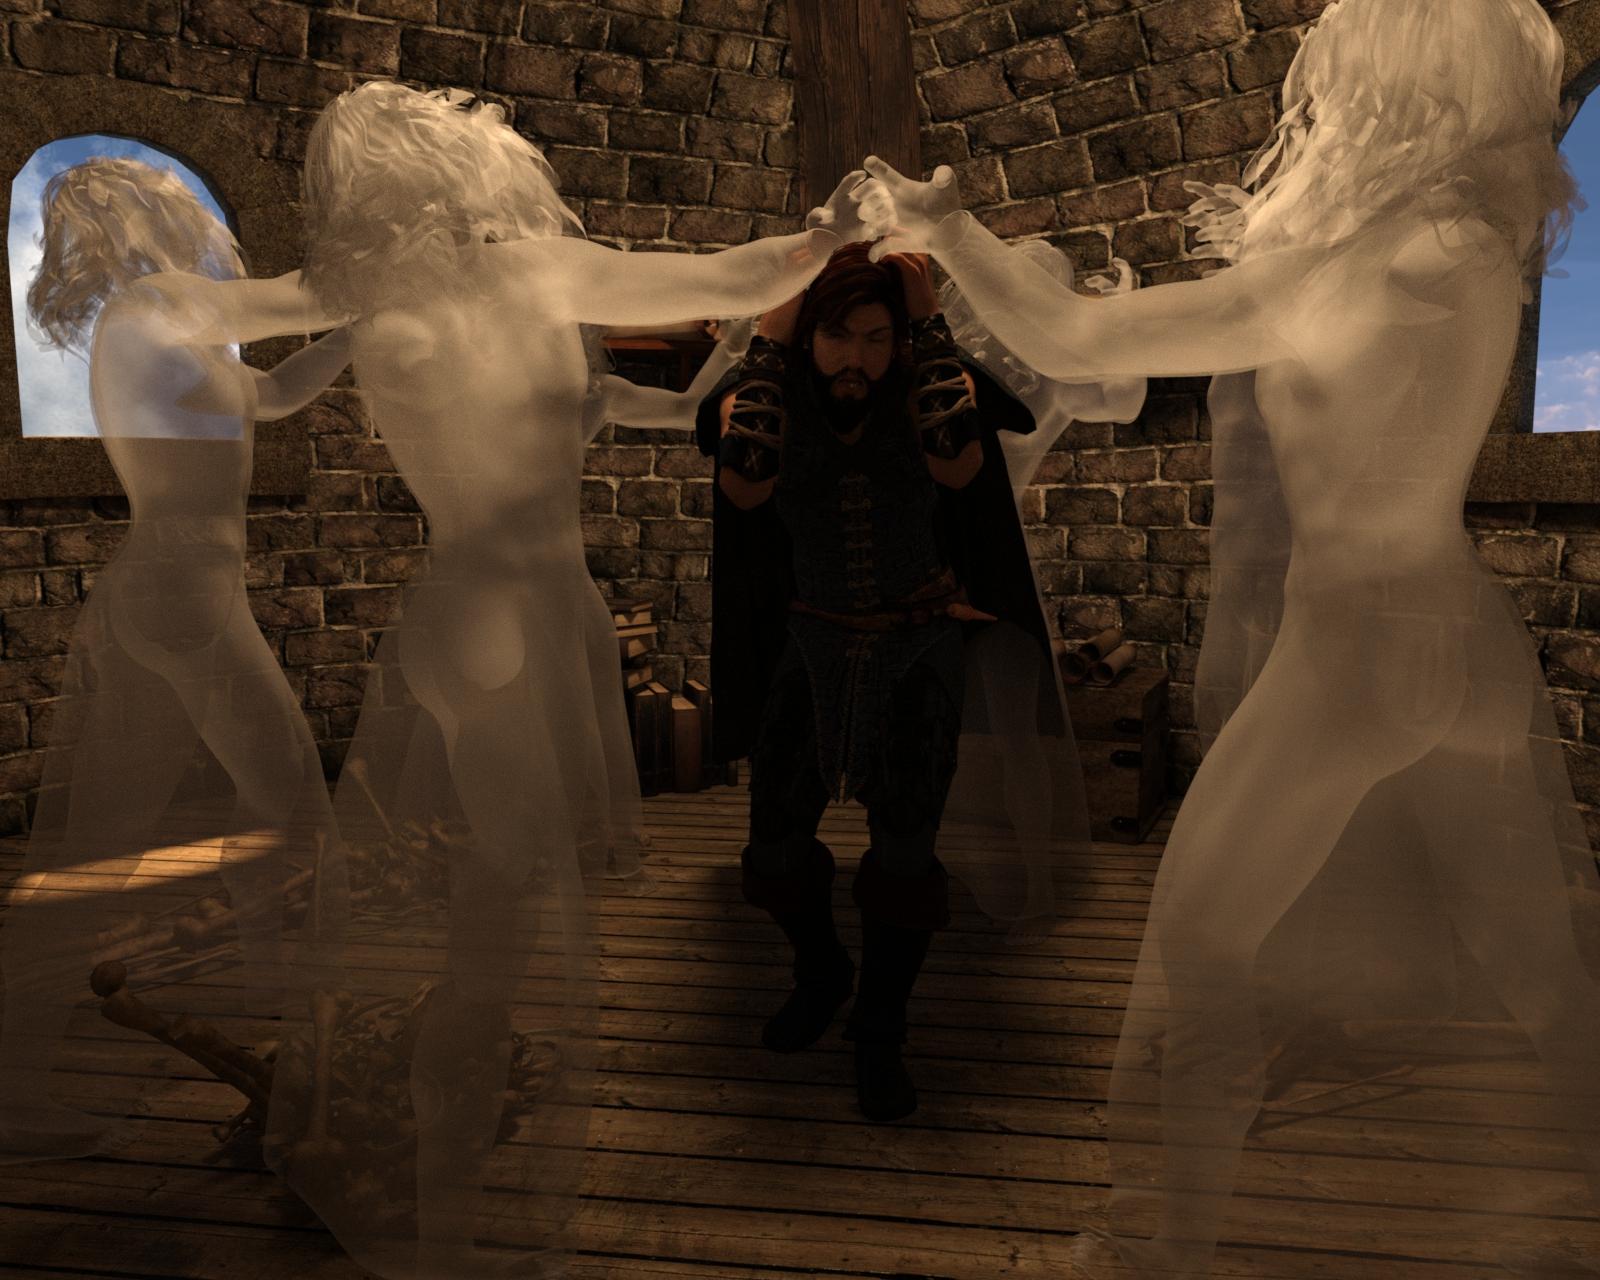
Instances used for the Spectres that are Attacking Ater Eterwood
(Special Thanks to Totte - Code 66 for the Example)
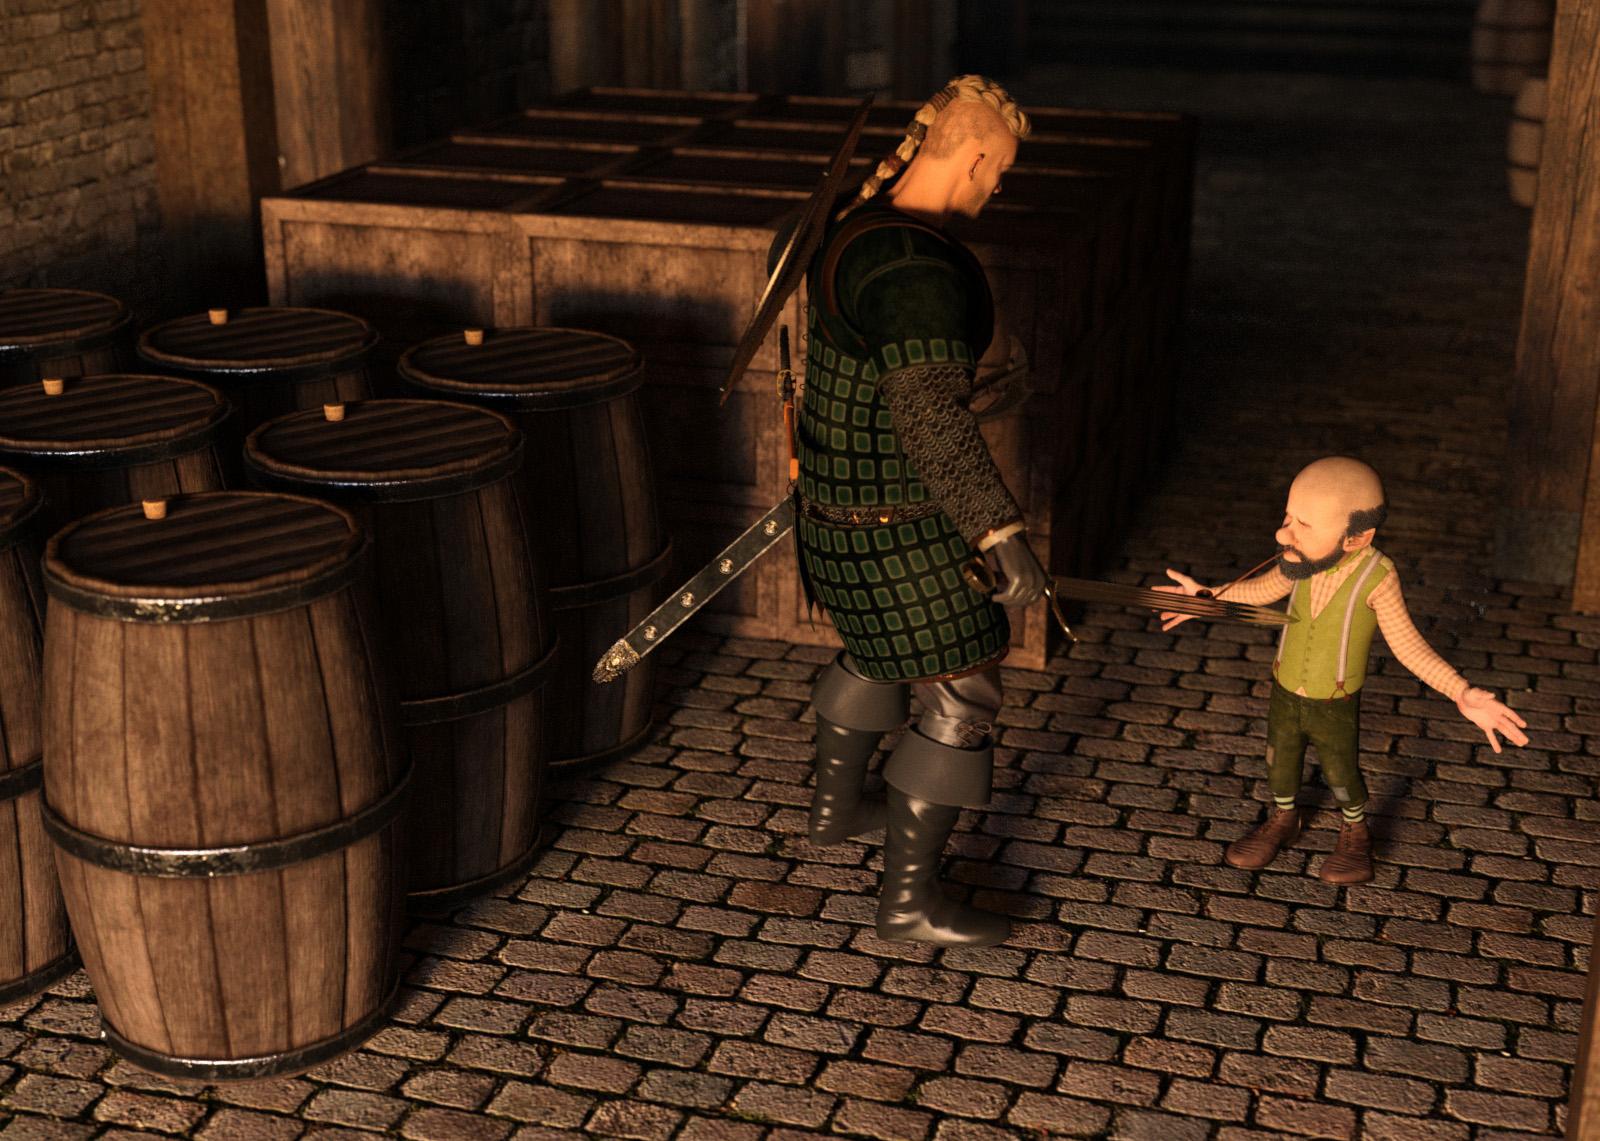
Instances used for the Crates and Barrels. Barrels were rotated to avoid the repeated look.
(Special Thanks to Totte - Code 66 for the Example)
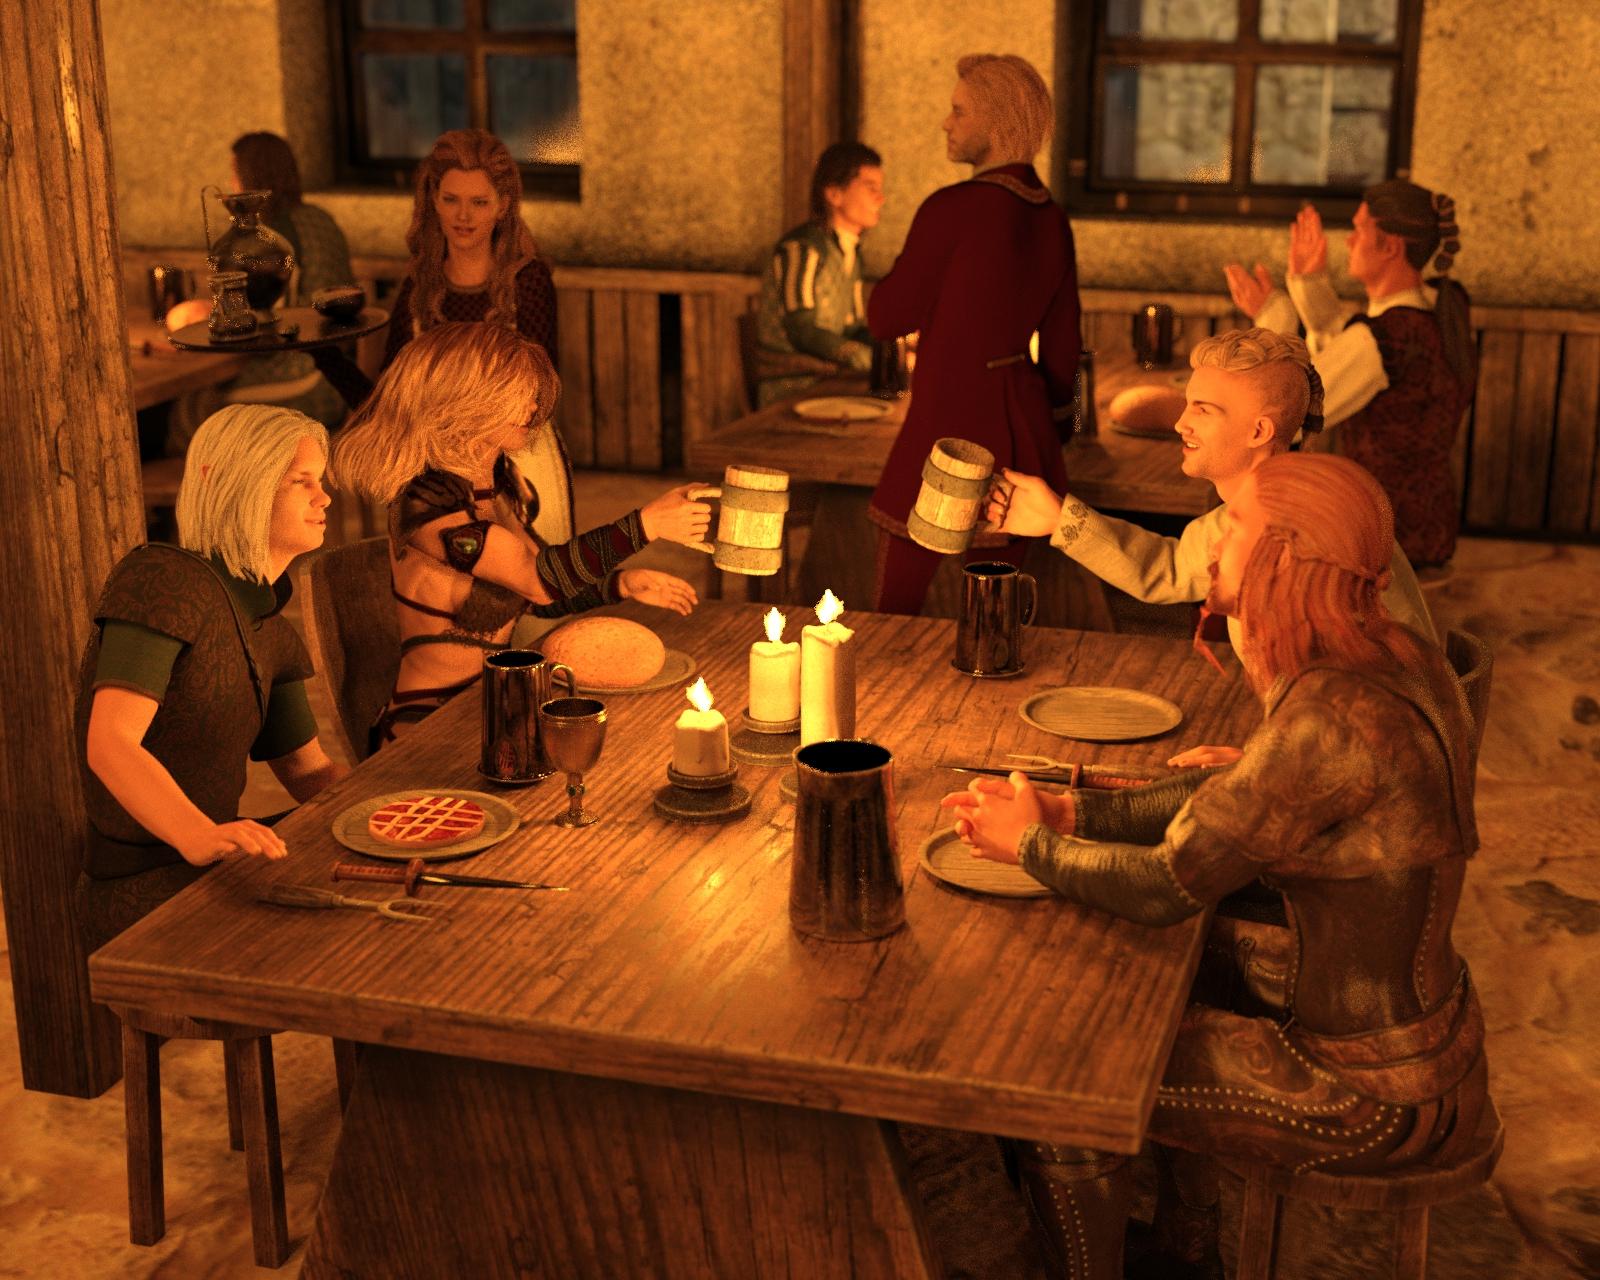
Instances used to add more Patrons to the tavern
(Special Thanks to Totte - Code 66 for the Example)
Handy Products to Use while Instancing:
FlockIt
Traffic Patterns Script and Prop Collection
Have a Seat
Stack'Em Up
UltraScatter Advanced Instancing for Daz Studio
UltraScatter Pro
Instances Plus+ for Daz Studi
I will be checking in as will the rest of the Community Volunteers to try and help with anything you all may need.
For a list of the current challenge rules, please see this thread : Challenge Rules
Closing Date: January 31st 2024
Hello,
Out of the three pictures showed as example of instancing, I only able to see where instancing was use in the first. On the second picture, to my eyes, all barrels look identical and not rotated individually to avoid repetition (but I suppose they are 5 instances). And on the third, I don't even see what is instanced (maybe the two patrons near the wall ?). I suppose plates and food are also instanced.
tables and chairs for sure were instanced as well, the tankards and probably more details, the clever part about instancing is when you don't even notive it, becuase it was used naturally in the scene
I understand better now: the goal was saving memory on everything else to be able to put more characters while staying inside the memory budget.
Thank you
Not An Entry
Ah yes, that is the main reason to use instances
that's a very cool image!
Challenge: Beginner
Title: Cats Playing Blackjack
Software: Daz Studio 4.22, Gimp, Caesium Image Compressor
Format: .jpg
The Daz Housecat returns to take center stage this month, poor little guy, he needs the attention (and bones in his face to power pose with). I didn't do much in post work outside of try to enhance some colors. Compressor did a good job, original 4k image was nearly 6MB, kept 97% of quality and reduced to a little over 1MB.
I did slam into a brick wall with this scene though, something about the way I've managled my actors heads and the housecat's body to get it to come out like this bugged out the translate tool. I can no longer move my actors with the cat heads in straight lines--they translate like bobbleheads and rotate at the same time even if moving them on horizontal or vertical axises, resulting in the heads to be turned upwards, downwards, to the left, right, etc, they're not where they're supposed to be. Having some weird issues with my scene window pane as well, single clicks can sometimes result in highlighting 20+ items, and oddly I'm having things randomly parent to other things (also from just a single click). I've had the scene pane issue before but never to the degree I'm having it in this scene. Camera is also orbitting a planet somewhere in outer space, constantly having to refocus it on an item to get it to move correctly. Also items that I've set to be hidden from the render and do not show up in the viewport Iray preview are appearing in the render. So, I'm not entirely sure what I did here to cause this many issues, but coupling them all together makes trying to do any changes to this scene an absolute (frustrating), nightmare I don't want to touch.
I may attempt to re-do the entire thing if enough comments or suggestions prompt it. Certainly open to criticism, not sure how else to get better at things. Still slowly trudging my way through the masterclass videos (or way to masterclass), thank you for putting the link up there. :)
As far as the challenge goes I did make use of depth of field to try to pull the viewer's eye where I want it, and use of hand gestures with the actors. Outside of inital sit poses, upper body and arms, and hands were all manually posed. I did go over the reading materials, but feel like I should go over them again and then re-visit them yet again in another week or two just to get everything to sink in and stick.
Anyway, hope the submission makes someone smile out there, as it is meant for light humor, or at the very least an attempt at it. :)
EDIT: Removed scene preview link from post. It won't display correctly, I guess this scene is determined to be problematic and buggy for me until the very end of time itself. Sigh.
Thank you. I was playing around. There are only 1001 noggins Dragonflies.
I just stumbled over this brilliant piece of instancing in the gallery and it blew my mind away, cudos to @Nebulart Link to the image in the gallery, where they explain as well how they managed this: https://www.daz3d.com/gallery/#image=1324359
true thinking outside the box
Awesome.
Here's my start for the month. The tables we see in the frame are instances of another table that is out of the frame.
@Totte did the images but in the second image the barrels and the crates were all instanced. In the 3rd image, if I recall correctly, some of the patrons were also intanced in that scene (if you look close at the one guy in the background with the green outfit on, I believe he is actually instanced and rotated and sitting behind himself too (Hopefully that makes sense ROFL) (At least I am fairly certain but not 100%)
LMAO The poker playing dogs are going to be very upset that they have competition hehe. Very cute and funny and yes it did definitely bring a smile to my face
There are a lot of instances there. I used Instancify I think to instancify props and also background people. I have "less old" images with more and better instancing examples I think (I've written some more helpful tools)
Title: What Lurks Beneath
Challenge: Beginner
The composition of this render does not use any particular rule, but I tried to put something of interest in each area. The title doesn’t initially make sense, as the first thing you see is the ballerina. But as your gaze moves across the image, you notice those sinister glowing green eyes in the corner, peeking from a gap in the curb. Or at least that is what I intended. I had never used emission before, and it took a lot of experimentation before I was satisfied with it. For the eyes, I hid all parts of a cat except its eyes and enlarged them so that they could be seen better. The Post Apocalyptic Street is a huge set and I learned how to navigate through it to find the spot with the broken street lights that I wanted to use for the image. I deleted everything that was not visible so that it didn’t take ages to render.
Constructive criticism is always appreciated.
Character: https://www.daz3d.com/jordina-for-genesis-8-female
Hair: https://www.daz3d.com/mrl-dforce-curly-bun-for-genesis-8-females
Clothing: https://www.daz3d.com/dforce-urban-ballerina-for-genesis-female-s
Cat: https://www.daz3d.com/daz-house-cat-with-dforce-hair
Scene: https://www.daz3d.com/xi-post-apocalyptic-street
Then it was worth the time put into it. :)
The house cat is getting a lot of attention this month, he certainly approves. :)
Creepy eyes for sure!
Hello.
I've been away awhile and returned recently so I have no idea how things work anymore. While I am not totally new to 3D, I am a total newbie to all the changes in Daz Studio that have happened since I was away. Iray and different rendering skills especially. I have no idea what I am doing! LOL But, I thought I would try the intermediate challenge to try to learn and catch up. I have a few questions, though. Are we required to participate in the thread to submit? Do we submit in here? Are we expected to post WIP's? Are there any limitations or rules I should be aware of? For example: are there size requirements or limitations I should know? Is post work allowed? Thanks in advance!
--JasmineSkunk
welcome back to DAZ!
In order to participate you have to submit an image to this thread, you might just post a finished one or WIPs. Esp this thread is to post questions, things you would want suggestions for, but you don't have to. though posting an image here might spark a reaction from one of the mods or other participants, again those would be just ideas, non of which is needed to follow. though through these things you can learn a lot.
there is no size recommendation though to post inside the comments you might want to resize it to 800 px on the largest side, the attachments can be any size.
For postwork the idea of the challenge is to achieve the topic of the month using DAZ (just as an example: for instancing we would want you to do that using the program and not duplicate things in postwork) aside from that you are welcome to use postwork as you see fit. If there are major changes to the rendered original, we request to post the rendered orignal alongside the one you consider final. For just suble colour adjustments, this is not required.
AI is not allowed
I hope this answers your questions, more general information about the rules can be found here: https://www.daz3d.com/forums/discussion/3440/new-user-challenge-rules-and-regulations#latest
Thanks, Linwelly! Okay! I'm going to give this a go! I still haven't "really" tried to make a fully realised render since I have been busy getting reacquainted with everything, so I'm hoping tihs goes okay! I'm working on an old laptop with only 8GB RAM! Wish me luck! LOL And good luck to everyone else too!
especially for a render machine with limited render power, instances are pure gold, so, looking forward to what you come up with
ooh. Quiet in here....
Hello... helloo... hellooo...
So, I have a question for anyone... I've been playing with some ideas for this, but as I mentioned...old laptop, little RAM. And I have encountered a little issue and wonder if it's my system limitations or if I'm just not setting something right. The problem is with little bits of noise in IRAY. I have the optimization turned up to 10 and cranked the samples up... but even if I let it render 100% (which takes like 6-8 hours!) I still get areas of noise. especially if I am using DOF on a camera. Is there anything I might try to fix it?
can you make a screenshot of your rendersettings, esp the filtering and the progressive rendering, maybe together with a render test and post that here?
some starter thoughts:
I would set the the instancing optimization to Memory ( in the optimisation tab)
And Iray want's light, lot's of light, the darker the scene the longer it takes to render and the more pixelated it stays. You can crank up the Environment Lighting resolution if you are working in dome and scene Environment mode (I usually go in doubling the number steps for that) or the SS multiplyer if you are using the Sun-Sky only setting. If this turns your render brighter than you want it for the scene you can rather set the f/stop to a higher value (8->16 or something in beween) in the tone mapping setting or tone it down in postwork
I hope that helps
I only started playing with adding lights more recently, so, I’m not a great authority on the subject, but maybe getting more light in those noisy areas would help.
If changing the lights is not possible or doesn’t lead to a pleasing result, you can use a denoiser on the final render. @mCasual provides a script from Daz UI to use one created by Intel, that doesn’t require an Nvidia GPU.
https://www.daz3d.com/forums/discussion/334881/a-i-based-open-source-de-noiser-for-daz-studio-pc-and-macs/
You need to install two programs before being able to use the script in Daz Studio and you will have to tell the script where to find these programs, but the denoiser seems to be able to remove the noise while preserving image sharpness, at least on the couple of render I used it.
One is in my gallery, ‘A Christmas tradition’: the main picture is the denoised render, and the second one is the raw render (in both cases, I converted them to 90 quality JPG which should not affect to much the picture quality). Off the top of my head (I cannot load the scene file to check right now), the scene was lighted by the two lighting sources provided by the PA with the Christmas Micro Scenes and I duplicated one, moving it to add more lights near under the table, mainly around the mug held by the woman on the left. You can see the denoiser action the most around the red candles in the back and on the mug itself.
Another example, more extreme, because I stopped the render long before it would even cross the 10% convergence ration threshold (after 2 hours of CPU rendering, it was still only at 1% – I don’t remember how many iterations were required to get there but it was not my best idea to make all dices translucent ). The two pictures were converted to JPG (quality 90) and a funny side effect of the denoiser is that while PNG denoised fill will be way bigger (19 MB vs 9.6 MB), it’s the opposite way with the JPG files.
Raw render:
Denoised render:
Okay... Here's a screenshot of my current render settings and a sample of the noise I'm seeing. I don't know if it will translate well in the forum, but as you can see, I've tried to use DOF in the camera settings, so the "blurry" noise is expected, but the tiny "extra" dots seem impossible to get rid of. No matter how long I let the render go, they still show as artifacts. I just turned the time and samples up up to a ridiculous number - I have no idea what they should be. I did change the optimization to memory and will see how it might help. There is a lot of light in the scene. It's a daylight scene using the dome and sky in the environment tab. Thanks for helping
Hey Elor! Thanks for the Denoiser! I'll Check it out!
yes unfortunately the wrong pixels get lost on the forum view, but from your setting I can see that ,
1) yes I believe there is enough light in the scene
2) I would advise to set the pixel filter radius to 1 or even 0.95 (for testing 1 is definitely enough)
3) reset the render qualit to standart 1
4) you can keep the rendering converged ratio at 99/ but I would actually set it back to standart as well for the next experiment, because it will increase the rendertime drastically
5) the instancing optimasation to memory as already mentioned
for the next tests I would return the render time to the standart values as well and only go back to change those if it still doesn't get to where you want it
and then I would suggest if this is an island setting with a lot of palm trees that you try to nix everything that isn't visible in the camera angle you are going to use, I have some island settings and they can get very render intense with all the stuff that is there, which is nice to be able to choose.from for a view.
In the long term you might want to invest in a usefull tool called scene optimizer which helps tremendously reducing the texture map sizes where you don't need them in a high resolution (like in the distance behind the DOF blur.
Good luck with the next steps, let us know if that helps or if the trouble persists