Rigging cloth for V4 in 4.5.0.137 (beta)
What is the difference when it comes to rigging for example a shoe to V4 vs Genesis in DS 4.5.n.n?
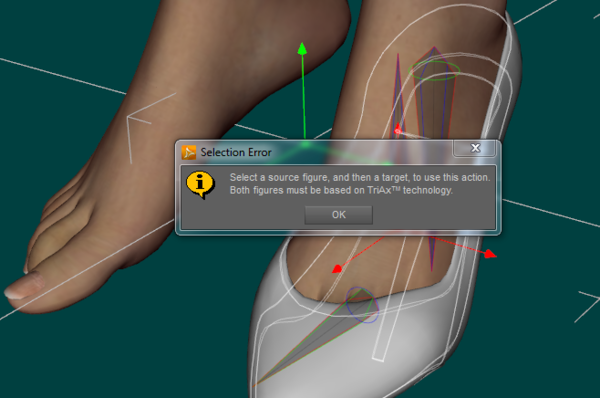
I've follow the same procedure I used on Genesis but get the following error message when I try to Transfer Rigging (figure Space) in the Joint Editor :
Edit : Just to clarify, I did select the Victoria 4 figure AND the new shoe figure before attempting to execute the Transfer Rigging command...


Selection_Error.PNG
658 x 436 - 252K
Post edited by bringho on


Comments
Neither Victoria 4 nor her clothes are TriAx figures (they don't use weight-mapping, and the Transfer Utility uses weight-mapping to project the source figure's rigging into the target figure or object). If you want to use a legacy figure as a donor for clothing to fit it you need to use the Figure Setup pane - copy the selected donor figure (pane menu), import the OBJ into the pane (not the scene), drag it into the hierarchy, remove (or add) bones as needed, check Modify Select at bottom-left, click Create.
Thanks Richard,
I should have posted the other screen capture as well...
I don't like / use the transfer utility much...
"There is a known bug in the boot template and isn't likely to get fixed, despite it being a two minute job in a text editor. "
If I don't misinterpret your instruction, that's exactly what I did.
Then I get the geometry and go to the Joint Editor to align the new bones with the original bones and when I hit Transfer Rigging I get this error message.
Edited:
So the question still is: Why won't the rigging transfer on V4 when it works with Genesis? or as stated in the first posting: What is the difference?
Hi bringho...
The 'Transfer Rigging (Figure Space)' feature is only for Tri-Ax weighted figures. That's one of several tool features created for making the rigging of Tri-Ax figures easier than legacy parametric figures.
There is no tool to automatically align the bones of a parametric rigged figure that I am aware of.
The Figure Setup pane relies on the mesh groups or face regions to position the bones, and shoes typically only have a few groups or regions, so all of the additional bones will 'clump' around the objects center.
For a Gen 4 or other parametric figure, there are two ways that I would recommend going about it.
The first, since you already used the Figure Setup, would be to copy the end point locations of each relevant node from your source figure that are listed in the Tool Settings pane when the Joint Editor tool is selected.
Then select a node of your shoe figure and select the menu in the Tool Settings pane and select Edit > Selected Node(s) Attributes. Then select 'Set Values' and fill in the end point values. Repeat for each node.
After all your bones are aligned to match the source figure, then make any needed adjustments to the bones positions that you may need for your figure. Then Memorize the Figure Rigging to set the values.
Adjust the 'fall off' zones, make any other additions or adjustments and export your .cr2 using version 6.
The second method, and the one I use on V4 items, is to use the 'V4 Dev Foundation' .cr2 as the starting point. DAZ provided it just for making clothing for V4. You can not use the V4 .cr2 for this as it has allot of information in it that can not be distributed per the EULA unless you are confident that you can 'strip out' all of that information to create a 'blank' .cr2.
Locate the 'V4 Dev Foundation.cr2' in your runtime folder and open in a text editor. Replace the geometry references with your shoe object. Then save as a new .cr2 using a unique name and a location in a readable runtime characters folder.
Now in DS, navigate to the poser format character folder where you saved your .cr2 and load it.
Using the Joint Editor, delete all of the unused bones. Remember, for Gen 4 figures you only need to retain one bone up the hierarchy from your top most mesh group. So for your shoe you only need the shin,foot and toe bones.
Adjust the end point locations of any bones as needed for your figure and then Memorize the Figure Rigging.
Adjust the 'fall off' zones.
Your new .cr2 will also have all of the morph channels added to it. When you have finished with everything you want to have in the .cr2, open the Property Editor and remove all of the morph channels that you do not need then export your .cr2 using version 6.
Hope this helps... :)
THANK YOU Niccipb!!!
That's a lot of help :cheese:
Clear, and to the point. I'll go with the second suggestion, the one you use and get back in here if there is something I did not grasp.
I've changed the geometry reference on line 7 and 275 of the 'V4 Dev Foundation.cr2' to:
figureResFile :Runtime:Geometries:xTreemeHeels:xTHPumps:xTHPumpsLzero.obj
And saved the cr2 as 'xTHPumpsL.cr2'.
When I loaded the 'xTHPumpsL.cr2 the geometry was scaled as seen in the first picture. In that case my geometry was scaled for Daz and it is roughly 24000 % of the original size which is the difference between saving as Daz (1 unit = 1cm) and Poser (1 unit = 8ft).
So I created another obj export scaled for Poser and the result is seen in the second image. No geometry is to be seen at all?!?
Any idea as to what is the solution to this problem?
Another question, what is the reference of the white line pointing backwards away from the hip bone when it is selected?
Make sure you change the option for groups to Use existing if you export using the Poser preset.
Thanks Richard!
Not totally obvious, but that's what I did wrong.
Now off to next step...
Damned, I've forgot (or maybe never learned / fully understood) how to edit the 'fall off' zones. I think I messed around with it when I gave up on the transfer utility for shoes on Genesis but right now I draw a blank...
Please, someone point in the right direction.
Edit:
Don't bother I've found it ;-)
Hi Bringho...
Sorry, I forgot to mention the part about using Poser scale for your .obj...
The link to the pdf for the Figure Setup Tools manual doen't work but here is a link to the videos that explain how to use the Joint Editor and Tool Settings pane to adjust the 'fall off' zones.
DAZ 3D Figure Setup Tools Video Tutoriols
The videos by rbtwhiz are really good and clear, and should show you every thing you need to know.
I would try to detail all the steps, but the post would be pages long, but just ask if you run into problems.
Hope this helps... :)
Edit: You edited while I was posting... ;-P
LOL Thanks M8!
I'll check it out anyway.
That was a good video. This might be out of topic for this thread but it it's the next obstacle on the road forward.
As I see it there are two different ways to get the result I want:
First : Is there any way to "Freeze" the rotation of a bone? Say that I rotate my toe -56 degrees and want that to be "frozen" to Zero rotation in the memorized figure.
Second : Is there any way to align (or to copy the position and rotation of the bone and the endpoints of) the bone of one figure to the bone of another figure? Say that I load 2 instances of the figure and rotate the toe of one figure -56 degrees. Then, to get the bone in my "master" figure to be at 0 degrees when posed as the rotated bone in the first figure I want to snap it (and the endpoints) to the position of the rotated bone in the first figure.
Hi bringho...
I'm just settling in at work and having my first cup of coffee... ;-) still a little fuzzy in the brain, but I'll try to help out here... I'm trying to visualize what your describing...
Ok, If I understand correctly then, your "master" figure would need to already have the mesh of the toe in the bent position to do that. There may be another way to do it, but I can't test it right now.
What is the zero pose of your shoe object? Is it with the toe mesh bent in its natural position or bent down position (v4 zero pose)?
argh.... I keep getting interrupted with work stuff while trying to post... >:( :roll:
I'll try to check back latter...
nicci... :)
Ain't that a bitch, work keeping one from doing all the important stuff ;-)
Thank you for your effort Nicci!
When I got my brain back on line I remembered how I did it on the Genesis figure a couple of months ago and I was able to do the same thing here so that problem is solved =)
I'll start another thread regarding my (probably mis-) understanding of rigid bodies...