Speed Lights
 MW_HNL
Posts: 45
Seems like there is no end to what there is to know about what makes a render blazing fast or infinite. I decided to try to sort out just actors. Gen4 and Gen6 and the new G3 stuff. At the most basic level and see what is making strange things happen like the same G2F suddenly taking 4 times as long to render? I have discovered all sorts of things. Hair makes a big difference. Really neat hair of course takes long renders. And it can be difficult to know what hair does that. And turns out morphs and all those sliders to customize your figure can have an effect. Especially HOW MANY of them you set. I had tweaked some of my figures going crazy with the sliders. I wondered if all those sliders set to just a bit of "fudge" like 0.1 or so were in fact adding up. They were, big time. I removed a bunch of them that really did not do that much to establish the new form and shazam divide by 4 on the base render time.
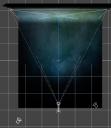
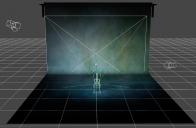
But I needed a test setup. So I just got a backdrop (happened to be the one from Boudoir Studio and I edited the texture for it a bit to lighten and blur it), turns out you need a physical backdrop to fill the scene for consistency, and you need the model to be a fixed distance from the camera and the lights to be at least two of them (in a classic portrait setup with main on one side and fill on the other is good) and both be shadow casting and a "X marks the spot" type thing you can be sure each model is centered and a nice stock pose to test them with and only change the framing by changing the focal length on the camera and not use Perspective View but a real camera and not even move the camera, just tweak its x rotation, zoom and perhaps it y height on its imaginary "tripod". Lighting like like you might really set up a render you want. I was testing with just a camera and its headlight and no backdrop and WOW they were all fast but in this setup all sorts of hidden things were revealed and the same render settings took MUCH longer with a real camera and the backdrop and two shadow casting lights, and it was hard to guess which ones were going to change drastically and which ones were going to be rather hoohum about the fancy setup.
I find 3Delight is great for this testing and you can set it to high values and still get a nice render in less than 3 minutes if you are not harboring something in the scene that is a CPU hog. (My computer alleged graphics card is as smart as a block of rotted Apple wood and useless, so I have to do all CPU). But you can use whatever you want as long as you can lock it down to a fixed set of parameters. It should not make any difference if you swap horizontal and vertical as long as the dimensions and everyting else stay the same (1200x900 to 900x1200 etc.)
So this has a special marker I use for my GoTo spot which does not render but is great for all sorts of things like putting about a set so you can select it and then just click on the view goto and shazam no more fiddling about. Picked this idea up from other users, I just made a fancy doohickie to mark the spot, and it is set to view center axis point since that is where loaded things tend to materialize. And the camera has two slaved lights that can be moved in 3d volumes on either side of it and move when the camera moves and always point at the doohickie (technical term) which is also slaved to the camera at its focal distance. So it is easy to select main and adjust its position relative to the model etc. but for speed testing these are locked into place. Building this camera rig was a study in how to hide parameters, lock them, set parameter ranges for them and how to organize them into a group so they are parented to the camera and move with it where ever it goes but still be selectable and able to adjust relative to the doohickie. Put the doohickie on the model and you are half done with a basic lighting. Think of it as some strange camera with two light holders mounted on it that are about 3 meters long each and can be adjusted in X,Y,Z relative to the camera and always point at the reference point doohickie. The camera is locked in zed rotation and restricted in rotation in X and Y. Once I started doing things like this to my cameras and lights EVERYTHING started to make more sense. I could handle them like real world lights and cameras "sliding" them back and forth and rasing and lowering them and tilting them in just X and Y like real lights on stands. It was particularly irritating to try to rotate a light with the universal tool and find it had spun around 672 degrees? or have a light suddenly end up miles out of a scene.
What I learned:
Be careful how many morph dials you use on a figure. Be very careful how many high res maps you install. Surprisingly a G2F does not mind much if you put on all Bree textures, add the Bree Bump Map and then the HD Bree Head Bump Map and then Bree face 1 and Bree eyelashes 1 and even paste on some nice tatoos. But select the wrong hair and things go long. So it is worthwhile to test the various hairs in such a setup and decide if you really need that fancy multilayer stuff for what you are trying to do. But you start fiddling with HD textures and testing will reveal how much time you have added which can be extreme. And you really need to test both the full body in the vertical frame with one stock zoom setting and then test again with the camera zoomed in tighter for just a belly button up shot or even tighter where the facial HD and fancy skin layering really starts to take up a lot of render area and kick in. I try to test with at least 3 ray depth allowed for that reason.
You need a very standardized setup to do any kind of speed testing of items and figures so you can actually see the effect of different kinds of surfaces and settings and shader types. And it MUST have lights that are shadow casting and there should be at least two of them and you should be using a real camera. I was able to go through my favorite adjusted actors and just drop them in one at a time and strip them down except for hair and put on a stock pose and go through them and do the identical render and framing on each one. The results were amazing. Gen 4 taking longer than G2F and one G2F that seems just a bit different than another G2F taking much longer to do the same render. Zero setting some of the morph sliders that were just touching things up a tiny bit and reconsidering if a single slider can do essentially the same thing I had managed to set two or three sliders to work on really made a difference. And now I have all of my hair types quickly sorted out as to which ones are slow and which ones are much faster. Often you can float clothing in space and speed test just the clothing and its various material you might want to apply to just a clothing item in this same setup. Just put it on the doohickie. You can even set the camera to do depth of field easily since you know how far away the doohickie is from the camera (250 in my case) so you can set the focal distance to that to center the depth of field on the test item. You can often float just a hair prop and test it all by itself with various settings. JUST ONE THING in a scene can make it go from reasonable to infinite.
The same set can also be made with Mesh Lights for Reality (I have slaved 3delight spots inside Mesh Lights so that I can use the 3delight spots to point and set the mesh light/3delight pair and then just turn those off in Reality and have the mesh lights pointing where I wanted them to be) or using any Render engine as long as you set and lock down as many parameters as possible and only change the object being "stock" photographed (rendered). Works the same on items. I used it to track down a problem with a prop which was slowing down an entire scene for instance. Load the speed testing setup and put it on the doohickie and zoom until it fills the frame as much as possible and render, adjust, render again, adjust, until you find out what is going on. You can of course just render the empty scene at the same zoom setting to get a baseline.
Gee almost like research which always starts with standardizing everything you can and locking as many parameters as possible down. Everyone has lots of advice, much of it incredible and very useful, but nothing beats asking your installed version of DAZ 3d on your computer with the render engine you like and the models you want to use and the scene props you like to use and the surfaces you think are best for what you specifically are trying to do.
Plus it demystifies all sorts of things. The secret used to be to bang the rocks together. Now it seems to be to figure out how to fiddle with all the settings (and do it in a way you can actually see what they are doing).



Comments