How do I add texture to 1 area only if model can't be ungrouped?
 launok
Posts: 793
launok
Posts: 793
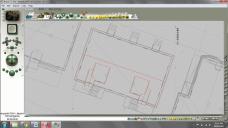
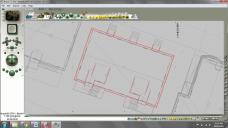
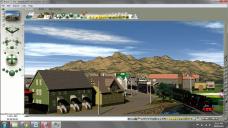
The original model I have downloaded is short of a texture on one part but this part of roof can't be ungrouped as seen in attachments. Can I sort of cut and paste this part from the correct textured part onto the untextured area?
You will notice the middle steps have a white/grey texture on the steps small roof.
Any advice will be much appreciated.

Bryce texture problem 1 render.JPG
1366 x 768 - 173K
Bryce texture problem 1 wireframe.JPG
1366 x 768 - 222K
Bryce texture problem 2 wireframe.JPG
1366 x 768 - 223K
Bryce texture problem 3 render.JPG
1366 x 768 - 195K

Bryce texture problem 3 wireframe.JPG
1366 x 768 - 219K
Post edited by launok on
Daz 3D is part of 
Connect
DAZ Productions, Inc.
7533 S Center View Ct #4664
West Jordan, UT 84084
Licensing Agreement | Terms of Service | Privacy Policy | EULA
© 2025 Daz Productions Inc. All Rights Reserved.
Comments
I am no Brycer but is this by some chance a sketchup model?
if so can it be edited in Sketchup?
As this particular surface is so simple, in this case I would just add a 2D rectangle or flattened cube, position it over the offending area, and apply the texture to that. The texture might need scaling (or editing).
@fool - yes, it is a sketchup model of a town.
@Peter Fulford - yes, that is another option to do it in PSP or Photoshop.
Another question regards models that are ungroupable in Bryce. I have quite some models from Archive3D but many of those seems like one mesh. For instance, a car model. When I import the .obj (wavefront) to Bryce and want to retexture it to say red, the whole car including windows and wheels turns red. How can one add different textures to it, i.e. glass to windows, etc? Or do I need to try this in Hexagon first? If I know how the model was initially created and in which software it would be better but unfortunately there are not much info on the models.
Ooer, no, I meant in Bryce (which would be much simpler and more adaptable than post editing).
Apply the roof texture to a 2D Face or cube from the Create menu (flatten the cube). Position the face / cube so that it sits immediately above the porch roof that is missing its texture. Scale (or edit) the texture to match.
Peter, thank you for the tip! I am not using Bryce a lot but all these tips help me to learn more and better understanding of all the features within Bryce.
I am not fond of doing postwork on a 3D scene.
Launok - I can relate to your problem, as I use only freebies and many of the models are only a single mesh. I used to apply a nice material which is sort of the main material and do post work on the rest of the model in Photoshop. However this way, I found the shadows and lighting are affected and the result not so cool. So I use the objects mainly in the distances to avoid the post work.
Peter - thanks for the tip I will try it this way the next time I have a single mesh.
Creative use of Boolean modelling within Bryce is a great way to separate tricky single mesh objects... But for that Bryce experience is most handy tool.
Archive 3D is a fab resource but as you say, most of the models are low detail, single mesh and usually import into Bryce without their textures. Using Boolean modelling you can actually mask off parts and then make a reverse mask for those parts and then texture them up using different materials. But as each model is different, there is no easy way to explain the best way to do it. An example is this truck, which I totally tranformed in Bryce from a 1950 F100 to a 1951 F100 by altering the whole if the front grill in Bryce using Boolean functions. I then added wheel arch trims and an upright exhaust.
Your truck alterations look great! But I am not a modeller, have only built a wooden cabinet in Bryce and a building in Sketchup but this is how far my experience goes. As you mentioned above about Bryce experience, then I have still a long way to go. Thanks for your tips about boolean modelling.
Yes, I am using freebies too and I have also used postwork on some final renders in Paint Shop Pro and have the same problems with shadows too. In PSP I try to add a shadow on a separate layer and try manipulate it to more or less fall in with the rest of the scene shadows but it's not always perfect as in attached render. The lady figures are 2D paint shop pro tubes to which I have manually add shadows on final image. Shadows in this instance are too dark in comparison to rest of scene.
If you know how to use transparency in Paint Shop Pro, you should be able to import and use those lady figure tubes in the Bryce scene itself and have them cast shadows automatically at the same level as everything else.
The info in this link will explain the Bryce side of things:
http://brycebasics.blogspot.co.uk/2012/02/discover-bryces-hidden-objects-and.html#PictureObjects
Launok - thanks a very nice render. I don't have paint shop pro, but I have a plug-in for photoshop which allows me to open and work with picture tubes.
Peter - thanks for sharing the link.