Placing Custom Textures
in The Commons
Hey everyone,
I downloaded some textures from Poly Haven and I can't seem to figure out how to get it to show properly. I had someone(Crosswind) help me in the past but i just never got the hang of it with a blender asset into Daz where the textures weren't placed correctly, items not being converted right, etc. Its in one of my previous posts. Now that i am building an enviorment, i dont have the proper assets to create some so im using what i have, just changing the textures to get it how i envision it.
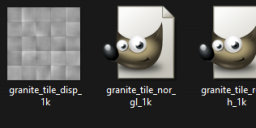
The file i downloaded doesnt show the others sub-files in the image, only 2 and 2 files for GIMP.


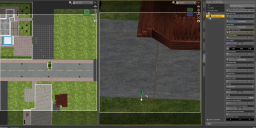
Screenshot 2025-01-08 203552.png
1883 x 941 - 3M


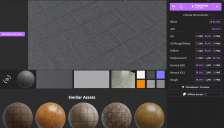
Screenshot 2025-01-08 203537.png
1396 x 796 - 984K


Screenshot 2025-01-08 204225.png
572 x 158 - 35K


Comments
You can find an explaination here:
https://www.daz3d.com/forums/discussion/comment/8855081/#Comment_8855081
I guess the image didn't post. Did i download them right? This is how the file appeared after download.
If it's for using them in Daz Studio, as far as I know, you only need the following files:
I'm using PNG because it seems the easiest way to only have PNG but you can use JPG and it's the same selection. I have no idea if EXR will work, I never tried to use it.
Your images did post. Elor have a reference to a post mentioning the individual maps.
In essence, you do not need AO maps, as these are for "faking" shadows which are not needed in Iray.
You need 'diffuse' which shall in Base Color channel.
'Displacement' can be used in displacement channel.
And you need one normal map. DS uses OpenGL.
'Roughness' can go in roughness channel.
I would suggest to download in either jpeg or png.
thank you, I will be giving* you an update when i get it to work. I'm still creating my enviorment. I will follow the instructions from the post you linked.
Edit:spelling
I meant in my original post. I thought they posted so i closed the window and went back to work.
I will download both in jpeg and png form just incase.
They are in your first message, but I didn't understand exactly what you were asking
Sorry about that. Sometimes when i'm trying things out myself for an extended period of time, my brains gets all mushy and I can't think/talk straight. I was trying to figure it out for 40 minutes before jumping on here asking for help.
Down below is what i see in this post. So I re-uploaded the pictures just in case.
So i tried following the steps and I don't understand what i am doing wrong. I've change many things around and i just cant...its one of the reasons why i didn't use the assets i bought from Blender last year and one of the reasons why i took a break from Daz.
Same developer, different map settings
I suppose you have two objects aligned and you're looking for a way to have their textures making like there is only one object ? If the gray areas and the paved ones are differents surfaces, and if the textures are seamless one, you can try to use the tiling settings:
You'll likely have to use the Horizontal/Vertical tiles setting to have the same scaling between the two objects's textures, and the offsets settings to align these textures as best as possible.
So i wouldn't need to add the textures? Just mess with whatever those dials are?
images are below are what i have in my scene. The first image is what i had down before and the second image is what im currently working with, trying to match as much as possible.
Are the base textures seamless ? Usually, they are taylored for the objects and in this case, you can't use the tiling presets.
If they are seamless, yes, you can try to adjust them directly (but tiling itself will not solve the different orientation and I don't know how to change the angle of a texture inside Daz Studio)
If they are not, then you'll have to find seamless textures and spend the time adjusting the settings to get them looking right.
Is it the same texture for all surfaces, or are there individual textures for each surface?
And if you look at the UV layout for the sidewalk (you can switch viewport to UV layout), does the UV then point in the same direction or does the UV just follow the direction in your overall image?
I don't understand what you mean by seamless texture. I have tried to mess with the textures, opening and replacing the texture images with what I believe would be a replacement. (sorry for the images) They are in order
The UV Set is set to default UVs so i wouldn't know. I took screenshots of the settings to a response above. All of the options of the surfaces are in order
That an surface uses default UV means it is the UV that was present when the object was imported. You can add more UVs.
What I suggested, was that you selected the sidewalk in Surfaces and swithed viewport to UV and see if the UVs were aligned in the same direction.
See example below which is from a Predatron set.
The other thing I asked was if all the surfaces used the same texture.
That can be checked by selecting all the surfaces and see at base color. If the image is a texture they are using the same, but if it is bluish it means there are different textures.
Also see example from the same Predatron set (it uses different textures).
It's a terminology thing... Basically there are two common ways of adding graphic details to the surface of a mesh/model...
One is to use a UV mapping software to "unwrap" the model by mapping the surface and creating a flattened "UV map" of the surface... that map information is then detailed using a graphic program... a simple map of an OBJ model of dice would be a jpeg or png or tiff of six squares with the graphics for the corresponding die faces... this jpeg, png or tiff "map" is unique to that model as all the coordinates are now in the obj file of the model once it's mapped out. You can't really apply that map to anything other than that model. When the "texture" for a model is an image that looks like a flattened pelt, it's a UV map... (some UV maps can look like they are made of hundreds of individual tiles or shapes if the model was automatically unwrapped using auto mapping software)... a UV map allows for many different details to be "painted" onto a model... like if you were to flatten out a cereal box, you'd make graphics for the front, the sides, etc... or more complex shapes like a race car, the different sponsor decals and graphics adorning the surface.
The other method is the use of seamless textures... they can be applied to a mapped or unmapped model... seamless textures are a "seamless" image (an image where if you lay multiple copies of the image next to each other, you see no seam where one ends and another begins), that image is applied (usually in the modeling program) to the surface of a model or separate part of a model and it repeats over and over to cover the surface like a paint or contact paper... seamless textures can be a seamless image or a procedural material (an entirely computer generated material) that repeats infinitely. Images are generally more universal because often procedural materials are specific to a program and can't be used outside of their specific environment. Seamless textures are great for models with separate surfaces and parts that can have an entire material like rusty metal or marble applied to it... it's a lot quicker to paint a surface with a single repeating texture image than to unwrap it and apply the texture as a map... (though by using an 3D painting program or feature within a modeling program along with automatic unwrapping/mapping, one can apply or paint textures and colors directly onto a model.... but that's a whole different discussion)
If you apply a seamless image/texture to a UV mapped model that doesn't have separate surfaces or parts, the entire model gets that texture applied to it... so if you apply a seamless image of bricks to the model of that aforementioned cereal box, it'll appear made of bricks (but likely some bricks will be oriented oddly) and if you apply the dice map to a model that was intended to have a seamless texture, you'll have the dice faces image repeating over and over on the face.
I'd include example images in this, but I'm not near my computer at the moment (I'm actually using a very technologically sophisticated potato to post this) so I'll just assume you or anyone who this answers/overly long explanation applies gets what I was trying to say.
I hope this was helpful and not that annoyingly presumptive of what you know or don't know.