Parts of Hair I can't use Geometry Editor or Mesh Grabber on
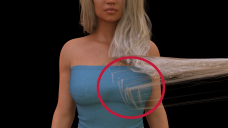
As the title states, I'm having issues with the Claudia Hair product. There are parts of the hair that I can't select or manipulate, not with the Geometry Editor or the Mesh Grabber. There is an attached file that displays what I mean.
How do I fix this? Is there a workaround? I've never experienced this with any product on the Daz Store before.


cht.png
1920 x 1080 - 2M


Comments
What does it look like if you go to Wire Texture Shaded before you try to select?
I am able to select all polygons on the hair, even the tips of the front. Is the hair selected in the scene tab? Try hiding the figure and/or clothing to get clear access to the hair, then show it again when using the Geometry tools or Mesh Grabber. But, are the movement morphs not good enough? The hair itself conforms to every shape I can throw at it (G3F and G8F).
Wireframe image added.
So, the deceptive thing about it is that looks like you can select all the geometry, but then when you go to hide those selected parts they don't actually disappear. Or, very few of them do, and then when you try to select the remaining fringe edges that weren't hidden, they're unselectable.
At times it seems like I can manipulate all of the hair parts via Mesh Grabber, but this is inconsistent and slightly buggy feeling. Even so, my main goal is hiding all of the fringe edges via the Geometry Editor.
I noticed I didn't have it updated via my Install Manager, so I updated it. Unfortunately, that also didn't fix it.
The hair is polygon hair. And if there is a polygon, I have never heard of you cant select it.
But when using the Geometry editor tool, what selection type do you use (polygon, edge, vertex)?
Polygon, as I can't see a way to hide any of the hair parts by way of edge or vertex.
What selection mode are you using? Drag Selection might miss the finer strands, but maybe Lasso Selection will catch everything.
I had no idea this existed because my right click is changed, but I figured it out. Lasso and Marquee don't help.
I appreciate everyone trying to help. If you have Claudia Hair, you can test this for yourself because I don't think it's just me.
Remember, at the first it's going to seem like you can select everything in the Geometry Editor. Add the selected pieces of hair to a group and then hide that group. There will still be a ton of fringe hair at the bottom, hair that you would've swore should be hidden via the group you made, but it won't be the case. The remaining, non-grouped pieces of hair won't be selectable and will still be visible. It's difficult to explain.
Okay, I remembered something. Looking in the Geometry Editor, none of the visibility icons (the "eyes") actually seem to control the visibility of the selected surfaces. Turning off individual surfaces does not appear to do anything, or not the correct surfaces.
Subdivision is the problem. Set Resolution Level to base, and you will be able to select and hide as expected. Unfortunately, restoring high resolution brings back all (or most) of the hidden geometry.
Dang, that was it! They said it couldn't be done. I appreciate you figuring this out, NorthOf45. Thanks so much.
Glad to help. Trying out something...
You could also delete the selected polygons (base or high resolution) and they will go away. You can't undo in the scene, it is a permanent change. It will not affect the original geometry files, but you could save a new asset with the trimmed locks for later use.
Well, I found no issue on this hair when manipulating it with GE and Mesh Grabber. If you want to push / drag the partial area of the hair with Mesh Grabber, the trick is: first select the hair with GE (lasso or marquee), then switch to Mesh Grabber, drag & push.