Tip for fast renders by converting your scene to an HDRI map
 Kaze
Posts: 51
Kaze
Posts: 51
There is a technique that I have found that allows for you to take advantage of HDRI maps to simulate the lighting of the objects within your scene. There will be some discrepancies though and it will always be most correct using a straightforward rendering approach.
The requirement is that for correct simulation of your scene, your camera must not change its xyz coordinates. Rotations of the camera are allowed.
If you place your camera in any other position, you will need to set up the scene from the beginning again according to this guide.
The advantage comes if you find yourself in a situation where you want to make a lot of tweaks to your subjects as you refine the scene to how you want. Like when you want to try a different color of hair, or different color of clothing, or if you want an entirely different figure instead.
So long as the camera stays in the same position you may find this method to really cut your time by quite a bit.
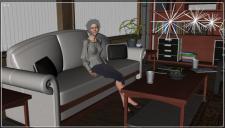
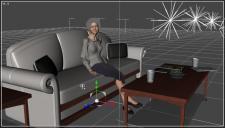
First set up your scene in a way that you want to render. See HDRI Scene 01.jpg.
Determine the placement of the camera and its settings. We will refer to this as the render camera. See HDRI Scene 02.jpg.
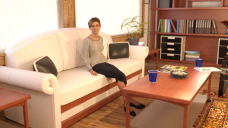
Render the scene for comparison at the end of this guide. See HDRI Scene 03.jpg.
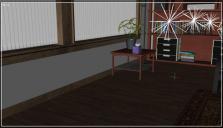
Now you will need to hide figures in your scene along with any objects that the figures would interact with or cast shadows on. Keep track of these for later because we will invert the selection later on.
The figures or objects in your renders may have other objects or figures in front of them. You would want to minimize this as this ends up requiring more things to be considered for the final render. Any objects or figures that fall into this category must also be made hidden. Also do not hide lights yet. See HDRI Scene 04.jpg.
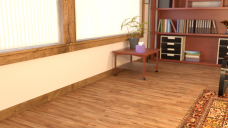
Using the render camera, render the scene. This will be used as a background for compositing your render in post processing. See HDRI Scene 05.jpg.
Create another camera that is a clone of the first camera. We will refer to this as the simulation camera.
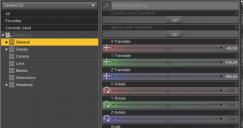
Set all the xyz rotations to 0 for the simulation camera. See HDRI Scene 06.jpg.
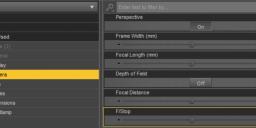
Disable depth of view and any headlamps on your camera. See HDRI Scene 07.jpg.
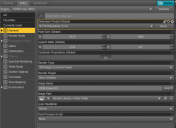
In the lens section of your camera, you want to set the distortion to Spherical. This is the key to creating the HDRI map of your scene. See HDRI Scene 08.jpg.
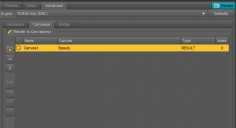
In the Render Settings, make sure you have the Iray engine selected. You will want to go to the Advanced -> Canvases
Click the checkmark for Render to Canvas(es) and press the + symbol to add a canvas. See HDRI Scene 09.jpg.
Go back to the Editor tab and change the aspect ratio of the renders to QTVR. This makes it so that we have a long horizontal image which translates pretty well to the mapping of a sphere while maintaining a good amount of quality on the horizontal plane.
Set the resolution to a value where the height is around the same height as your final render. See HDRI Scene 10.jpg.
We will be rendering a still image. Make sure that you are aware of the folder that you are saving your image to.
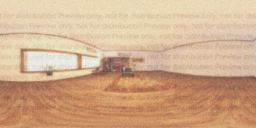
Render your image. It doesn't have to be great. This is only really being used for lighting purposes. See HDRI Scene 11.jpg.
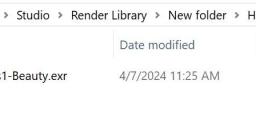
When you have saved your render, you will find a new folder that will be named after what you named your image followed by "_canvases". See HDRI Scene 12.jpg.
Within the new folder is your HDRI map. It'll be an .exr file. Now you have your file, you can disable Render to Canvas(es) in the advanced menu for Render Settings.
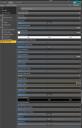
Set this as the environment map for your scene. You will want to set the Environment Intensity and the Environment Map value to 0.01. Without this, the brightness will be too bright.
Set the Dome Mode to Infinite Sphere.
Set the Dome Orientation Y to 90.
For this scene I have the ground aligned with the ground in the scene so I'll manually set ground position mode to manual and keep it at 0, 0, 0 on ground origin x, y, z. See HDRI Scene 13.jpg.
Return the aspect ratio and resolution of the render to what you were using before.
Switch back to using the "render" camera that we started with.
Make all the previously hidden objects and figures visible. For all the objects that were previously visible, make them hidden. See HDRI Scene 14.jpg.
When you render the scene it should match the correct placement and all of the lighting is essentially consolidated to the map which reduces the number of objects you have to render. See HDRI Scene 15.jpg.
The HDRI map will be blurred significantly so will want to hide the dome in the Render Settings. This will render a png that will have a transparency layer to allow you to composite the image over another image. See HDRI Scene 16.jpg.
Now you can composite the new renders over the background render we made a while back. We will refer to he new renders as foreground renders. I use GIMP because it is quite powerful, open source, and free. See HDRI Scene 17.jpg.
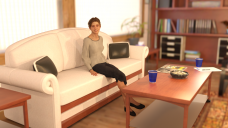
You can compare the straightforward render vs. the composited render and find that they will be very similar. Between the two techniques, the ground shadow and the light through the windows are the biggest discrepancy.
You may also need to disable some lights to make the shadows closer to the straightforward render. I found that I had to remove the furthest light in the back in this case.
Full Scene straightforward render
1920 x 1080 1000 samples 2 min 37 sec
Foreground render
1920 x 1080 1000 samples 1 min 7 sec
For outdoor scenes it'll be a bit better of a result since you don't have to deal with the transparency of windows for the path of the light.
Hopefully this is helpful for you all and maybe some community suggestions to the technique can help refine it to be even more accurate.


Daz 3D is part of 
Connect
DAZ Productions, Inc.
7533 S Center View Ct #4664
West Jordan, UT 84084
Licensing Agreement | Terms of Service | Privacy Policy | EULA
© 2025 Daz Productions Inc. All Rights Reserved.