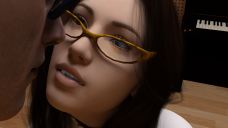
Artificats on G8F forehead
 tam_c3df5332fc
Posts: 113
tam_c3df5332fc
Posts: 113
Hey guys,
I am rendering on a Windows 10 machine and using version 4.20. My G8M character never has the following issue.
I have tried different things, such as changing the lighting, positions, etc... but, no matter what, every once in a while an artificat will appear on G8F's forehead. I can usually clean it up by using Motion 5 on my Mac by adding a mask to an image one frame before the artifact begins and use the newly created mask to cover the area, but it becomes very complicated when the character's head is in motion, which I often have it doing when dialogue is going on for that character.
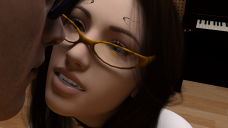
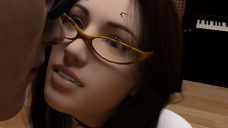
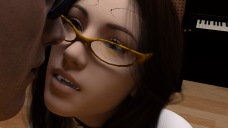
The last image uploaded is frame 19, the first is frame uploaded is frame 20 - I did this to show the difference in a frame rendered correctly, followed by an image with the artificat on the forehead.
Just in case the number of the frame matters, then the following are the frames of the images where the artificats begin to show 20, 97, 128 and 184. The artificats disappear about six to seven frames later
Any ideas, because my hands are growing tired from all of the plotting x and y coordinates of the mask to match the movement of each frame
Thanx n advance

Daz 3D is part of 
Connect
DAZ Productions, Inc.
7533 S Center View Ct #4664
West Jordan, UT 84084
Licensing Agreement | Terms of Service | Privacy Policy | EULA
© 2025 Daz Productions Inc. All Rights Reserved.
Comments
The common cause for this is the hair scale mesh intersecting with the forehead mesh - I imagine you do not get the artifacts when the hair is removed?
You can usually fix this by making the hair scalp very slightly bigger or smaller - not enough to be visually noticable but just enough so that the mashes do not interfere.
@SofaCitizen
I was about to mention in the post, that when I have a G8F character with no hair, then I do not have this issue.
I will give your suggestion a try. Ironically, I am rendering a long scene with a G8F character with no hair at the moment and, when it completes sometime tomorrow, I will render and report back my findings.
Thank so much
If the hair doesn't have a smoothing modifier, you can try adding one. That's fixed it on a few hairs for me.
Sorry to take so long in getting back to you but the scenes with the hairless characters took all this time to render. Plus, I work the graveyard shift, which delayed progress as well, but I came home today to render one frame and it looks good - see attached pics
Thank you for your suggestion @SofaCitizen - this hair does not have any scalp to increase or decrease - see attached pic
Thank you for your suggestion @G3Renderworks - it looks like it has worked. I have only rendered frame 20 so far, but it looks good. I will render the scene today and if you do not hear back from me, then you know that it worked.
Ahh, in that instance the scalp is part of the same object (Cap surface) and so you would apply the slight increase/decrease to the entire hair if you still wanted to try that method to fix it. Although if you already found a different way then perhaps not needed this time.
Thank you once more @SofaCitizen - what do I change under the Surfaces> Cap to decrease or increase?
As far as the adding a smooth mesh, it wasn't completely successful. While most of the 216 frames were good, there were a few artificats and, while they are not that noticeble while looking at a single frame, when played in their entirety as an animation, it looks like little hairs are moving around her temple area - see attached pics
@G3Renderworks I have tried to increase the Smoothing Iterations from the default to three, which produced better results. Obviously, changing it to four produced the best results so far - see attached pics - first upload three iterations, second upload four iterations and the last upload was with default settings
I shall await response before rendering another 219 frames - thanx n advance
@SofaCitizen - BTW - my surface> cap settings look slightly different and I am unable to add a smoothing modifer directly, while in this panel - see attached pic
Ahh, the surface image was just to show that it has a mesh surface that would be the part that appears to be intersecting with your characters forehead. You would need to adjust the size of the hair as a whole. I can see that those controls are hidden so you first need to show hidden controls using the corner menu.
Oh, it should be the same unless you changed anything. Mine was just from the hair as loaded by default - although I made the other surfaces hidden to isolate the cap for the image.
My PC is in the middle of what seems to be a complicated render right now but I will have a play around with the hair on my Mac to see if I also get the artifacts and then see if I can fix them using the size adjustment.
@SofaCitizen - thank you for your reply.
I have turned on hidden, but I am still not seeing the "Smoothing" section - see attached image - and when I try to apply directly, while in this tab, then I receive the following prompt. The only way to add a smoothing modifer is to be in the Scene's tab.
I am also going to bump up the "Collision Iterations" to five to see if that helps
Also, when you say make the hair overall - I do not see a scale parameter
Sometimes you have to really increase the iterations to a high level like 10-20 but that will slow things down and it can also take a little time to update in preview. Maybe you can combine the smoothing modifier with some suggestions from sofacitizen. Also, if you have Mesh grabber you can try to push parts of the cap further into head to see if that helps hide it. Not sure how well these methods will work if this is for an animation.
I will have to get to sleep soon, so that I can be ready for tonight's graveyard shift.
I will check for responses later on and thank you all for your help.
I will also start the render with the "Collision Iterations" set to five and the follow @G3Renderworks suggestion of setting the "Smoothing Iterations" to "eleven" :-)
BTW, I do have mesh grabber, which I love, but as you noted, it does not produce the desired effects in an animtion, because that portion that you pull out will always stick out and look unnatural.
I will let you guys know how it turns out
Those are two separate suggestions/ideas: You add the smoothing modifier to the hair from the corner menu on the Scene tab (Edit/Geometry). I was refering to using the corner menu of the properties tab to enable the scale properties which are hidden on that hair.
I was not able to replicate the artifacts on the model I chose to test the hair on, however, it does look like decreasing the hair size will add a bald patch in the central parting and so you would most likely only consider making the hair a bit bigger.
Thanks @SofaCitizen
I took @G3Renderworks suggestions and changed the "Smoothing Iterations" to eleven, along with the "Collision Iterations" set to five. It almost came out perfect. Some of her hair moves as the character speaks, which makes it look like some of her hair is moving while the rest stays in place - see frame 140 and 141 to the left - facing her
Well, the system is not allowing me to upload images - "No file data could be found in your post"
With some file types the forum software likes them, not!
I think by comparison some forum programs like phpBB (dot com) optionally allow anything.
Especially since forward leaning bangs have a tendency to cast undesired shadows on parts of a model's face, my quick fix for this is to spot render (doesn't take as long) the face once with no hair, saving it as a .TIFF file. Then I just cut pieces out of my overlay with an image editor - giving the cut piece a feathered border for smoothness.
Most modern image editors allow you to paste part of a image's area in the exact same position on a copy of the image, as long as both files are the same size (height and width) in pixels.
Thank you for your suggestion @Roman_K2 but this is an animated series of images where the head of the character is moving as she speaks
One thing that I have done to add to the smooth modifier is to add a push modifier to the hair as well - zero artificats showing now
Thank you all