Animated Shader VFX in Carrara
 DesertDude
Posts: 1,238
DesertDude
Posts: 1,238
Hi everyone!
A while back I started watching tutorials demonstrating real time shader effects for video games and I was thinking, we can totally do these things in Carrara. There are so many cool things you can achieve manipulating the UV space and stacking up various Operators like Multiply, Add and Subtract etc.
I didn't really know where to start, then Wendy recently asked a question about having a UV offset parameter and...Carrara has just such a feature introduced in 8.5. This is a fairly easy example to set up, so let's jump in!
Fire up Carrara and create a new scene
Insert a Vertex Object.
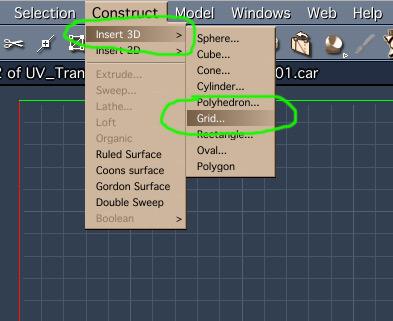
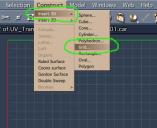
In the Vertex Room, go to Construct > Insert 3D > Grid.
Daz 3D is part of 
Connect
DAZ Productions, Inc.
7533 S Center View Ct #4664
West Jordan, UT 84084
Licensing Agreement | Terms of Service | Privacy Policy | EULA
© 2025 Daz Productions Inc. All Rights Reserved.
Comments
I set my U & V Size to .5m and the U Vertex count to 2 and the V Vertex Count to 32. On the Perpendicular thingy select the ‘Z’ axis and hit OK.
You should now have a strip of polygons like this
Go to UV Editing Mode. If you select the top row of vertices running down the Y axis and the edge on the far left you’ll notice they are facing the wrong way on the UV grid. Select the whole object, and rotate it 90 degrees to the right.
Now the UV map is facing the right direction
For good measure I go to the Operation Tab and hit ‘Fit UVs’.
Now manipulate the geometry however you like.
Create a new Shader for your object and head on over to the Shader room. We will do this simple test in the Color Channel. From the drop down menu go to Operators > UV Transform. For the Shader slot, choose Texture Map.
For this test I am using a picture of an arrow. When first loaded, the arrow will look completely stretched out. If we change the Scaling on the ‘X’ we can tile the image. I chose .05 and that filled my geometry with little arrows.
I made a 6 second animation test. Drag the playhead down to the end of your animation and from the UV Transform box, change the Offset for ‘X’ to 1. This will slide the UV space once over the texture map. Now the arrows follow the geometry like a path.
Final animation test, looped twice:
thanks for the tutorial DesertDude
I did play with it myself, I even played with the same thing in DAZ studio and Casual's Matanim
but in my current scenario ended up going back to PhotoMirage and rendering a 900 frame animation of the waterfall foam texture because the looping the offset just didn't look right on that particular scene
it certainly will work for other scenes where a regular loop needed like a tank tread
this was the DAZ studio one, Carrara it looked much the same but I never rendered it as was not what I wanted but yes it worked
the Carrara 900 frame opacity foam maps one I ended up doing
Cool and thanks!
The water in the second animation looks fantastic.
LOL yes PhotoMirage which I used on the texture maps is pretty awesome just on the rendered images, it really shines used on textures like smoke, clouds and fire too
I combined it with using an ocean primitive
there are some cheaper AI based programs that do this out there now too (plot paths to animate on images)
sadly cannot link any
are free phone apps too
Freaking awesome!
+1
lDesertDude : nice
Diomede, Bunyip02 and ed3D, thank you for the nice comments.
Wendy - I took a look at PhotoMirage, I think I have a better understanding of what is happening. Pretty nifty!
yes the textures themselves flow, I use it on smoke and fire textures too
only annoying thing is it has limited output formats mp4 and gif and set sizes
so I just do 1920x 1080 or 1080x1920 stretching to fill as no large square option
then convert to image series with Hitfilm