Needing Help With Shader (Blender to Daz)
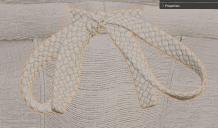
I'm modeling some clothes in Blender, and for the most part things are going fine with the materials when I import into Daz. Except for one particular object, a knot in a lacing.
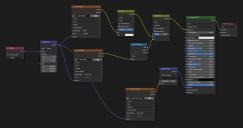
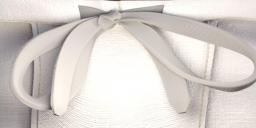
See attached for screens.
You can KIIIIIND of make out a texture on the surface, but otherwise it's very clearly not doing what it should be.
I'm trying to convert the Blender shader into Daz3D's Shader Mixer.
As I understand it, there's no equivalent node in Daz to Blender's Texture Coordinates node, but I found something on the forums that's SUPPOSED to do the same. The problem is changing the tiling or rotation does nothing. You can also see I'm not getting the mask multiplying properly over the diffuse texture.
Is there something I'm missing, here?





Comments
It looks like an issue of Normal Map with wrong coord system... Did you bake the normal map in Blender or just get it from somewhere else? If it's the latter, you may check the format of it... DirectX or OpenGL. Daz only supports to use OpenGL NM format.
BTW, I see no necessity to mix another Shader other than using default Iray Uber for your case. If it is a format issue, you can easily convert a DirectX NM map to OpenGL NM map in Blender or other software, by inverting Y axis...
It's not just the Normal Map. Attached is what it looks like in Blender without it. So there's clearly something else wrong.
The material came with the plugin I used to make the knot itself.
Okay, if so, there might be diffuse map as well. Check all the procedural materials you've defined. If necessary, you can bake and make them as tileable texture maps for being used in DS.
All of the maps have already been added (there's three: Diffuse, a Mask which is used as a multiplier on the Diffuse, and the Normal).
I need to get the rotation and tiling working because I'll need it on other objects, and this one is simple enough to work with to figure it out.
I don't understand... what sort of Mask... which slot of surface in DS was it assigned ? Simple test could be always a Diffuse + NM with preview in DS... If they work well, add other slots one by one...
Right now I can't get it to update the settings when the new shader is applied at all. Even though I've saved the changes to the Shader in Mixer, purged memory, refreshed images, and even closed and reopened DS altogether, any time the material applies through Mixer it uses the original settings (even though when I open the shader in Mixer it shows the new settings!)
Check your "Texture Tiling" settings, it's probably so high that the pattern is now so tiny that you can barely see it.
And as for the modification in Shader Mixer, you need to Apply the shader to the current selected surface. Then save it as a Shader Definition Asset for repetitive use...
I've tried turning the tiling down to "1" and it does nothing.
I AM clicking apply. Even if I import the asset into a completely new file, open the saved Shader, and click apply it's ignoring the updated settings in the Shader and using an old version.
See attached for examples. Note specifically the RGB value for the Diffuse. This is after importing my asset into a brand new file, and freshly applying the shader.
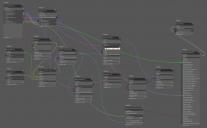
You miss understood what I meant, the TC (MDL) output on the "tiler" brick is being ran through several other bricks before it gets to the Surface brick, the "1" at the tiler brick is probably 0.000001 or 1000+ at the Surface brick, which means you are either looking at one pixel of the texture spread all over the UV coordinates, or a 1000+ instances of the texture spread over the UV coordinates.
I understand what you're saying, I'm just not clear on how it could be multiplying the number of tiling iterations just by running it through subsequent bricks AFTER the tiling is being applied. The Tiler bricks only connects to each of the three maps once. Although the Mask and Diffuse are mixing before going into the Base Color node, the tiling is being done on them individually before they mix.
Furthermore, you can see that the Normal Map — which is completely independent of the other two — is TRYING to do something, as you can see the difference in the lighting on the model where the normals are being affected. However, changing the values on either the Tiler or the Rotation brick makes no changes to what the Normal map is actually doing.
And that still doesn't address the issue that right now applying the shader keeps pulling some cached data that won't go away even after closing/reopening the program and manually purging the cache.
I fixed it. Apparently the guide I was following the first time was just plain set up wrong.
Need to tweak some of the values so it's not so heavy, but otherwise it's there.