How can I group (regroup) a particular item in the scene?
 launok
Posts: 793
launok
Posts: 793
I need help with grouping some items in the scene please.
I know about grouping/ungrouping but in this instance I have a problem.
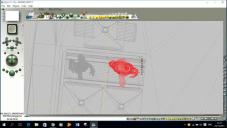
When I have imported Genesis Female into the scene and moved her to a point everything works ok. But the moment I imported Genesis Male he becomes the "red marked' model and G2F turned automatically grey as the rest of model parts in the scene. But here is where my problem now lies! If I want to go back to G2F to move her a bit more down or in whatever position, she is not a single model anymore but now in parts! Usually I press Cntrl and click on the model. But I have no idea how to get the model grouped back to form the 'red' model as before. G2M is ok to move as he is still red and I can work on him.
Is there a way to group G2F to become a solid 'red' model again? I have tried ways but then all the surrounding parts get grouped as well. Actually it turns out so messy that I just save the scene in a new name as to not loose everything. 
There is a box line around the model but I can't click on it as I thought this should turn model solid again.
G2F is the grey model to the left of G2M in red in attachment.
Any help is appreciated 
Laura
Daz 3D is part of 
Connect
DAZ Productions, Inc.
7533 S Center View Ct #4664
West Jordan, UT 84084
Licensing Agreement | Terms of Service | Privacy Policy | EULA
© 2025 Daz Productions Inc. All Rights Reserved.
Comments
Looking at you set up G2M is already grouped... I guess the G2F is grouped too, but for some unknown reason clicking it isn't recognising the fact.
If you go to the little downward pointing triangle button on the bottom right menu, click it and hold your mouse button so it opens up it's sub menu.
One of the options is "Select groups"... You should see the G2F's group name in that list.
Hope this helps.
I found that if some parts of a model are grouped I can't group the whole thing until I ungroup the ones that are.
Also to stop other objects becoming part of the model press the tab key to select the objects you dont want to join the model and click the little A and select Locked.
That way other parts are locked and cant be selected until you untick Locked again.
Something else to consider. If you click the little grey square below the A you can assign a colour for each object in a model.
That way you can have say 1 model with green colour wireframe and another say blue, then you can select each model by colour
by clicking the little square to the left of the downward pointing arrow the Dave mentioned.
Oh wow, this works like a charm! I have not noticed the pointing triangle and therefore never used it. The moment I used this option now both the 2 characters models are grouped (red)!
Now I have learn another trick!
Both your help is much appreciated Dave and StuartB!
BUT NEED MORE ADVICE PLEASE!
Just another thing which is actually quite frustrating!!! If I import 1-2 more people in the same Bryce scene, Bryce enters a message 'out of memory' and crashes!!
I want to add people on the pavement outside building as well. Are there too many objects in the same scene?
I have noticed when rendering takes place the laptop's battery going low much quicker than normal, which mean I have to do such rather when plugged-in an electrical outlet.
The 2 characters are already in the scene as shown on partially rendered scene, but I still have to move them more down.
Thanks again,
Laura
Your out of memory messages probably owe more to the amount of jpeg texture maps you have, and the size of them, rather than the characters themselves.
Bryce decompresses JPGs to basically BMP size in KB, and nowadays texture maps are getting larger and larger in size. Unless I am using them in the foregrround I tend to try and keep my characters made with the same set of textures if I can, and I have reduced the tex sizes of these sets in PS to make them more usable in Bryce.
Like Chohole says, it's most likely down to the textures... There are other tricks too which we use to reduce the amount of textures used in background (and even foreground) figures. The main one being that if a character is covered in clothes, you don't need to export the actual body as you can't see it anyway. Only select the clothing (you might have to test a few if for instance the sleeves are shortish, you'll have to export the hands and maybe the forearns)
This is especially helpfull with Genesis figures and Victoria Elite textures, which will hog a lot of memory within Bryce.
For background figures, maybe use a less detailed (lower poly) model or a V3 or M3 with only basic textures added.
If you are bringing the figures in from DAZ Studio, I have found the Texture Atlas plugin to be quite helpful for reducing the sizes of the textures used on the figure and clothing. It takes some trial and error to get right, and can't be undone, so I would suggest experimenting with an empty scene to see the effects of the reduced resolution using a copy of the figure. Recently I have taken to setting up my DS pose and materials, then when I'm happy, I copy that figure and drag it up out of the way and use texture atlas on the copy only. If things go horribly wrong or if I need to modify the figure I just delete the copy, adjust the original to my satisfaction, then make a new copy and texture atlas that copy again. It's not a good process if you have lots of changes, only if you're pretty much done with it, since you have to redo it each time.
Thank you for all the advice.
Yes, I am actually setting up everything, including clothing/hair with its original textures and poses first in Daz Studio and exporting it as an .obj (wavefront) and then import the .obj into Bryce. In some instances sending items via the bridge I have lost textures (i.e. Genesis' body mats turns up grey in Bryce) and the other way round works better. But then, I don't have to use the original textures and can just as well use mats from Bryce itself. I just have to play around and do more testing to see what will work/not work to try avoid out of memory and crashing issues.
I wish there was more variation of fabric materials in Bryce. I am actually now searching for seamless textures to use in Bryce to use on clothing. The textures on the building and interiors/vehicle used in the above render are the original SketchUp textures which I am glad it imports greatly. But for the characters I have to look out for more mats.