Transfer Utility - Repositions Shoes Incorrectly
 joliva
Posts: 0
joliva
Posts: 0
Hello,
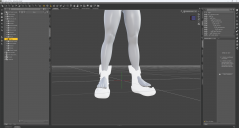
I'm a new user to Daz trying to attach these OBJ boots I made to my Genesis 8.1 Morph for posing and animation. When I try using the transfer utility, it positions the shoes below the feet like in the attached image. Does anyone know what I can do to get them in the right positon?
Thanks!
DAZ Studio 4.21 Pro - Farhad_Daz-04.duf 11_28_2023 8_35_35 PM.png
3840 x 2053 - 1M
Daz 3D is part of 
Connect
DAZ Productions, Inc.
7533 S Center View Ct #4664
West Jordan, UT 84084
Licensing Agreement | Terms of Service | Privacy Policy | EULA
© 2025 Daz Productions Inc. All Rights Reserved.
Comments
1. With the default load of G8.1 {no character morphs} - does this footwear "land" exactly where it should be upon import. It "has to."
2. Then run the Transfer Utility and see what happens. Their placement should not be changing. IF it is correct, select the footwear and save it as a figure/prop.
3. Then remove that footwear from the scene, with the target figure selected - load the newly saved footwear. As you gently move the foot about there may be a few corrective morphs to make. There may be a little weight-mapping to be adjusted too. [be very careful to have the footwear selected for this, not the target figure] When done, resave the file to the exact same folders as before [so the new will overwrite the old].
4. Then remove that footwear from the scene, with the target figure selected - loaded the new footwear. Select the character and dial in the character morph. The footwear should still fit however some morphs, esp. those from extreme character morphs, may require a little fitting morph.
5. Sometimes an alternative method works -- hide the foot or the toes.
you have to bake transformations before running transfer utiity. Bake = Export the shoes after positioning them, and then reimport the shoes. This way all transforms are at 0.
If you are running transfer utility on non-default figure (in other words if you have any morphs applied), then you need to tick the box for 'reverse source shape from target' or whatever its called in the options dialogue of transfer utility.
For a non Genesis Base figure (if it was in your case), set different options in Transfer Utility as attached screenshots. Then you have to further fix the character's body morph on the wearable....
Reminder: Never use a Character to make wearables ! Use Base figure, then it'll be easier to rig and fix distortion with bodymorphs / corrective morphs, etc....
Thank you all! @crosswind, the settings in your first screenshot ended up working for me with no additional modifications needed, but I am curious about what you meant by fixing in Blender - would this mean manually moving the vertices back into shape? Also, thanks for the workflow tips, I did sculp the boots on top of a custom morph I made, but it must have been close enough to the base figure to not cause any major distortion.