What do do about this?
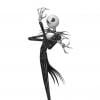
Got poke through on the Hood. I'm still rather green about some of these kind of problems, thankfully I don't get them all the time. I messed with the slider to the right, highlited yellow, but it of course just made the hood huge before the hair no longer poked through, so huge it was not an option. No smoothing modifier cold be applied, so that didnt work. Ideas?

HoodRat.png
949 x 572 - 445K
Daz 3D is part of 
Connect
DAZ Productions, Inc.
7533 S Center View Ct #4664
West Jordan, UT 84084
Licensing Agreement | Terms of Service | Privacy Policy | EULA
© 2025 Daz Productions Inc. All Rights Reserved.
Comments
Interested in the answer to this as well.
Reader with the hair in place, then render with the hair invisible. Use the clone brush in PS or another 2D paint program to "paint" the hood over the the poke-through of the first render.
you can use the geometry editor to hide the sections of hair that go through the hood.
you could make a custom morph for either the hood or hair to make sure they don't overlap.
you could spot render the bad section like Ashely said.
Which works best will depend on the scenario. I would first go with a morph personally. Then geometry editor. Then if that fails, do two renders like ashley mentioned.
Also, please remember to list the products you are using, including figure and possible character morphs, so that if someone has them, they can try them. I also do what Ashley suggests all the time. It works for illustrations. If you're doing animations, you may be able to use Smoothing modifier and/or DFormers.
It's hard to believe with all the hooded cloaks and such in the daz store that one should have this problem to begin with. I don't see these problems in PA promos. I just saw at least 2 if not more hooded figures a minute ago in tonight "even more" section of the sale and the hood and hair was flawless.
Well what I did do was change the colision of the hood from 'Dahlia' to the 'hair' instead, this almost fixed it. It took away most of the poke through. I then upped the smoothing iterations and that helped some more, but in the end it wasn't enough to get rid of all of it. I appreciate Ashleys solution but not so sure I wan't to go through the time or pains to deal with that, I mean why make hoods if it's known to have these problems in the first place?
Larsmidnatt: I'll have to check into what u said. I have a limited knowledge and experience with Studio's Geometry editor, so I wouldn't even know how to do what u said. Making a custom morph sounds interesting, but I have no idea whatsoever on how to make a custom morph. I'm open to suggestions on tutorials though if u know of any.
Cris Palomino: Character: Dahlia for G3F, Clothes: Austrani Outfit for Genesis 3 Female(s). Daz Studio 4.8. Iray. Character morphs: default g3F; whatever loads with dahlia. No animations Cris, just a 'Still.' Smoothing modifiers really didnt work, and the normal edit>geometry>Apply smoothing modifier just brought up the box that says that node cant have a smoothing modifier.
I think I will be rethinking my purchases in the future on all hooded clothing since "evidently" it doesnt work out of the box and one has to come up with rigging things to work or post production, thats nonsense when cash is involved to begin with. Just my thoughts. Reminds me of buying a car and the dealer stating the wheels don't work right from the factory, so you will have to rig them to work from one's own ingenium.
Clothing (and hair, and bodies) are not dynamic - if you apply tight clothing it won't pull the flesh in, if you layer clothing the under-layers won't be flattened, and if you apply a hat or hood the hair won't be compressed. All these things require morphs in the thing which should yield or, absent morphs, tricks like the above (to which I would add using a DForm or Push Modifier with a weight map, so that you can paint the protruding hair and have it sucked out of sight).
there are countless tutorials on deformers and morphs. I would leverage them. It's a valuable skillset if you are working with these assets. Not just cloaks but Daz/Poser assets in general.
Yep, setting up DFormers or Push Modifiers, as stated, would be your best bet. If you get any of the hair that has hat morphs, you;ll see that the morphs pull the hair in so they don't bisect with the worn hat. Kimberly hair is one such hair.
Hair without hat morph http://prntscr.com/8lb7t6
Hair with hat morph http://prntscr.com/8lb7wm
Then there is the possibility to turn the opacity to sero for all Hair parts but those at the front and maybe the skull cap.
All of these solutions seem to be a lot of work to make a product behave in the way it appears to work in the promo images, i.e. with no poke through of hair. How about a disclaimer on promos: 'This image produced with the use of [technique/solution] to eliminate hair poke through'?
This kind of issue is by no means limited to hoods and hats and their interaction - or lack of interaction - with hair.
I could fix this in seconds in Poser with the morph brush. Perhaps DS5 will have similar. Fingers crossed.
Actually, DFormers are not difficult to use. It shouldn't be a lot of work. Also rendering with and without hair is very common useage and working with an adjustment layer mask makes quick work of things.
We will have to disagree on the ease of use of DFormers. I find them exasperatingly difficult: to get decent results on something like this I would end up using 4 or 5 little ones. They are like making playing the piano with boxing gloves on.
Rendering without hair is no good if you want hair to show from under the hat/hood as it often does in those lovely promo images. If you mean combining two images, with and without hair, then that's also not straightforward, and isn't 'working out of the box'.
As for 'adjustment layer mask', I think that would need a good deal of explanation for a new user - I have no idea what it means, so cannot gauge how much work it would entail. My guess is you mean you can somehow hide the hair that is under the hat/hood, and leave the rest visible.
The underlying point was and is that the product does not intrinsically do what the marketing indicates it will, and it's far from alone in that. I assume content creators know their products have these limitations and have tested them with hair. It would be helpful if they were upfront about that.
When you are looking closely at the Austrani Outfit and the Austrani texure promos you will notice that they all have been rendered without hair.
This can help.
When you first learn to use anything, it can be hard depending on you grasp it. As for adjustment layer masks in Photoshop, they are well worth learning to use.
Here's what you could do.
1. Say you have your head in the cloak as you show the pic and render that.
2. Now you make the figure and accessories invisible (sometimes you can do just the hair, many ways to go about this depending on what you want as the final result) and render. I just quickly painted to simulate this.
3. Now you both layers and you select the inside area of the cloak where your figure and hair are. What is in the selection will be remain when you create the layer adjustment mask, but you want to hide what you have selected, so invert the selection (Ctrl i/ Cmd i).
5. I've disabled the original render so you can see in white what is now gone, but because it's an layer adjustment mask, it's actually still there and editable. This is what is known as non-destructive workflow.
6. Now with the original visible, you can see it showing through the cape.
The hair might even look suitable at this point, but say you want some of it to curl out over the cape as in the original render. By painting with black in the layer mask, it will increase the mask and reveal more hair. If you overpaint and reveal too much, you can paint with white to hide. Notice that there are some small white dots; this is just from the mask and be corrected by painting a bit of black over those white bits and you end up with this result. Again, because it is non-destructive, you can mess with it as much as you want.
Please note this was all done and painted very quickly for the purpose of demonstration. For the real thing, you will want to spend a bit more time with your masks to make them look as clean as possible.
Cris, thanks for taking the time to explain this, that's very good information and I'm sure that with a bit of care good results could be achieved. I will have to investigate adapting this technique to GIMP, as I don't have the resources to purchase Photoshop (likewise Zbrush, GTX 980ti etc. - constantly amazed at the cash people devote to this!). The principle's clear enough, and I imagine there is a similar function.
However, I still rather resent the effort that has to be made to fix paid-for content to get the results the marketing indicates the product will give you. Reminds me of watching slickly produced TV ads for toys as a kid and then being deeply disappointed by the reality. I am beginning to learn to take the marketing with a large handful of salt.
True enough, and of course when you have been caught out once by this you are likely to look more closely at promo images. But it will continue to catch people out at least once, and I think they are entitled to feel miffed.
Please remember that a modeler can't account for every type of hair that a customer uses, nor can the hair maker anticipate the use of clothing on their hair. As I've said to others in the past, we are becoming much more spoiled with all that we actually can do with all the morphs that creators give in their packages. Even so, there often are more morphs that we wish we could have. Believe me though, had you started back when I did, you didn't have 1/10th of the things you get now.
Yes that's probably quite true Cris but there are an awful lot of products for sale, some even quite expensive ones, that do not do anything quite as easily as the seller would have you believe. If this is the case it should be made known that you may well have to own (as quite a lot of people do not) a good 2D painting program to make this work as shown. Since my time with DAZ, which isn't that long to be fair, I have bought a lot of products that are very disappointing and do not do exactly how you are lead to believe they will do. A lot of vendors either wrongly assume that everyone here is an expert and will know how to work around problems, or they delibratley leave out of the product discription that you are going to get issues with it.
Is there a 'Product Review' page in the forum ? I've not seen one, but there should be one so that buyers can let people know what to expect when purchasing stuff instead of only having the sellers say so.
There is the Product Suggestion forum and there are also the vendors' commercial threads for specific products. Most vendors will listen to suggestions or what you may have found difficult to work with as it allows them to improve.
It looks like the problem of hiding hair under hats (though not hoods) has been noted by one vendor, Sickleyield, who has produced this product http://www.daz3d.com/hat-and-hair-helper-genesis-2 to attempt to address it. This is an additional purchase on top of buying a hat, but a good deal cheaper than Photoshop would be (but not GIMP). If it works as advertised (and I have no evidence either way), and you like your characters to wear hats, it could be worth the outlay. NB - Genesis 2, so I guess for now G3 characters go hatless or shaven-headed!
Point taken. I tried DS v. 3 way back when, and gave up for exactly the reason that the whole ecosystem just seemed not to be mature enough. It is much better now, but has still a way to go.
You can get Photoshop elements at a very good price and it has everything you could need and more to do post work. You don't need the full photoshop at $700 + to do what you want to do. The only difference between the elements and the full version area couple of tools and the fact that you can't use the photoshop bridge in daz. And the tools that you don't get in the elements version are not that important for what most us do in postwork.
And GIMP is free. It has many of the same functions as PS, can use most of the same brushes and has a ton of addons too.
It is. But for some reason I had a really hard time understanding how to use Gimp and not so much photoshop. which honestly, is probably a personal problem lol. No idea why one clicked and the other didn't. It could also be that when I tried gimp the first time I had 0 experience using any kind of software like that at all.
I've been discussing this on a similar thread, and was advised to render once with hair, once without then use Gimp to delete unwanted hair from the top layer. I've found Gimp awkward to use, but once this procedure was explained to me it worked well. The people on this forum are better at explaining how to do stuff in Gimp than Gimp's own website/tutorials.
I have a similar issue and just found this thread. How and where would I change the collision of an object?
Thanks!
In the Parameters pane's Editor tab, under the Mesh Smoothing group, chnage the Collision Target by clicking the button and selecting a new item. If you don't have a Mesh Smoothing group then there's no Smoothing Modifier applied - Edit>Figure>Geometry>Apply Smoothing Modifier.