Help realism
 jimread
Posts: 39
jimread
Posts: 39
Hello there,
I like to do figure in the landscape pics using G3F and G8F
NSFW - mod edit: cannot link to nudity that has no age-verification process
I'd really appreciate some tips and tricks to make the figures look more realistic
Cheers - J
Post edited by Cris Palomino on
Daz 3D is part of 
Connect
DAZ Productions, Inc.
7533 S Center View Ct #4664
West Jordan, UT 84084
Licensing Agreement | Terms of Service | Privacy Policy | EULA
© 2025 Daz Productions Inc. All Rights Reserved.
Comments
Hi,
I looked at examples on your website and on some of the images the figures blend in really well, and look very realistic.
It seems like you have accounted for the direction of shadows in the photos , and matched that on the figure renders, that's an importans step which people sometimes miss.
On some of the less realistic images the figure is much sharper than the photo, so it stands out rather unnaturally. Maybe you could experiment with the depth of field in the DAZ renderer to soften the figure renders? Alternatively you could do this in postwork if you prefer that approach. The contrast on some of the figures seems to be higher than on some of the background photos, and this is also making them look false.
It's not clear to me, or maybe I didn't read properly, whether you are adding the figure to the background by overlaying in some image manipulation program, or if you are are rendering the figure directly over the background in DAZ ( by using your photo as a backdrop in the render ), I supect the former method is being used. Rendering against a backdrop of your photo might help integrate the figure into the scene. It can help with matching the colour response. One problem you might encounter if you use a photo as a backdrop is keeping the photo bright enough without having DAZ Studio lights affecting it though.
Another option to consider is using a HDRI to illuminate the figure rather than DAZ Studio lights, this would give a softer lighting which I think would help. While you wouldn't be able to get an exact matching HDRI for your photos something similar should be available.
Hello Background,
Many thanks for your comprehensive reply I'm grateful to you.
I render the figures in DAZ using the Environment, Dome rotation, plus X,Y & Z and remove the ground shadow. I have the Auto Face Enhancer and the Auto Shape Enhancer and am beginning to use those.
I pick up the renders and paste them into Ps you were quite right abot that. I hadn't thought of softening the figures I will do that with a little Gaussian Blur. Just looked at one image at 100% and I can see that the figure is much sharper that the background, thanks for that.
Thinking about colour matching I try to match the figure to the background, responding to your advice I will do both.
I'm not sure what or where HDRI is I'd be grateful to know.
I've put a link to my Flickr photostream below, not many pics on there I only joined in early March. I did have one lady contact me wanting to know if the one B&W pic I have was 3D or real. I will be doing a screencast for her soon.
Regards - J
Apologies for doing that, I have altered my signature to my Flickr photostream, I use the correct safety levels for all my content.
Regards - J
The easy way without using PS is to use your picture in Environment/Backdrop/Image.
Then in the Environment Tab use the Exif data from your picture and use these settings for place, time and date. In Tone mapping set the camera settings in the appropriate sections, ISO, F/stop, Shutter Speed.
Load a camera and set it to height and focal length of the original camera used.
That is how I do it.
Click on image for full size.
I did put it through PS too :)
Click on image for full size.
Hi J,
Thanks for your response. Most of the users on this forum are in the USA, so don't be surprised if it takes some hours for some people to reply. I am in the UK and I believe you are too, from reading your website, so the timezone should be less of an issue.
A HDRI is a 360 degree image which wraps around an entire scene. There are several different formats. The clever part of HDRI's is that they incorporate exposure levels far beyond what would be possible from a single photograph, by doing this it is possible for the HDRI image to generate lighting as well as provide a background image. The HDRI can be rotated in DAZ studio, so the direction of lighting can be controlled, and the intensity of the HDRI can also be controlled. I believe Studio comes with an example HDRI but can't remember what it is of. For your purposes I think you would only need the HDRI to provide the lighting, so the actual 'background' image of the HDRI would not be important to you. So I would think if you used a 'forest' HDRI the light and shadows it provides would be similar to the quality of light in a forest background photo.
There are some HDRI's available in the DAZ store and there are also websites which offer free HDRI's. You will find HDRI's come in a variety of resolutions, this mainly affects the sharpness of the image if using the HDRI as a background, if using the HDRI just for lighting the HDRI resolution would be less importane.
There are youtube videos on HDRI, and I'm pretty sure there is at least one on usig HDRI's in Studio.
I have attached a picture created with a HDRI. It's not particularly good ( parts of the background are far over exposed ) but it illustrates how the lighting can give a softer effect than conventional lights. The dark grey top come out quite well I think. No conventional lights were used, just the light from the background HDRI image.
Hello Sandy,
I like your Edwardian image very well done, you've captured the atmosphere of the age.
Looking at the spec of your machine mine is barely 20% of yours. I must ask; if I put an image into DAZ as a background do the renders take longer? Just a single full length figure takes over an hour on mine.
If it does I think I would be better off using Ps
Cheers - J
I can't find the original render for that image but here is another one done on the old laptop.
2019-09-30 20:19:59.590 Total Rendering Time: 1 hours 46.8 seconds
Click on image for full size.
Sandy,
That's a really nice image, and very realistic IMHO. Only a couple of things on the hatchback seem slighly 'off'. The interior light is very bright and is casting razor sharp shadows , I would expect it to be a more diffuse light.
The wheel trim seems un-natural in some way. The bodywork of the hatchback is 100% realistic to me.
Edited to add: I think the wheel trim is looking brighter than the white snow, and that's what seems strange.
I did a few and that was the first I came across :)
How about this one?
2018-09-16 17:41:07.215 Total Rendering Time: 56 minutes 32.3 seconds
Click on image for full size.
Hi Sandy,
Yes that looks more natural to me ( bear in mind I'm just some random old bloke on the Internet so my opinion carries no weight ).
).
Everyone's opinion matters :)
What about this one :)
2022-08-08 11:05:35.132 Total Rendering Time: 17.72 seconds
Click on image for full size.
Hmmm,
It's not clear if the log he's sitting on is part of the photo or an added element. It's certainly convincing. If I had to find something I would say he's a bit too sharp, particularly the back of his head and his body, and his shadow looks to be from a smaller light source than sunlight. The refelction is a nice touch. Having said that it's probably better than I could do.
There are two compontents to the problem of matching digital assets and real photographed assets.
1. Matching the quality.
You cant composite a daz figure or digital prop onto a photoreal background and expect the composition to work if the figure doesnt look photoreal by itself.
Creating photoreal daz figures is a much broader conversation in itself - see other existing threads about achieving photorealism in iray.
2. Matching the ambient parameters.
Casting a critical eye, ensure the following:
- Shadow catchers are used to collect realistic shadows between composite figures and bg
-match lighting (this includes lighting type (i.e., diffused lighting, outdoor lighting, directed lighting from lamps etc), lighting direction, lighting intensity, shadow intensity)
-match colors (i.e., color correct in post if needed)
-match camera properties, i.e., focal length, depth of field
-match the camera angle of background and the composited foreground images
Hello Background,
Really nice portrait and well placed in the frame.
Thanks for the message good of you to reply so quickly
Once I'd found out what HDRI meant I knew I'd seen some of those sphere's on Marcel Wifwinkels site;
https://www.textures.com/browse/hdr-spheres/114552 there are to 'straightened out' ones as well on the page above. I do sometimes use some of Marcel's stuff but only in montages.
I've been doing photography since I was 12, through the darkroom caper with my homemade wooden 4x5, from 1998 onwards using PS, I really enjoy long walks looking for scenes with the figure missing.
There are many tools in Ps to blur a background including one that emulates a plate camera with a sloping DOF. Or what I prefer a freehand selection with a large dose of Feather, it's simpler and far more accurate.
Thanks for the explanation very good of you.
Cheers - J
There is only him and Matte Objects. One for the log shadow and one for the water reflection. The light is from the dome sun and probaly softened by lowering the Ground Shadow Intensity under Evironment but I could be wrong with that :) It was done a while ago.
Hello Sandy,
Good of you to post more stuff. May I ask your permission to have a go at the snow image. If you do I will give a full explanation.
I do hope you don't mind but the shadow from the fishing man is lit from the back, but his face is lit from the lower right of the picture.
Regards - J
Hello J,
Thanks, It was never really intended as 'art', I was helping someone figure out how to use Facegen, so it was rendered to provide a bit of encouragement that, with practice, it was possible to create images that looked like the original person ( I think it was based on a photograph in the same pose, in a different setting ). Sadly her computer developed a major fault, so we didn't get very far into rendering.
My own experience with photography is rather limited. When I was younger I didn't have the patience to wait for film to be developed at the local chemist ( actualy they were probably sent away to be processed ), and there was nobody that I knew that could explain why my photographs sometimes didn't come out as I expected. On my last year at school we were given a one day crash course ( here's some out of date film and some tired chemicals to develop the photos ). What photos I took were trying to capture some bits of railway history. My father was more into 8mm cine film ( holidays and special occasions. ) but that was very much focused on 'doing something' and recording the scene for posterity, like a silent newsreel.
edited to add: The last part, about 'doing something' reminds me of the time , some years later, when Granada TV sent a crew to film some work the company I was working at doing research. They were shown the latest and most expensive research tools we had ( that was a PDP11 controlled scanning tool I think ). They said "Hmm have you got anything that moves, that will be much more interesting for our viewers" so they filmed some of our older equipment complete with blinking lights and belt driven scanners ).
You don't need my permission :)
The sun is in the exact position of the sun when the photograph was taken which I do by setting it to the Exif settings from the picture. The reason he looks so bright is I didn't take time to put something between him and the sun to create the shadow that lies across that part of the image. Most of these were just early experiments using my photos and i didn't realy spend much time on them.
Achmelvich Bay background Genesis 2 Female, FW Joannie HD, Victoria 5 UV Set.. Librarian Outfit with G2Femail Flipflops and Flirt Hair
2017-07-15 19:25:16.403 Total Rendering Time: 12 minutes 42.25 seconds
Click on image for full size.
Hello Sandy,
Many thanks for the explanation good of you.
And many thanks for allowing me to 'have a go, with the snow'
Your Achmelvich Bay photo looks ten times better :-)
Hello Background
I had another go at the figure for my rocks pic.
https://www.flickr.com/photos/197808381@N07/52787573875/ NB *restricted content*
The figure is one of Adan Thwaites at https://www.most-digital-creations.com/ called Sophie I used the G3F one his he calls his figures 'Anatomically Correct' to my mind much better that some of the G8F offerings. Nice bloke too and in the UK.
I blurred the edges first using a selection aroind the body contracted and feathered it then deleted the edge leaving the feather. When in the right position I used some gaussian blur.
Cheers - J
Constructive criticism:
1) your image is like 1000 × 629 pixels, and the composition has the figure teeny tiny and randomly off to the side. Obviously the latter is an artistic liberty, but you might want to reassess composition? Anyway. surely you can increase res?
2) Background way too sharp compared to foreground figure.
3) It's hard to resolve any effect of blurring the edges at such low res but it almost makes it look like the figure was just crudely masked out of a picture as there is now a dark halo around it. (Darkness on edge of figure also related to next point)
4) The shadow and lighting direction is not realistic and harmonious with background. Can't you use an outdoor HDRI from polyhaven and try to match the background photo you are using in terms of brightness and light direction?
5) Shadow catching figure on ground could improve harmony by making figure+background interact more.
5) You render in iray? Almost looks 3delight? When you render character by itself does it approach photorealism? Have you considered just using free Photogrammetry backdrops from sketchfab or other 3D environments, e.g., from Daz Studio? There's no point compositing photo with non-photoreal figure or the juxtaposition of disparate qualities of background and foreground will just end up being visually displeasing.
Developing critical eye is key.
Hello Lilweep,
Many thanks for your constructive criticism.
I use the photographs I take on my walks here in the English countryside and the small towns local to us.
Without the figure ones eye goes down the slope of the rock and and right out of the picture. The position of the figure arrests the eye and her sightline returns the eye to the rocks. A simple compositional tool that has been used for 100's of years most notably by Claude Loraine. There is also a line of dead grass leading to the figure which gives a secondary route for the eye to leave the image.
I agree that I should have and will put some shadow from the feet upwards. At the location the sun was obscured by cloud so I used the Shadow/Highlight tool to brighten it, there is very little indication of the suns position.
I did have a look at Polyhaven and Sketchfab many thanks for the names, however I saw nothing that was of any interest to me at either of them. I really do prefer to make my own images, coming across a scene that cries out for a figure is one of the joys of my life.
I have seen the words 'three delight' but sadly don't know where to find it. At the render stage my figures do not have photorealism, I then do what I can with Ps, and I will continue to do so, I am achieving more now than I ever did previously.
Thank you for your input it must have taken some time to write so comprehensively. I am grateful to you.
Kind regards - J
It may pay to review the HDRI options on Polyhaven again. Literally everyone at some point in 3D industry uses free HDRIs from polyhaven. There are many outdoor lighting HDRIs that would much better reflect the environment of e.g., a forest or a field compared to the lighting you appear to be using
Same with sketchfab. There are 1000's of photogrammetry assets on sketchfab that can achieve near photorealism at certain angles. Yes, you may have to edit the render in photoshop afterwards by clone stamping over some artefacts, and may need to tweak the shader a bit, possibly add some normal details. but then you dont have to worry as much about compositing in photoshop. I attached an example of render done with photogrammetry assets. Backdrop is some free photogrammetry asset from sketchfab, clothing are all photogrammetry assets. It's a pointless artless render but intended for example purposes only. By the way, Im not saying that this is the only route to realism, Im just saying it can get you some of the way there pretty effortlessly and doesnt require compositing. Note: There are also photogrammetry environments on Daz store, but not many are terrain or nature based.
If you must use photo background, you could benefit from HDRI that simulates the backdrop and lighting, and also watching Photoshop training videos as many are all about compositing characters into background
There is a big thread about photorealism here, most of it is not particularly useful, but you may find some useful tips about rendering skin etc: https://www.daz3d.com/forums/discussion/313401/iray-photorealism#latest
@lilweep
I think you are missing the whole point of the discussion. He wants to use his own picture as a backdrop and drop 3D elements into them. using a random HDRI as lighting just wont work as the lighting from the sun would be all wrong even if you could manage to get one with the same sun position. That is why I use the Exif information from the actual image and put those figures into the Environment Tab, Tone Mapping and Camera Settings. I then find the lat/long for where the image was taken and put that into the Environment Tab along with the time of day. I then, in the scene, set the camera height and Focal length to match the real camera and then point it in the direction I was facing, N/S/E/W and anywhere in between, which should put the Dome Sun in the correct position to get the shadows right. I then lock the camera in place so that I can't move it up/down or from side to side. It is then possible to zoom the camera and move the subject to get the image you want, or would like to get, it isn't always that easy.
I have attached some of my early renders I did .
Jem,
Clearly there are different opinions on what is realistic, and different approaches to achieving that using Studio along with other assets. As mentioned there are long discussions on these forums about achieving realism ( along with some folks saying it's impossible so why even try etc etc. ). Maybe it would be useful to you to google some photos of similar subjects that you like and compare how the figure fits into the photo to how your rendered figures fit in, then you can think about how to move your photo/renders closer to the 'real thing' . For example, from my limited knowledge of photography I know it is possible for a photographer to make a model 'pop' in a photograph, which may or may not be what you want. I get a lot of inspiration from the Youtube videos that the photographer Peter Coulson does. He does a lot of work in his studio, but also some outdoors. The particular aspect I like is that he goes into detail about how and why he sets up a particular photoshoot. He does a lot af black and white, but some colour, and of course the youtube videos are in colour.
What I'm saying is that each of us has our own style of photo/render that we like, and getting advice from someone who prefers as different style to yourself is probably not going to work too well.
Lilweep,
I agree that photogrammetry is a great source of assets, I have made a few basic ones in the past using Archipelis Designer and Canoma ( anyone remember Canoma ?). The issue I find with photogrammetry is that the source images really have to have shadows to make the details visible, and it can sometimes be tricky to match the shadows on a photogrammetry prop to the rest of the scene.
oh didnt realise the sun position was the only thing that causes light in an environment.
Reflected light from environment just doesnt exist i guess. So if you have a character in the middle of a forest, you can apparently ignore all reflected light values from foliage...
You know you can rotate HDRI right?
Jem,
Thinking further... The photographer I mentioned, Peter, is generally aiming for a fashion type image. The girl is the focus and he works hard to make her pop in the image, the props he uses are a backdrop for the main character ( I believe he has done shoots with cars and bikes too, but the same principle applies ) There is a primary focus of the image.
With your images I'm not sure if you intend the girl or the background is the focus With girl being small, as Lilweep mentioned, it's hard to see her as the focus. In your latest example you describe how the position and pose of the girl directs the eye back into the landscape, so that would imply the landscape is not just a backdrop for the girl, but a feature of equal or greater importance , almost like the girl is a prop to complete the image, like she could be replaced by a tree in a similar position and shape, and the image would still work. ( or maybe I'm completely misreading the image. ). If the girl isn't the focus of the image then trying to make her pop is probably not what you intend.
Hello @background and Hello @Fishtales and Hello @lilweep
Many thanks for your contributions it's very good of you all to do this. I had no idea that the topic was the subject of other threads. I do hope I've not wasted your time and effort in replying to my question instead of searching for these other threads. Rest assured that I will be looking for them and using the links and suggestions by returning to this thread until I have evaluated everyone. Evaluated not as a critic but in their usefulness for my own images.
I may go back to my very first thoughts of using some general lighting effect with a little emphasis on bringing out body detail and then using Ps. I see lots of nudes on the DAZ Flickr groups where this has been done with no reference to lighting direction.
I hope you don't mind an example with this image https://www.flickr.com/photos/197808381@N07/52782605675/ NSFW *Restricted content* I used DAZ for G8F Emma's right (left looking at the image) hand side and Ps to do her left. The wall is merely a Selection Fill so was the floor until I added the boards under it and blended them. I wanted to create the grittiness of Kodak Tri-X 400ASA and get something near to Ruth Bernhard's original, she used three lights two spots and one general for background as fay as I can tell.
One of the problems I come up with using using colour is the RED in the renders I have to use the Hue/Saturation tool to get rid of it and Color Balance to put something back.
Cheers and thanks all - J
It does if you want the shadows to follow the ones in the used image without messing about for hours with an HDRI for light.
The reflected light is still there from the dome and it can also be set for the ground reflection and the shadow density in the Environment Tab.
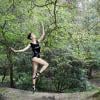
In a forest like this you mean? As I said these were just experiments to see if I could use one of my own pictures as a backdrop for a render they weren't meant to be scrutinised for perfection.
Hello Background,
You have read the image perfectly thank you. In about 1908 Anne W Brigman and friends posed nude in the Sierra Nevada https://www.flickr.com/photos/14500508@N07/1641698756/ *safe historical content* (her work is taught in schools, colleges and universaties all over the USA)
I came across this image and was totally gobsmacked, she IS the Soul of that Pine and definately not the subject of the image just part of it the story would fall apart is she was. Lots of others in the same manner.
Thanks good of you - J