Ghost Opacity

Hello,
I'm Lucas, a new user disovering Daz3d. I'm sorry in advance if this question as already been asked but i counldn't find the answer in the Daz3D forums.
I downloaded the plugin to apply ghost opacity on Genesis 2 :
http://www.daz3d.com/pwghost ;
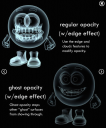
I would like to obtain the result as seen in figure two, but when i reduce the opacity it shows the back of the object (like figure one) and the PW ghost shader doesn’t seem to apply.
I suppose i have to change other settings before applying the shader. Could you explain to me what are those settings ?
Thank you in advance and sorry for my english,
Lucas
Daz 3D is part of 
Connect
DAZ Productions, Inc.
7533 S Center View Ct #4664
West Jordan, UT 84084
Licensing Agreement | Terms of Service | Privacy Policy | EULA
© 2025 Daz Productions Inc. All Rights Reserved.
Comments
The PW shaders don't work in Iray only 3Delight. You have to choose the render engine from the drop down menu in Render Settings so I would check that first.
Hmmm... I too have tried it just now and nothing seems to be happening - no "effect" on the figure or prop when I try to render it. I admit I'm a new user but I've rendered other stuff reasonably well, eg. a cavern model where you click on the rock face and then click on the rock shader and it modifies the surface on the result.
It has been a while since I used it.
First select the object in the scene tab.
Select the surfaces in the surface tab
Apply the Base Shader
Apply the Ghost Shader or whichever one you are going to use.
A few different shaders are used in this image.
Click on image for full size.
Aha, it works!!! First clicking on the Base Shader and then applying one of the ghost shaders or features indeed does the trick. Thanks!
I'm not sure what is going on with the jaw bone (?) in this quick sample render of Genesis, but the ghostly feet will do nicely, thanks. For those who "go back that far" the feet remind me of the guys in the "Phantom Zone" in the DC Superman comics.
Another thing to keep in mind for pwGhost is that (at least for the manual installation version) there are additional installation steps required, because some folders in the content have to be moved to the DS folder, rather than whatever content folder you installed it into. Which also means that if you ever reinstall from scratch, or the DS folder were to change locations, you would have to do these steps again at that time as well:
Unzip the product into a temp folder, locate the top level folder named something like “DAZ Studio_4.5;4” or “DAZ Studio_4.5;4;4.x Public Build;4.x Private Build”, then manually merge those files and folders with the corresponding folders of the same names where DS is installed.