How to smooth out wrinkles without ruining your look?
 DH6602636-
Posts: 22
DH6602636-
Posts: 22
(sorry for my bad english use google translate)
I imported the DAZ character to ZBrush for editing, but after I edited with ZBrush, I found that there are small wrinkles on the bridge of the nose. I tried to use ZBrush to smooth it, but the effect is not obvious. If I use too much smoothing, it will even destroy the shape. How should I solve this problem?
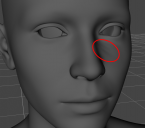
1.png
834 x 738 - 138K
Daz 3D is part of 
Connect
DAZ Productions, Inc.
7533 S Center View Ct #4664
West Jordan, UT 84084
Licensing Agreement | Terms of Service | Privacy Policy | EULA
© 2024 Daz Productions Inc. All Rights Reserved.
Comments
It's impossible to express with words the behavior of ZBrush brushes. You're gonna have to practice ZBrush a bit more to understand how sculpting works.
Only advices I could give :
- Work in ZBrush with 3D Layers when doing morphs. Import Genesis with GoZ, or by importing an obj. As soon as Genesis is imported, create a 3D Layer (name it for example Base Genesis). This way if anything goes wrong, you still have the base mesh. And then add layers for each modification or morph you're working on. Be sure to always check that the 3D Layer you work on is the good one, and is in Record mode.
- Genesis is too small for ZBrush's world scale which makes sculpting uneasy. Create a second Layer (Name it for Example Genesis Scale). Then use the Gizmo 3D (Y) to scale Genesis once until your reach "10" (the maximum scale you can do with that tool). This will give you a better control over the brushes' draw size. Be careful to not move the Gizmo. And be sure of course to slide that scale 3D Layer back to 0 before sending the morph back to Daz.
- Then create a 3rd 3D Layer and work on a morph. A 4th 3D Layer and work on another morph. And so on.
- When working on any morph, it's preferable to subdivide the Genesis in ZBrush. 1/ It's a non destructive modifier so no worries, morphs will work in Daz 2/ it'll avoid any unwanted modification of the base wireframe 3/ it'll give you a more precise control when using brushes : the more vertices, the more control you have over your mesh in ZBrush.
The rest really is all about practicing brushes. Your "wrinkles" I guess exist only because they follow Genesis' polyflow around the eyes. So move your brushes following the flow of polygons and you'll avoid creating unwanted details such as this one. The movement of a brush is important when painting, it's also true in 3D sculpting.
Good luck.
Thanks for answering! :)
I tried the suggestion you gave and it worked perfectly for me with ZBrush! Especially you mentioned subdivide, I always thought it would break the character, when I added subdivide to smooth the character, it worked a lot better, thank you very much! :D