Jeepers, Creepers... I gave G8 G9's peepers.
 MeneerWolfman
Posts: 429
MeneerWolfman
Posts: 429
When I saw on one of the posts that the eyes were conformers instead of geografts I got to thinking "Hmmm..." 
So with about 15 minutes of futzing around, I was able to turn G9's eyes into a conforming G8M prop.
It actually works really well, and once you set it up and save it out, you can drop it in any g8 figure, just make sure to hide the g8 left and right eye joint.
I wouldn't really call this an advanced operation either, maybe intermediate at best.
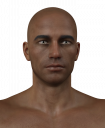
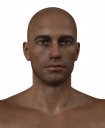
Attached is a picture of Scar 8 with the default g8 eyes and materials. Then a version of his with the refitted G9 eyes and its default mats. Next is a mix of Brutus and Scar with G9 eyes showing how it moves seamlessly with g8's eye controls.
I would not have thought about making the eyes conforming it, but I do see its benefits. But as you can see, this is a pretty easy way to "upgrade" your g8 for free using the g9 model 
Daz 3D is part of 
Connect
DAZ Productions, Inc.
7533 S Center View Ct #4664
West Jordan, UT 84084
Licensing Agreement | Terms of Service | Privacy Policy | EULA
© 2025 Daz Productions Inc. All Rights Reserved.
Comments
Very cool ,now to learn if I can do it
Could you please give instructions how to do it?
very good Upgrade for G8 :)
Where'd your pictures go?
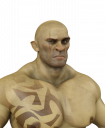
Two other examples with everyone's fan favorite, Maxx.
The simplified instructions are as follows. Please note, you may have to individually scale the eyeballs manually for certain figures. This is just my first go at it, so I can't say these scales are 100% spot on, but works well enough to share.
Very useful. Thanks for the walkthrough.
You're welcome. They're actually very cool eyes and the conforming eyes are a nice idea. I'm just not ready to sacrifice g8 to get them
Very nice. The only criticism I have is that the irises are too large. Can you dial them smaller a bit?
Yes, it will take any and all existing eye morphs you have on your g8 figure. They are a bit big because well g8m is a bit weirdly proportioned by default
This is the same image from before with the Daz "Eyes Iris Size" reduced to -75%
If the process described above is just applying the G8 rigging to a separate eyeball, couldnt we just separate out the G8 eyeball instead of using the G9 eyeball, and then rig that G8 eyeball instead of the G9 eyeball? That way the G8 eyeball would already be scaled and in correct position so wouldnt need to rescale the g9 eyeball etc before rigging.
Or is there something particular that we want from the G9 eyeball that the G8 eyeball doesnt have?
The G9 eyes are more poly dense and have a different UV. It would allow you to use the new g9 eye textures too.
Thank you very much
You're welcome :)
Why not just use the 8.1 UV map on the 8.0 eyes, so you can use the 8.1 textures? G9 eye UVs are very similar to 8.1, so you can just swap the G9 eye textures onto your favorite 8.0 characters this way. This way you still keep all the eye morphs you have on 8.0 to make any adjustments to the iris, ect.
You can save your G9/G8.1 eye as a shader preset, which lets you apply it to any surface. You can apply this new shader to your 8.0 character and manually swap the UV to 8.1 in the surface settings. Boom, 8.1/9 eyes on a 8.0 character.
To get the UV, export a dev G8.1 as OBJ. Load your dev 8.0. Go to the surfaces tab, click the box that opens the drop down menu, find EDIT, LOAD UV SET. Then use the OBJ file you just made. Now you have 8.1 UVs for 8.0.
This doesn't allow you to use the 8.1 head UV on the 8.0, if anybody is wondering. It works fantastic for the eyes, though. But it is part of the process that can make a 8.1 UV work natively on G8.0.
A few reasons:
Are you rendering the people at base res? Just stepping up once quadruples that number. Rendering at HD2 quadruples it again. By that point the poly count of the eyes becomes irrelevant, and honestly I have never seen an image of G8 where I thought the eyes specifically were lacking in this area. I've certainly thought other things needed more subdivision at times, like eyelashes or eyebrows, but not the eyes.
Most of the improvement you see is from a texture design rather the model design itself. The mesh is a little bit different, but not in a way that makes the mesh objectively better.
And I have found a drawback to the Genesis 9 eyes. They have a pupil bag now, which is cool, I guess, but that doesn't serve a real purpose. Additionally, a large portion of the polygons that you quoted as making the G9 eye superior come from the fact that they spent a number of those polygons on making the inner eye, when it doesn't serve a purpose for us.
Here is a test. This is Zelara 8. She has one default G9 eye positioned in place and one G8 eyeball wearing the default G9 mats. Which is better?
As for the surfaces, G9 also combined the 'eye moisture' and 'cornea' surfaces. Easy fix, just use the same eye moisture shader on the cornea, and make sure both are set to the 8.1 UV like the rest of the eye surfaces. Problem solved.
Other than that, the most visible difference is that the sclera takes up a different amount of space from 8.1 and 9. This is the only thing I see here, and the only way to tell which eye is which. Other than that, you would never know which eye is which. If you didn't tell you about the sclera and used both G8 or G9 eyes, you wouldn't notice.
I found a new problem that I didn't expect. Because the G9 eye now has this pupil bag inner eye shape, the eye socket from my Zelara poked through this. In some shots it is not a problem, but in certain lights this created a reflection inside the pupil. Maybe not a big deal if done right, but there might be certain shapes that allow this to happen, and in such cases you have to make changes to the lacrimal to get rid of it. I am not sure why the pupil needed this huge bag. This wasn't a problem with past models because the pupil was shallow. On a fair number of G8s you will find the eye socket is smaller than the actual eye itself. So when this happens and you are using the G9 eyes, you may run into this issue.
If it works for you, more power to you. The G9 eye looks better and works better for me, but if you're happy with a new UV slapped on the G8 that method is equally valid for you. It's a hobby afterall
great, with enough experimentation we can completely turn a g8 into a g9 lol
This is probably beyond my skill level (judging the results of my first attempt) but i am keen to get it right... the promising thing is i was able to follow the tutorial to the end but i must have made some mistakes... when i loaded my saved materials onto my new prop it only effected the right eye, the left eye turned transparent, also when i tried to load another material from the gen 9 starter essentials nothing happened.
Things i wasn't sure about...
15. Under surfaces, remove the "_" in all the surface names and replace with " " (does this mean replace the _ with a space or just remove it?)
16. now change to the node weight map brush. Select general weight and paint the entire left eye red. (when i selected general weight the eye turned red anyway and when i painted it, it was with a slightly transparent yellow... i've never been in that tool before so that must be the default setting, does that sound right?)
21. At this point you can save this out as a prop. ( is that... save as > support asset > Figure/prop assets?)
Thank you for the tutorial and i hope you (or anyone who knows better than me) can guide me to a successful outcome
Ok, i'm making progress but it still isn't right...
i've got it working on both eyes now and i think i'm right in saying i will have to save a shader preset and material preset for each eye colour i want to use and i can't just click on a colour i like in the G9 essentials, correct?
i don't know for sure but i think it's step 16 where i'm struggling...it starts with "under the G9 eyeballs" (are we talking the new G9 eyeballs?) also i've never used this tool and am finding it difficult to follow the instructions to a point where i'm confident i've completed the step.
Help from anyone would be appreciated,
Thank you.
My bad, was overseas for the holidays and didn't see this.
For step 16, you need to expand the new gen9 eye prop and go down to the individual "left eye" and then "right eye" joint and then choose the weight map brush and then the general weight map. You'll have to do it for each joint "left eye" and "right eye". Those two joints you need to make sure that each eyeball (respectively) is painted red. E.g., "Left eye" joint, the left eyeball is completely red and the right eyeball should have no weightmap.
Hi there... i've tried step 16 (the best i can) on both the new and old gen9 eye prop but the result is the same as if i didn't carry the step out at all.
there is something wrong and i can't pinpoint it!
i could do with clarification on the following steps...
10, export as what?
12, via transfer utility?
15, does this mean remove the _ but leave a space?
Thank you.
10.) You would export as an obj with the default settings.
12.) Correct, via asset transfer utility
15.) Correct, this is so the surface has the same name as the default g9 eye surfaces so you can apply materials to it.
This is what happens when i open the node weight map brush tool... when selected they are already red, it's difficult to know if the eyeball was successfuly painted red when it is already red to begin with, is it the same for you?
Maybe you are color blind, there is clearly still some blue there in your screenshots...
Look at the Head bone, there will still be some red weight assigned to that. So you need to paint it so eyes are all red (which will mean no other bones have any red weighting)
Also pro tip dont follow these two steps of the tutorial.Those values stated in the tutorial will put the eye in the wrong position and it will become more obvious with eye poses and face morphs
Scale and position one of the eyes in Blender in Xray or Wireframe mode using a native G8 set of eyes as a guide. Use Morph loader and use symmetry options to apply the eye morph to both eyes
Yes i can see that but none of these eyeballs have been painted yet... how can you possible tell when the eye has been completely painted red with the brush when 95% was red to begin with?
Edit: or am i misunderstanding and the eyes already come mostly weighted and i just need to fill in the bits missing?
you did Transfer Utility in a previous step, which will transfer most of the weights to your G9 eyes, but it wont be perfect (some of the weights will be assigned to the Head bone instead of the Eye bones)
to make it perfect, you need to manually paint any parts of the mesh that arent already red for the Eye bone to red (95% of it will already be red from Transfer Utility).
Also while im here and for posterity:
there are several layers of geometry to g9 eye, so you need to ensure you paint weights for all layerrs, not just the top layer.
Otherwise you will end up with some blue weighting on the internal eyeball.
Instead of painting weights, just select the eyeball geometry, and then change tool to Weight Node Brush and right-click->Edit Weights-> 'fill selected' as 100%