[Solved]Where can I learn to solve about unexpected stretch of fibermesh hair from ZBrush?
 qingliuhongtai
Posts: 43
qingliuhongtai
Posts: 43
I have bought ZBrush to use fibermesh hair.
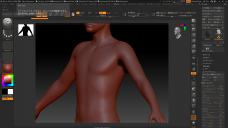
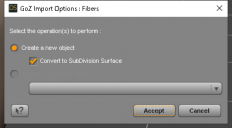
And I successfully have sent fibermesh hair to DAZ using GoZ.
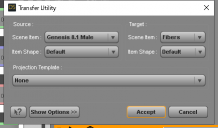
The fibermesh hair stretches following morph of parent figure as intended using Transfer Utility.
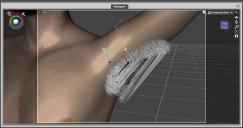
However, it troubles me with extreme stretching following pose of parent figure.
When G81M raises his arm, his fibermesh armpit hair breaks.
I have tried to find solution about this issue, but I could not do it well.
Could you teach me where can I learn to solve about unexpected stretch of fibermesh hair from ZBrush?
スクリーンショット 2022-10-19 23.43.05.png
1391 x 733 - 571K
スクリーンショット 2022-10-19 23.43.31.png
1920 x 1080 - 747K
スクリーンショット 2022-10-19 23.54.16.png
427 x 236 - 9K
スクリーンショット 2022-10-19 23.54.56.png
435 x 255 - 9K
Post edited by qingliuhongtai on
Daz 3D is part of 
Connect
DAZ Productions, Inc.
7533 S Center View Ct #4664
West Jordan, UT 84084
Licensing Agreement | Terms of Service | Privacy Policy | EULA
© 2024 Daz Productions Inc. All Rights Reserved.
Comments
Any object attached to an armature has to be weighted.
By transfering the Genesis rig onto your imported mesh, Daz did its best to also transfer the weighting of Genesis vertices onto your mesh vertices.
But as good a job as Daz's Transfer Utility does, there is always vertices weighting to do. This is the same in any other 3D app. Especially in areas such as crotch or armpits where there is a shared influence from multiple adjacent bones.
After rigging any mesh to any armature, second part of the job is weighting. Which vertices move with which bone ? Are my mesh's vertices influenced by a bone only, or more than one? How strong is the influence of each bone ? etc.
- Select your mesh in the Scene Tab, select the Weight Brush Tool (Alt+Shift+W)
- Go down the bones list for your mesh until you reach Chest upper, maybe chest lower, Left Collar, Left Shoulder Bend, etc. Basically any bone in the mesh's area.
- If you go to the Tool Settings Tab you'll see, in the Weight Maps Tab : General Weights. Select that and you can now see the inluence (red/blue) of your selected bone on vertices.
- Use the Weight Brush Tool and all its different functions to solve the problem, by assigning the proper influence from the proper bones.
http://docs.daz3d.com/doku.php/public/software/dazstudio/4/userguide/creating_content/rigging/tutorials/weight_mapping_a_figure/start
P.S : If your hair are not all attached to a common base mesh hidden in the body, you might suffer a bit with weighting. And prefer Weighting tools such as Directional Gradient, or Sphere Gradient (I tried once and didn't manage, yet, to make those work so far, so I can't really advise).
Thank you for your teaching!
If you had not told me today, I would not have realized the importance of the "Weight Brush Tool".
Because in all my 5 years of using DAZ, I have never used that.
I will learn it and try to rescue his fibermesh armpit hair!
Thanks ;) And good luck with that weighting extra work.
I just though of something else : send your mesh to ZBrush using GoZ if you want to. But send it back to Daz through .obj because GoZ doesn't sent Face Groups info (polygroups).
Create a polygroup in Zbrush for all the very first polygon(s) of each hair strand and define them all as 1 or more polygroups (as many polygroups as you have bones influencing the mesh). Then export your hair from ZBrush as .obj. Import that in Daz and you'll get Face Groups automatically created rom the polygroup information.
1/ Face Groups will help you a lot to select hair(s) when weighting vertices.
2/ Face Groups will help to create Surface Groups in order to set different dForce Surface properties so that hair simulates without falling.
Polygroups that become face groups are very, very useful when working on custom made assets. Same goes in Blender with Vertex groups that will also be converted into Face Groups.