Possible to set rendering/camera clipping distance?
 AlephGates
Posts: 6
AlephGates
Posts: 6
Is possible to set a rendering/clipping/camera distance for renders? In Blender there are clipping planes for near and far distances. For instance, I am wanting to render the front half of a hair item and for the back of the hair to not render or be invisible/Transparent. I currently have a colored plane (white in attached image) going through the hair item and selecting out the color in Gimp to create a tranparency of the hair without the back of the hair. It doesn't work very well unless I make the background white too. The idea is to set up a catelog of characters and hair etc and then just render each hair and character item once. I can combine them in a 2d with layers etc (python) and be able to go through a ton of combination quickly for prototyping/conceptualizing without having to setup and render each combination of hair and character (and other styling options) individually. If I can render the hair as a transparency without the back of the hair rendering then I don't have to create a mask/selection in Gimp and delete the back of the hair. I hope that makes sense (?).
Daz 3D is part of 
Connect
DAZ Productions, Inc.
7533 S Center View Ct #4664
West Jordan, UT 84084
Licensing Agreement | Terms of Service | Privacy Policy | EULA
© 2024 Daz Productions Inc. All Rights Reserved.
Comments
When rendering in IRAY you could try using a section plane:
In DAZ go to the Create → New Iray Section Plane Node
This cuts your scene in half one half is rendered, the other half not.
You can add multiple in one scene. Using two and rotating one 180° you can set up what you want
Here is a quick tutorial on DeviantArt
There is also a product for this: Camera Cutaway
MarkusMatern Thank you so much! This is perfect! You just made my day.
Glad it worked out four you! I tinkered a bit and think this is a great idea for checking out hair for a character.
I did the following for these mannequins
Optionallay name it Clone for Name and Label
Check the Y Translate of the Original and if it is not 0 apply it also to the Clone
Set rotations to X = -13.3; Y = 0; Z = 0
This makes sure when rendering characters with different heights, that their head is always at the same spot!
Make sure what the scale setting is for the original character and apply it to the Clone
Prepare a scene for hair
I used a sphere with 15cm diameter
Move the object to -30 in X as you did with the original figure above
Optionally add a second section plane 180° rotated and call it back
You should see it twice
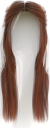
Render the character and the front hair, optionally the back hair
Combine the results in your favourite image editor that supports layers. The hair should be in the right place!
Gina with Matilda hair front:
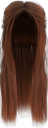
Some hairs need the additional back version enabled to look right. You have three layers in total. Back hair, character and front hair.
Genesis 81 with Low Updo hair front and back on the left; MSOGina with Low Updo hair front only on the right:
Thank you for posting this too! This is exactly what I was going for, but I am not that great with Daz so it is educational for me to see how one goes about doing this that is much more experienced than me.
Your are most welcome! Hope you get the result you were expecting!