Creating surfaces on a new item
 Pendraia
Posts: 3,598
Pendraia
Posts: 3,598
Edited to add: Just discoverred this https://www.daz3d.com/the-geometry-editor-an-in-depth-tutorial-guide it has videos rather than writing and images so it's certainly worth a look as it contains way more than I have done here and looks quite extensive. I'm going to have to save up for this one.
I offered to help someone recently with creating surfaces in DS and I'm posting it here just in case anyone else is interested. Just like to say I'm not an expert I'm just sharing what I've found.
I'm going to start with the basics and build to the more complex.
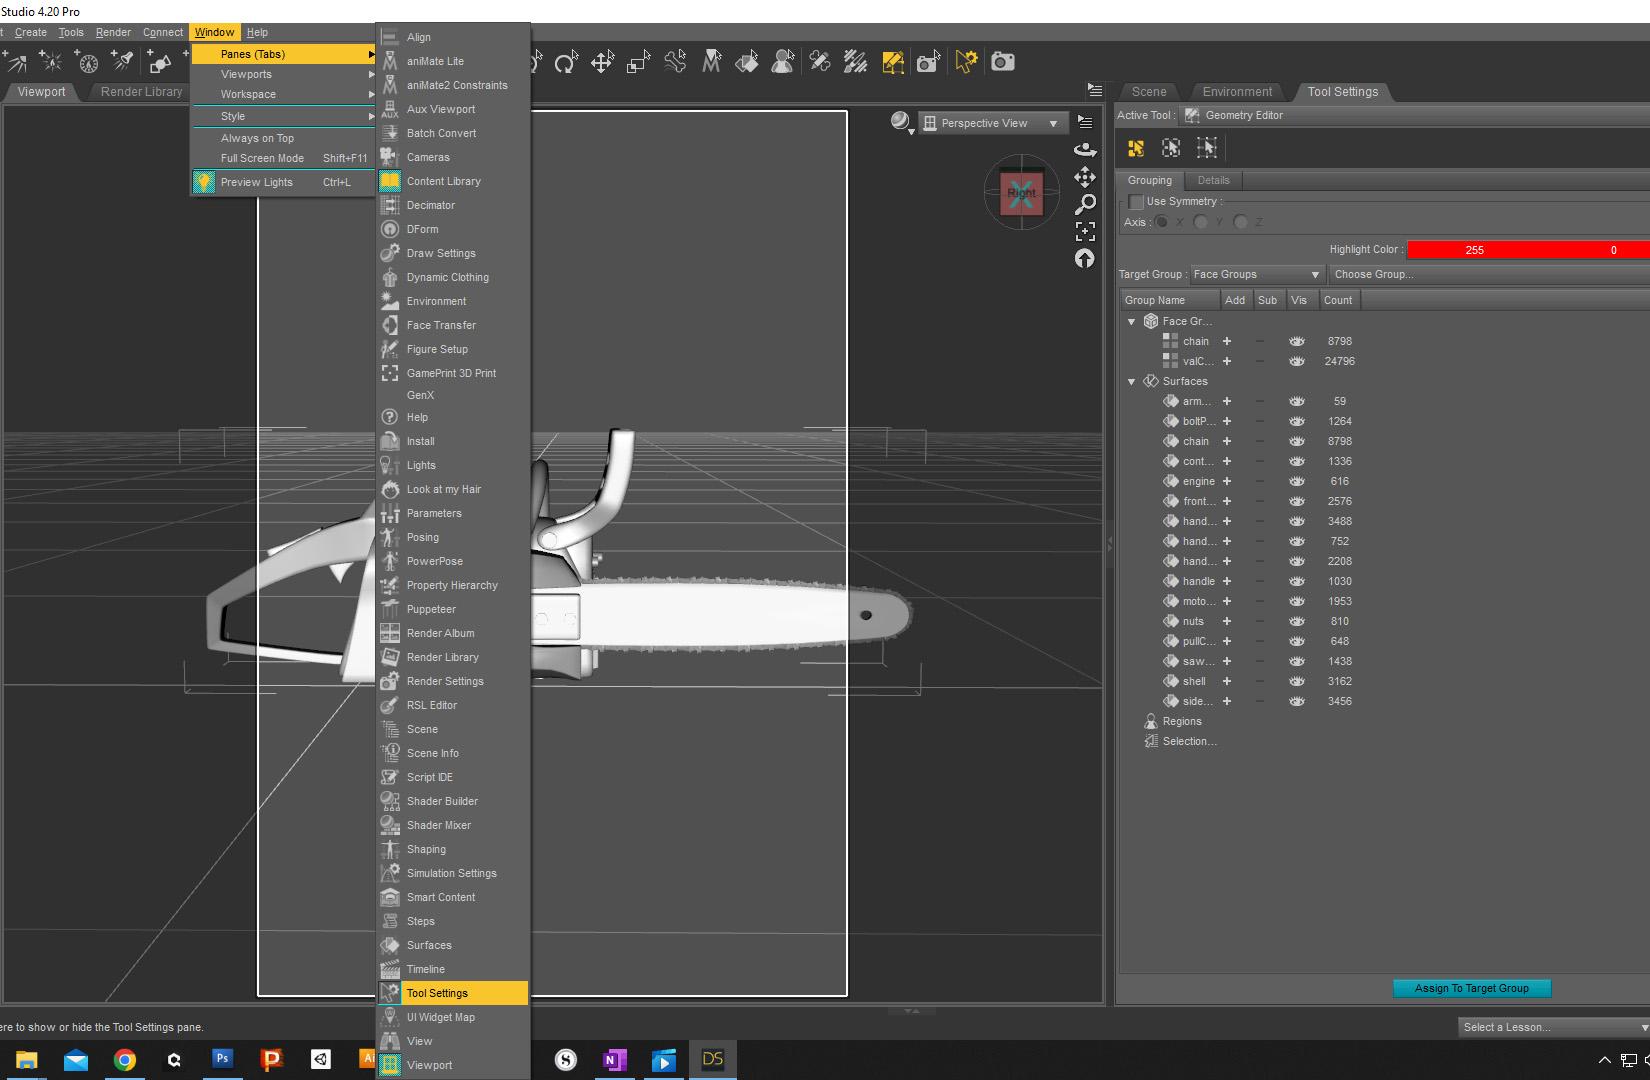
If you haven't already opened the tool settings tab it can be located by going to the menu strip along the top.
Select Window/Panes/Tool Settings.
This will load a new tab. You'll probably notice my ds looks different to the default view as I've set it up to suit myself and the fact that I use two monitors
If you look on the right hand side of the image you will see the tool settings pane is docked. You'll also notice that it contains both surfaces and face groups.
If you look on the left side you will see the window menu highlighted in yellow, along with the pane tab and right down towards the bottom of the menu is the tool setting tab.
Daz 3D is part of 
Connect
DAZ Productions, Inc.
7533 S Center View Ct #4664
West Jordan, UT 84084
Licensing Agreement | Terms of Service | Privacy Policy | EULA
© 2025 Daz Productions Inc. All Rights Reserved.
Comments
So we have our tool setting menu. I know that you have loaded your obj so you don't really need to know this but for anyone else, you can either use the bridge if using a program like zbrush or hexagon or you can go to file /import.
I want to show you that there is a difference though between the two methods. The zbrush bridge for example doesn't include face groups in the transfer but if you export and then load it as an object it will include the face groups.
You might be wondering why we would need the face groups when doing surfaces and I will explain it in the post where I talk about the next steps.
As you can see both look the same in the viewport.
Here's the one from the bridge transfer and you'll see there are just default surfaces.
Same sword using a different import method and there are face groups. This will become important further on.
Before we do anything else we need to select the geometry editor from the drop down menu at the top of the tool settings tab. Mine was already selected as I've been using it recently.
Lots of interesting things in there but we are going to concentrate on the Geometry editor.
The next image is of the viewport menu that you can see by right clicking anywhere in the viewport. It doesn't matter whether the scene tab is showing or the tool setting tab. While geometry editor is selected you should see this menu. If you change it to one of the other options you will notice the menu changes.
Take a moment and have a look at the menu.
Starting with the sword that has only the default settings let's look at what options are available to us.
If you select the surfaces on the tool setting tab and right click it gives us another menu. DS has lots of useful functions that are hidden in this way and it's worth having a look around at what's there when you get chance.
For now. It gives us two options we can create a surface or we can create a surface from selected.
Now from looking at the previous post you'll know there are lots of options in the viewport menu...you did take the time to explore like I suggested?
So what is the best way to select things to create surfaces?
Lets start by having a look at the first option it gives you on the viewport menu. It offers 3 options Polygons, Edge and Vertex.
You've already completed a model so I'm going assume you know what each of those are. I tend to use polygon selection as I find it easier. Best way for you to work out which suits you is to have a play with each method and see which one you prefer.
The next option on the menu is selection mode.
Again 3 options, Marquee, Lasso and Drag.
I mainly use Drag and Marquee but again this is a personal preference.
Marquee allows you to use a rectangle to select.
The menu options
If you look closely at the next image you'll see a red dotted outline which is what the marquee tool looks like.
And the next image is what a selection looks like. Please not it selects not only the polygons facing the screen but the ones behind as well.
Next option Lasso selection. This is more free form than the marquee but allows selection of large chunks of the mesh also.
See image below:
For the drag selection I prefer to change the way I view the mesh in the viewport to wire texture shaded see the image for how to change this by clicking on the draw styles menu.
Drag option: I find this a very versatile option especially when used in conjunction with other selection methods that can be found in the viewport menu.
You'll notice that my mesh now shows the way the mesh is created. Please excuse the mesh as it's from one of the first tutorials I did in zbrush but will serve us here as an example.
Clicking with the mouse inside a poly will select that poly.
Clicking in a poly but continuing to hold the mouse button down and moving it across multiple polys will select all the polys you move across.
The next option on our viewport menu is geometry selection and here's where it gets a bit more complicated and also more powerful in terms of the options available to you.
The first option Converting Selections allows you to change the selection between polys, edges and vertex selection. I don't use this much but it's useful to know it's there.
Second two options are fairly self explanatory select all and a clear function. I use the clear function a lot when creating surfaces. It's a good practice imo to clear the selection before creating an additional surface otherwise you might end up adding them to the next surface you create.
It also allows you to select by surfaces which allows you to check if all the polys are included in the right surface.
I haven't used the final two options so I'm going to leave them for now.
The next menu option is deselect by and gives the same options but instead of select allows you to deselect.
The next option is invert selection.
I just discovered a great option for using this here. https://www.daz3d.com/forums/discussion/594441/trying-to-apply-dforce-to-a-jacket you'll need to scroll down.
I'm still learning and it's great what you can find in these forums but I can seem to link to a specific post for some reason.
Please note in the image it shows the menu item followed by Ctrl+/ this is the hot keys you can use instead of right clicking. So it can save time.
So the next option is grow selection this also has hot keys so you can use it without having to go into the menu. Ctrl++
So what happens when I use this function. If I have a single poly selected it will select all of the polys touching the original poly.
Now what happens if I have a poly loop selected you ask? See the images below which give a before and after
So shrink does similar in reverse and boundary selects the outer polygons.
Select connected seems to select the all the connected polys to the mesh.
Thanks for the info, Pendraia! I've added this page to my favorites, as I'm sure it will come in handy in the future. But, I actually figured out my issue, with some help, of course. It turns out I had weight-mapped the rod BEFORE adding the guides, so they weren't part of the weight mapping. Here's the link to that thread if you want to see a picture of what my issue was. https://www.daz3d.com/forums/discussion/593881/need-some-assistance-rigging#latest
Thanks again!
Thanks Pendraia for explaining all that as I'm sure it'll be useful to many ☆彡(ノ^-^)ノ
I'm using a Razer Tartarus (a version I bought in 2011, that's some seriously solid hardware !) with multiple different Profiles per application but also per tool for Daz. To select geometry, weight vertices, create a custom rig, etc. It's super useful, as those viewport right-click menus and sub-menus in Daz really slooow down a workflow.
It would feel more logical and definitely much more efficient if all the content from those right-click menus and sub menus were all listed and accessible with a single-click straight from the Tool Settings window that has, as it is, so much empty space that could definitely be used for that.
Just waking up. . I'll check your link out. I'm really glad you sorted your issue. I'm going to continue to work on this as there just isn't a lot of documentation on it. I'll most likely put it into pdf format up on share cg as threads can disappear over time.
Thanks! You sound like your hardware is way superior to mine.
The right click menus work okay for me though but I think a lot of people don't realise that there is so much hidden in them.
Edited to add this could be solved by allowing a switch to an advanced menu similar to the one shader mixer has on the bricks.
I think daz deliberately do that with some of the more complex functions so it doesn't overwhelm people when starting.
I think there should be more key commands to allow more expert users to avoid all the layers which can slow down work flow.
I'm hoping to add more to this later but I do have an appointment in the middle of the day for my parents so it might end up later in the day.
Okay back to it. The other option is select loop. This one is extremely useful but does have a few pitfalls to be aware of.
If you select only one poly and use it you will sometimes get the loops in both directions. Sometimes like just now when I tried to get an image for you with the sword it did nothing.
If you select two or 3 polygons in the direction you want the loop it will then loop in that direction and you will only get that one direction.
There are more functions below but I haven't really explored them and we don't need them for what we're trying to do.
So we're ready to start creating surfaces.
I'm going to create a surface group for the sword blade.
I like to create my surface group so once I have the polygons selected I can assign them. You can do this by right clicking on the surface label in the tool settings tab and selecting create surface.
when you do this a dialogue box will pop up. Click on the box and type in the name of the new surface. I've typed Sword Hilt in mine. And then click accept.
When you do this a new surface will appear under surfaces. If you can't see the name of the groups. Hover your cursor over the line where I have placed a purple dot.
A double headed arrow cursor should appear and will allow you to drag the line to the right so you can see the names of the surfaces.
Let's have a look at what is listed with that new surface. If you click on the add on the default you will get all the polygons in that group selected on your mesh as the default still contains all the polygons it is all over the mesh. If you click on the minus it will remove the selection. This can come in handy later.
If you click on the eye it will toggle the visibility of that surface. This can come in useful when you need to hide one surface group to get at polygons that are behind it. Say for example you want to create a surface group that isn't visible in dforce so skirt sections don't fall down.
The last column tells you a count. As it only shows up when selecting by polygons I believe it gives the polygon count assigned to that surface.
So the next thing we need to do is to assign some polys to our new surface.
We're going to start by changing the selection mode to marquee using the viewports right click menu. See image below when you see the yellow tick against marquee you know that you have it selected.
Use the marquee tool to select most of the blade. It's best to do this with the item sitting straight in front of the camera. Remember it will select the back polygons as well as the front.
You'll notice I didn't select right to the end of the blade. The reason for this is it is very easy to get polys from the hilt as well as the blade and there is an easier way to do this.
Next I'm going to select a the option grow selection using the right click menu. Remember you can also use the hot keys for this. I'm going to use this twice which will take me to the end of the blade.
Now we have the whole blade selected on the tool settings tab, select our new surface sword hilt, right click and assign selected surfaces.
Now when we look at the sword hilt in the tool settings tab you should see a number of polygons assigned to that surface. And yes it's only a small number of polys because most of them are in the hilt and the sword handle.
I have to go to an appointment so I will leave the next step for now but the next bit we'll look at how best to assign the polys in the hilt to separate surfaces.
If you look closely at the image you will see some bindings that I would like to make into a separate surface.
The easiest way to do the hilt is to use the face groups so I'm going to use the model that has the face groups to demonstrate this. I can use similar techniques to what I did for the blade and I did notice that I called it the sword hilt and it should have been the sword blade. Sorry about that.
I'm just going to demonstrate it with the end cap. As you can see from the image below the face groups have numbers that don't tell me which part. By selecting each one in the tool settings tab I can easily see which is which as the polygons go pink.
I need to create another surface and I'll use the same method as before I'll select the surfaces in the tool settings, right click and create surface. This time I'll call it endcap
By using the right click menu I can go to the geometry selection, select face groups and then the number which corresponds to the end cap.
If you look at the image below you'll notice the numbers match.
This will select the end cap and then it's a simple matter of rightclicking on the endcap surface in the tool settings and assigning selected.
You continue to do this with all the face groups until you have surfaces for everything. Some of the surfaces are more than one face group but you just repeat and assign them to the surface you want them to be part of.
That's pretty much it for now. Ask if you have any questions and I'll try to help.
Here's a quick render of the sword with shaders on the blade and the endcap. Not bad as it's not been uv'ed yet.
Just as a quick project I remeshed the sword in Zbrush played with the groups, uv mapped in uv layout and then brought it back in to DS and created the surfaces from the face groups and applied shaders.
I just wanted to see it finished. I might include the sword with the pdf as an object file and let those who want use it as they work thru the tutorial.