Texture & Shader Alignment Issues
 Novbre
Posts: 83
Novbre
Posts: 83
I thought this was a minor problem that I could easily fix....two days later I'm nearly bald from tearing my hair out lol...
I have a pile of imported obj/fbx objects that I'm finally getting around to texturing and converting into Daz props. Some of the objects have this strange texture issue that I haven't been able to solve, heck I'm not even sure I can explain it! Here's some pics of the issue.
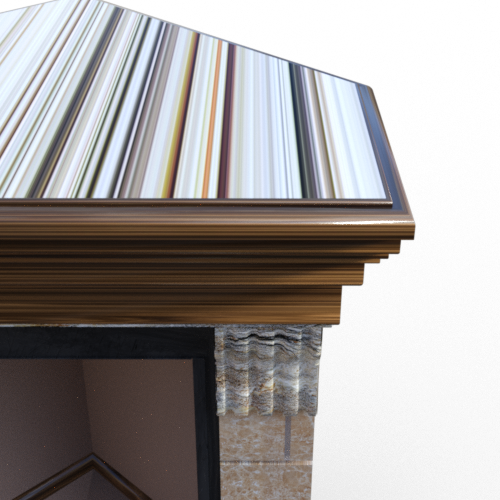
The first image is a diffuse map on some bricks. The front face of the bricks has the correct image map, but the top of the bricks are streaks, like the diffuse map was just dragged backwards from the face, rather than having the image replicated on face. I'm so sorry, I know I am not explaining this well!
Diffuse map

The second image is with a shader. The corbel below the mantle is the same shader (different material zone) and it renders correctly, but the stone top again looks like it's just pushed back from the front of the fireplace to the back instead of rendering with the image facing up.
Shader
Settings I've been using:
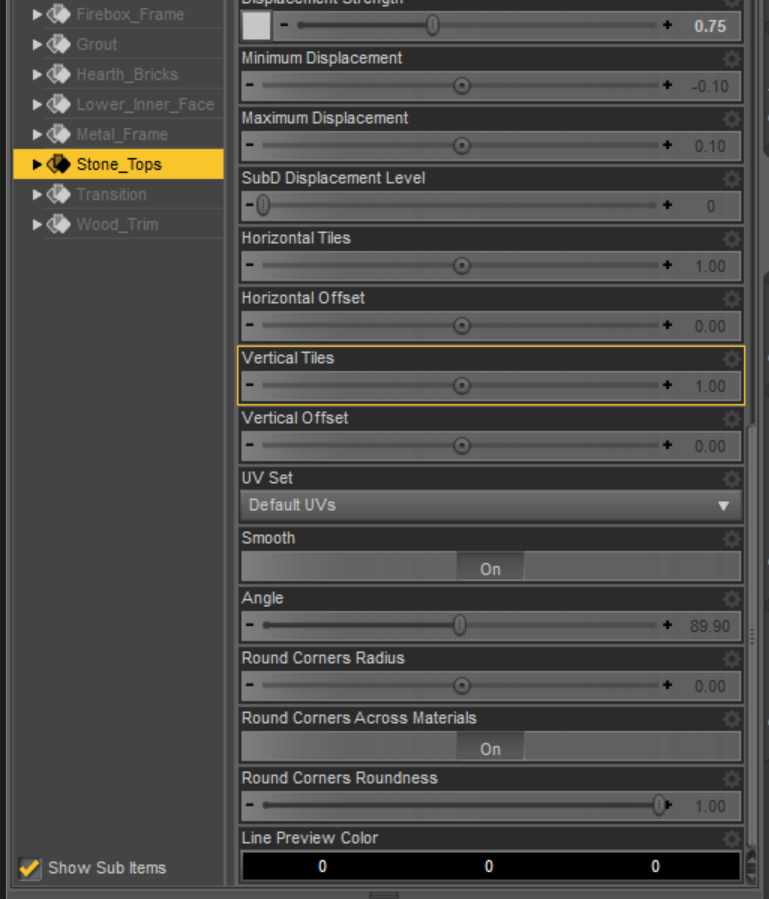
I had thought changing the angle in the setting would fix it, but I couldn't tell where it changes anything at all. On the shader version, I tried using a shader rotator but didn't have any luck there either. I don't even know what this kind of issue is called, so google has not been very nice. I looked into the geometry tool, but my skills there are just plan dangerous, so I thought I would ask for help before I went that far lol.
ANY help would be greatly appreciated!
~ Novbre
Daz 3D is part of 
Connect
DAZ Productions, Inc.
7533 S Center View Ct #4664
West Jordan, UT 84084
Licensing Agreement | Terms of Service | Privacy Policy | EULA
© 2024 Daz Productions Inc. All Rights Reserved.
Comments
Those lines are happening because the uvmap was not unfolded/flattened resulting in what may be called stretch marks.
In the modeller, make seams along the edges and unfold the uvmaps. Rearrange them as you please inside the one square, giving them different surface names esp. if they are going to be overlapping on the uvmap.
Providing no change was made to the mesh, one can then export out the new .obj file from the modeller, and bring it into D/S via the Edit options for a new uv set. Give it a sensible name. If it 'takes' and you like it, then it's VERY important to first save the new uv set, then save any new mats made with it.
OR, you could import the new .obj into D/S and make a new prop with it. Might be easier this way in the long run.
This object is only partially unwrapped. You need to use third party 3D apps to unwrap. RizomUV is the ultimate killer app for that. But countless other 3D apps or dedicated tools enable to get decent enough results if you're not too fussy. Parts of this object that aren't unwrapped see their 3D geometry (XYZ) become a thin line in the 2D space of a texture (UV).
What you see here has nothing to do with 3D geometry issue, nothing to do with shaders or bitmaps. It has to do with the 2D planar (UV) of a bitmap or portion of a bitmap onto 3D polygons (XY) of a mesh. A polygon is flat let's say, unwrapping tells 2D pixels how they need to be projected onto each polygon. This info is missing from the object you downloaded.
3D objects found here and there and created by unkown John Doe(s) are seldom very professional objects that you can be sure have been made properly.
What you see here is the projection of the last pixels of the front bricks being squashed into an infinitely thin 2D line. If a polygon is not unwrapped then the only "pixel" that can be projected on it is a squashed pixel (in 2D) that end up looking like a "stretched" pixel in 3D. Color's coming from adjacent/welded/textured geometry.
UV unwrapping, Texel Density, Texture Coordinates, UV Islands Packing, are keywords that could help you find info on the subject.
Polycount, for the basics, is often a very informative source of info (even if most articles are now seriously outdated) :
http://wiki.polycount.com/wiki/Texture_Coordinates
P.S : it all sounds very technical but actually, In a full 3D sculpting/modeling workflow, unwrapping is by far the fastest and easiest step.
Awesome! Thank you both! You gave me enough information to do a search in the right direction. I don't understand the "whys" of it yet, but I was able to change the uv projection in Hexagon without toooooo much trouble. Under the UV & Paint tab there is a Projection Editor tool that took about 5 minutes to figure out, and it worked like a charm! Thank you guys so much!!!!
You're most welcome, happy to see the good results :-)