Daz Rigging Custom Character from scratch
 hansolocambo
Posts: 649
hansolocambo
Posts: 649
Today's my first attempt at building a rig in Daz, on this stuffed teddy which I made for the occasion. Building the skeleton is pretty straightforward, at least the basics. But I'm a little lost when it comes to weighting vertices for the following reason:
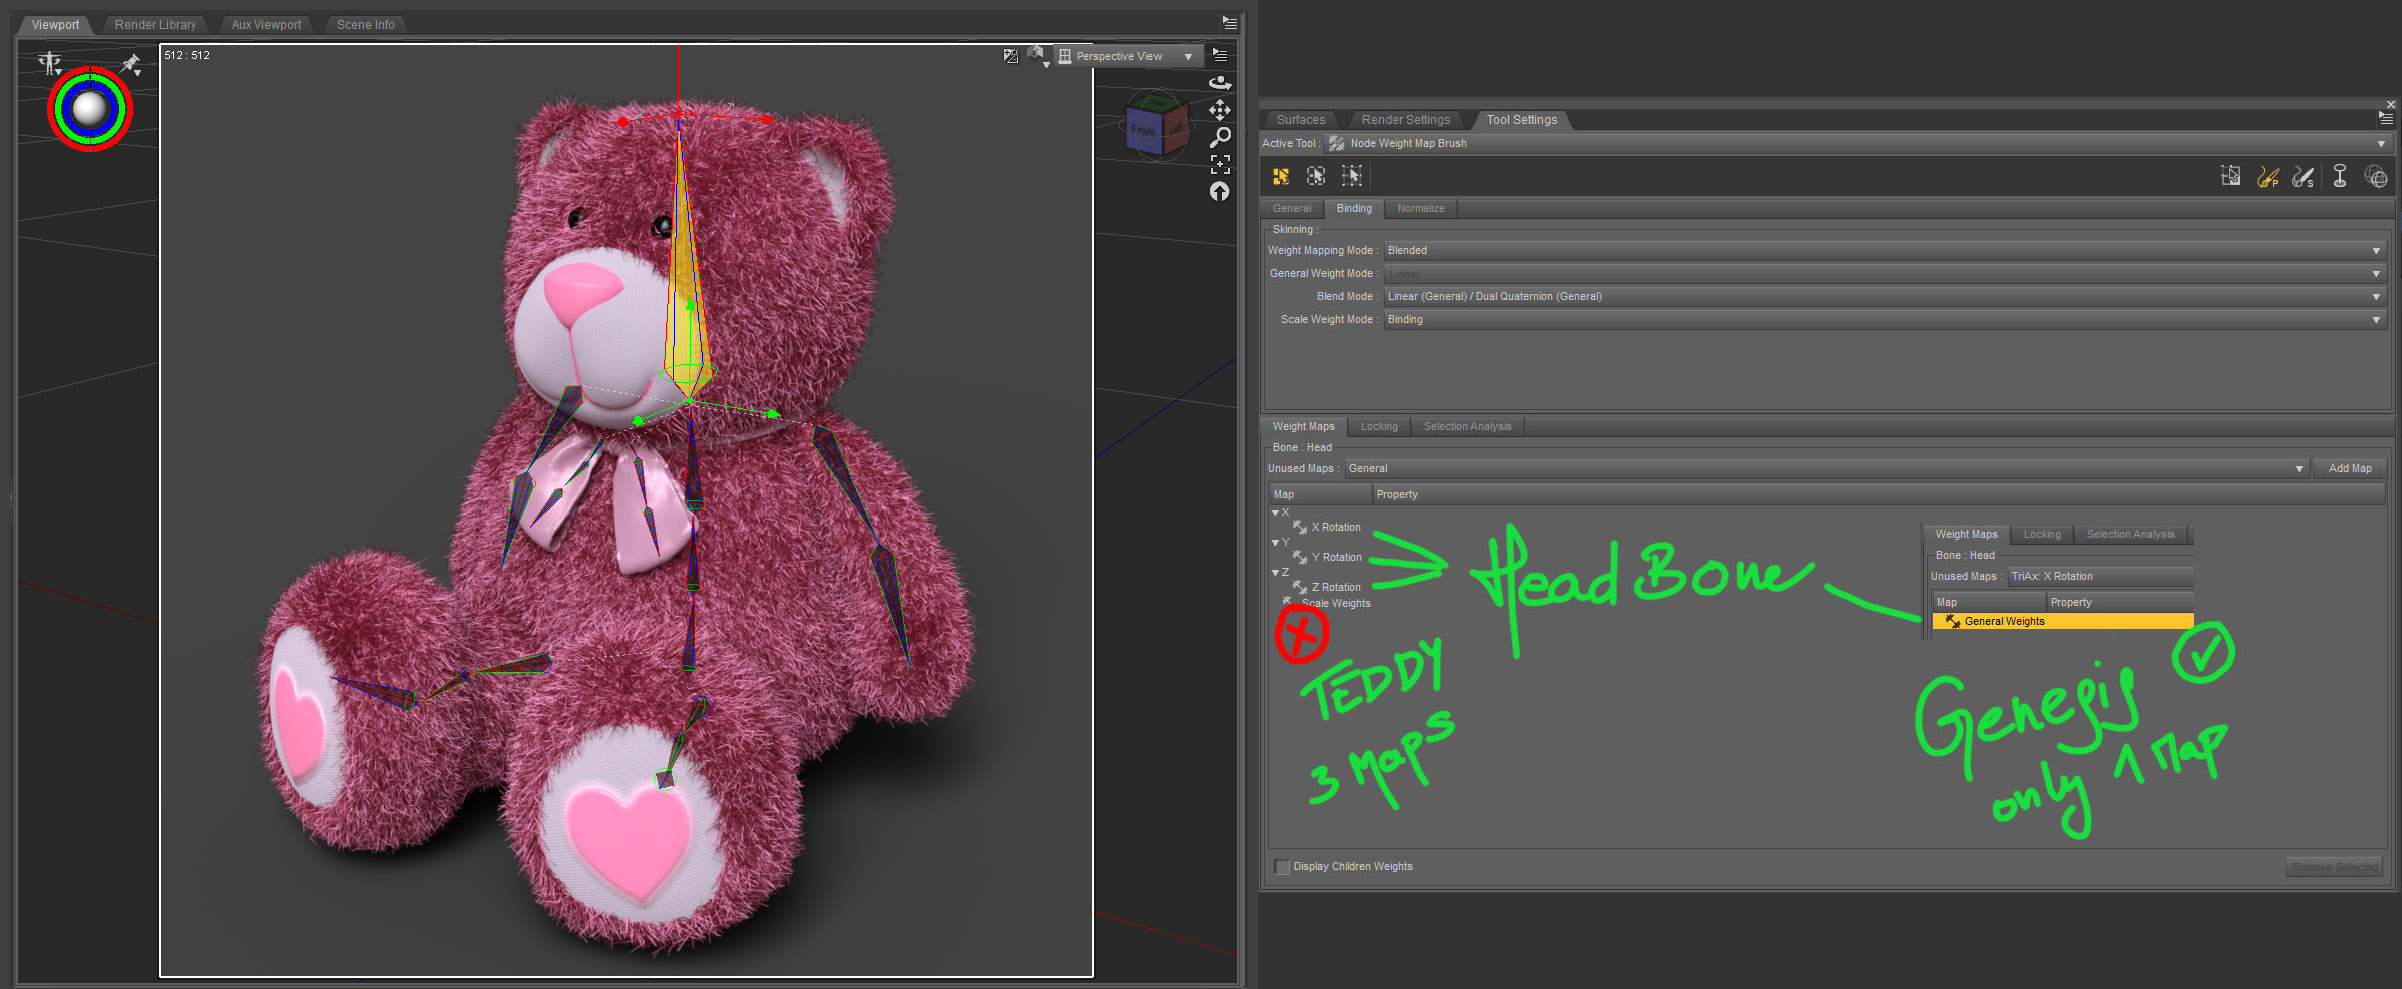
If I select the head bone (for example) of the Genesis, I can set the weights with only 1 weight map: General Weights. This is what I have always seen so far when working on weights with Daz.
But on my custom skeleton, when I select (for example) the head bone, I have 3 rotation values X,Y,Z and... I have to paint the weight for each of them ? ヽ(°〇°)ノ
Could someone please help me understand how I can have only 1 "General Weights" map that will control the deformation of the vertices on all axes for each one of my bones. Rather than having to paint weights on 3 axes separately?
I tried to change a few things in Tool Settings > Node Weight Map Brush > Binding > Skinning (Weight Mapping Mode, General Weight Mode, Scale Weight Mode, etc.) not sure yet what this does as I don't really see any difference. At least no what I'm looking for Σ(-᷅_-᷄๑)
Thanks.
Daz 3D is part of 
Connect
DAZ Productions, Inc.
7533 S Center View Ct #4664
West Jordan, UT 84084
Licensing Agreement | Terms of Service | Privacy Policy | EULA
© 2024 Daz Productions Inc. All Rights Reserved.
Comments
I deleted in Weight Maps everything that was there by default for a bone : X,Y and Z Rotations + Scale Weights (cf.screenshot thereabove).
I then Clicked on Add Map with "Unused Maps" set to General. And this worked. I ended up with a "General Weights". It doesn't feel like a normal workflow... Still, I tried to paint influences :/ Not sure I'm getting in the right direction at all. As now when I move a bone, the mesh follows, but as soon as I release the bone, it stays in place, but the mesh' vertices jump back to their original position.
The first two Genesis generations used TriAx rigging - a map for each axis, plus maps for bulges (push in/out as a joint bends), scale and others. Genesis 3 and 8 (and, I assume, 9) use General weight mapping. The former has the advantage of allowing finer control, but it is very non-standard. The latter is widely used, but is less flexible (forcing, for example, the addition of twist bones since bends and twists generally require very different weighting).
Oh all right thanks. It's legacy stuff then. Usueful in some cases I can imagine although using General weights on all 3 axes then defining twist / bend / side-side limits per slider sounds precise enough. But I've just been scratching the surface of Daz rigging for a few hours so I could be wrong.
I still haven't figured out a way to add a "General Weights" map for all bones without having to do it one by one. Same goes for deleting X,Y,Z,Scale maps given by default to all created bones. It's 8 clicks per bone to get rid of that..Actions on multiple selections are really something I've always missed in Daz.
I have another issue, serious this one (°ヘ°) I followed quiet a few Daz rigging tutorials today but my 2 test rigs ended up the same way : when I rotate a bone, everything works fine with weight influences, etc. As soon as I release the mouse, the bone stays in place but the rigged geometry goes back to its initial shape ? In all videos I see there's nothing special that seems necessary for that to just... work. That's a real bummer right now.
Does someone please have an idea ?
With the object selected in the scene tab and the weight tool selected, richt-click in the viewport and select weight editing > Convert Weights > Triax to General.
And after that you can delete the Triax weights.
I already did that manually. Convert TriAx to General pop-up tells me : "Selected figure already has general weights. Would you like to replace them ?". General Weights + bones limits is how I've always seen people rigging in other apps. It seems to be efficient enough, at least for video game characters and creatures.
I didn't use TriAx at all so there's nothing to convert anyway. I saw that convertion option and indeed it'll be useful for my next rigging attempts. Thanks.
My real problem is that the mesh follows the bone I'm rotating, but as soon as I release the mouse button geometry goes back to neutral position ?
EDIT : I tried instead : "convert General Weights to TriAx Weights" and now the mesh follows its rig properly. So I guess what Daz didn't like much is my manually deleting all TriAx and adding General Weights Maps instead. I'll try next time to Convert TriAx to General before defining any weight to see if it works.
Well it's not a solid workflow yet but at least I manage to end up with a usable result. That's pretty cool thanks felis. Geografting and rigging are relativly simple and open up some really fun opportunities.
Only thing I regret is that all useful options for rigging and weighting are accessible through right click and multiple sub-menus when a Tab dedicated to those tasks, with all options clearly visible and accessible in on click, would have saved so much time.
Strange - I have never seen such behavior.
How has it been rigged?
And if you select the geometry tool, are there then geometry assigned to each bone?
And have you tried to clear Triax weights?
You can choose between TriAx and General rigging when creating the figure - it sounds as if you chose TriAx.
I thhink this is also why ypur model is not following the bones - by adding the General Weights to a triAx rig you have turned on the Blended Weight mapping Mode (see your first screenshot) but you haven't yet told it to use the general Weight rather than the TriAx (which iss till zeroed). Try changing that to General instead and I think you will find the model responds.
Weight brush tool ;) Yeah I assigned geometry, thanks to Vertex Groups created ahead in Blender which helps a bit for that.
As I was yesterday digging for the first time in Daz rigging, I played a bit with too many options without fully understanding them (far from that). And yes Richard Haseltine you got it right again thanks ;) I indeed changed at some point :
Tool Settings > Node Weight Map Brush > Bending > Skinning, to TriAx (local)
Later I manually deleted all TriAx and Scale Weights on each bone, to replace them with General Weights. But I didn't think at all about changing back to :
Tool Settings > Node Weight Map Brush > Bending > Skinning to : General
which fixed instantly the issue as my skin now follows bones as it should. Damn cool, I am reassured :)
I now regret having made a too simple Teddy Bear for the test (no mouth, no eyes to animate, etc.) because it's actually "easy" to rig in Daz. I especially like the fact that at any time one can edit anything in the rig's bones (rotation order, EndPoints, positions, etc), then Memorize the Figure Rigging to take into account those modifications for a future Restore Figure Pose.
Rigging seems to be a totally non-destructive workflow in Daz and it's quiet pleasant.
Back to work. Let's "perfect" a bit the skeleton and weighting on Mr Teddy...