Collective3D Create-A-Room products
 Xandyr78
Posts: 119
Xandyr78
Posts: 119
Hello, all! I really hope someone can help me. I own Collective3D's Create-A-Room and its 3 expansion packs. I love them...but I'm a little saddened by the fact that the X-Pack 3 has all these new sizes of rooms/doors, but one cannot add the wainscotting and lower-wall geometry and textures that are used in the original base pack on these walls. I've been using DAZ for a LOOOOOONG time, but just to render, and my kit-bashing is relatively new. Is there ANY way to get those elements from the base pack and have them work on the newer walls in the expansions? The odd part is that the X-Pack 3 has a top and a bottom layer for materials on each wall, so I can split them just fine...I'd just like to be able to include the wainscotting, mid-wall runners, and paneling options that existed in the base pack.
I bought the scene splitter utility recently, but it doesn't seem to work on the C-a-R items, so I'd really appreciate any help on this that someone can give. Thanks in advance!
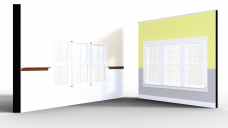
I attached a (really rough) render of the two separate wall types. The left side is one of the base room's walls, showing just one of the trim elements that can be colored/shown. They're obviously separate geometry, but as you can see, the walls on the right don't have that geometry. How could I make the elements from the base wall usable on the X-pack walls?
Apologies if this is a stupid or simple question...it's just out of my wheelhouse.
Daz 3D is part of 
Connect
DAZ Productions, Inc.
7533 S Center View Ct #4664
West Jordan, UT 84084
Licensing Agreement | Terms of Service | Privacy Policy | EULA
© 2025 Daz Productions Inc. All Rights Reserved.
Comments
On the first two expansion sets, the wainscotting panels and battens, molding and chair rails are all part of the geometry, with opacity initially set to zero. The material presets give them some texture and set the opacity to 1 so that they can actually be seen. The later expansion kits do not have the geometry included, so you have to tint the baseboards, door frames and window frames yourself in the Surfaces Tab. The material presets just reset the colours to white, with some roughness and a bump map for texture.
If you really, really want to have the missing parts, you would have to extract them by deleting everything else with Geometry editor, and exporting a new object. It gets complicated, but is do-able.
Thanks so much for the response! I really do want the missing wainscotting and its accoutrements, so I may have to just learn the geometry editor! Appreciate the assistance!
Okay, to get you started...
Load a wall segment with the parts you want to keep. Select the wall segment in the Scene tab, and switch to the Geometry Editor tool. Go to the Tool Settings tab and expand the Surfaces group. The idea is to isolate the part(s) you want to keep. To include in the selection, click the + sign. You can only delete selected polygons, so invert the selection if needed, then delete.
Take a moment to plan the next steps. Rename the parts left over in the Scene tab (just slow double-click) to give it an appropriate title (this is the Node Label). You will need a folder to save it to if you don't want to mix it in with the originals.You will need to come up with a unique name for each of the parts. The saved part will load in the exact position it is in now, so make sure it is located where you want it to be.
Once you have what you want, you can Save As -> Support Asset -> Figure/Prop Assets. Enter the name of the file (.duf) that it will be saved under, in the content folder of your choice (must be in a Library). The next dialog (Save Options) is a bit daunting. The Asset directory is where the /data folder will be located (top level). Sub-folders are determined by what you put in Vendor, Product and Item Name. Put the original vendor name, since they actually made the parts. Product can be something new to indicate that it is different from the orignal product. Item Name is the internal name used (aka Node Name, not the same as Node Label), and can be the same as Node Label, but sometimes adds more descriptive or technical details. Clear any metadata entries at this point, that can be entered later for all the parts at the same time.
Accept and that's it. Load your new asset to see if it what you wanted.
That should get me started...I hope. Thanks again for taking the time to respond!
Glad to help. If you need more info, don't be afraid to ask.