Made a Present for You, and How to Make Your Own
 CTippetts
Posts: 162
CTippetts
Posts: 162
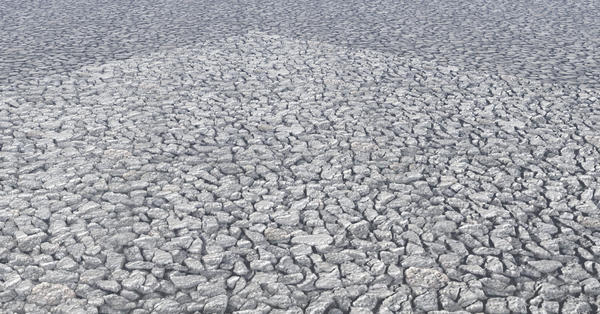
I created a gravel material for tiled terrains, and, though I offer it here, I hope I'm not in some sort of copyright violation, since I did not take the original picture I used to make it. I found it on the Internet, on the web site www.photos-public-domain.com . The site says that it is "... free for any use.", so I think I'm okay, except it seems to me there is still something in copyright law about re-distribution. However, it's not in its original form at all, and at least I'm not selling it, so don't you sell it, either. It's yours on a sample of 9 tiled terrains and an infinite plain, framed as in the image below so you can see where the tiled terrains end and the infinite plain begins here:
https://www.dropbox.com/s/u3ryini80jfj367/Gravel3X3TiledTerrains.br5?dl=0
I wanted to explain how I did it, in case you'd like to try the same thing using one of your images, (or someone else's). I used Bryce 5.5 to make this, but the same method can be used in newer versions of Bryce. Also, though newer versions of Bryce can load the BR5 file above, Bryce 5 and 6 users would not be able to use the file above if I had used version 7. So, everyone should be happy. Also, I used Paint Shop Pro XI to prepare the images, but the exact same process can be done in Paint Shop Pro 8 and on up. Many other image editing programs have the same features I describe below, if you prefer to use them.
To make this, well, first I downloaded the picture, (of course). I threw that into Paint Shop Pro, where I made a square selection. The area I selected was determined by the blackest shadows I could get three of the four corners of the selection to land in. Four of four would have been preferred, but when it's a random pattern, you take what you can get. I then cropped the image to the selection giving me a perfectly square image.
Next I used the "Seamless Tiling" tool so that no seams would be seen in the pattern. For this one, the parameters I used were "bidirectional" on "corners" at a 25% transition with 0 offset and the "Curved" "Corner style". With the already random pattern of the original image, both "Curved" and "Linear" looked the same to me, but I like curves. ;-P I saved the results as its own file in the TIFF format called simply Gravel.TIF .
Due to the fact that this image is already mostly gray, I probably didn't need to do a "grayscale" operation on it, but I did anyway. I then saved the results of that in a different TIFF image called Gravel_Grayscale.TIF .
The last thing I did with Paint Shop Pro before starting up Bryce was to convert the grayscale image to a two color, black and white image, then changed that back to a 16-bit color image. Of course it remained only two colors, but, though Paint Shop Pro can save a TIFF file with a two color palette, Bryce does not know how to read a two color palette. I then saved the results of that in its own file called Gravel_Mask.TIF , and closed Paint Shop Pro.
After starting up Bryce, I created a terrain. In the Terrain Editor I did a "New", then switched to the "Pictures" tab. For the first box I did a "Load" and brought in Gravel_Grayscale.TIF , left the second box all white, and moved the "Blend" button as far to the left as it would go, to retain the original image. I then exited the Terrain Editor.
Next I squashed the terrain down to a mere 0.9BU on the Y axis. I probably could have gotten away with around 1.5BU. You'll have to experiment with that when you make your own. I left the X and Z axis at the default 81.92BU.
In the Material Editor, I put a dot in the A column for "Diffuse". In the new "Texture A" box I clicked the "P" button to change to "Image Texture", and went into the "Texture Source Editor". I clicked on the first blank icon next to the little Da Vinci man, and opened Gravel.TIF . I then set the Texture Mapping Mode for Texture A to "Object Top". I put a dot in the B column for "Bump". In the new "Texture B" box I clicked the "P" button to change to "Image Texture", and went into the "Texture Source Editor". I clicked on the first blank icon next to Gravel, and opened Gravel_Grayscale.TIF . I then clicked on "Load" for the second image box or "mask" box, and opened Gravel_Mask.TIF . In that image box, since white means "don't show this" and black means "show this", I had to click on the half white, half black button to invert my mask image, making the gravel black, and the cracks between the gravel white. (I suppose I could have done a "Negative Image" in Paint Shop Pro before saving that mask file, but it comes out to six one way, and a half dozen the other way.) I then changed the Texture Mapping Mode for Texture B to "Object Top". I then adjusted "Bump" to a value of 100, and exited the Material Editor.
That's it for the terrain. For the Infinite Plain I used the exact same material, except I left both Texture Mapping Modes for Textures A and B at "Parametric" instead of "Object Top".
To tile the terrains, they can't just be placed immediately next to each other 81.92BU center to center or it will appear that there is a gap. What I learned from Horo is to duplicate a terrain, then hold Shift as you press the arrow key for the direction you want it to go 8 times, then hold Alt and press the arrow key pointing the opposite direction 2 times. Try to work in an outward spiral where your first terrain is the center terrain. Though the effect of this is they end up 81.76BU center to center, attempting to simply place them that way still has a gap or overlap, though using the arrow keys to place them avoids this.
Render. Done.
We out.
Daz 3D is part of 
Connect
DAZ Productions, Inc.
7533 S Center View Ct #4664
West Jordan, UT 84084
Licensing Agreement | Terms of Service | Privacy Policy | EULA
© 2025 Daz Productions Inc. All Rights Reserved.
Comments
Thanks for sharing :)
I posted a sample of how this can be used here:
http://www.daz3d.com/forums/viewreply/850204/
HAVE FUN!