Approaching Realism in DAZ Studio and Gamma Correction Demystified
 Parris
Posts: 392
Parris
Posts: 392
Hi Everyone,
I want to share some things I've learned about attempting realism. I'm going to focus on improving the look of human skin, but this really applies to just about any surface in your scene. Probably the first question that comes to mind with the topic of realism is "Why bother when we could just take a picture?" Well, I'm a big fan of a lot of different styles and genres of art, many of which have very little to do with photo realism. But I'm particularly drawn to the idea of "suspension of disbelief". When I go to the movies, I'm always thrilled when an effect is so good that, at least for a moment, I'm fooled. Best of all, I like knowing that the potential for creating something just as convincing , allusive as it may be, sits waiting in my desktop PC. With Lux, Octane, and now Iray, being offered to DAZ Studio users as alternative render engines, clearly more realism is something others are interested in as well. But what you may not know is that there is hidden power in 3Delight for creating more realistic renders, just waiting for you to take advantage of it.
At the heart of this hidden power is the concept of Linear Workflow, otherwise know as Gamma Correction. For some, Gamma Correction may be old news. After all, it was 2008 when Baggisbill compelled Poser users to start using GC in the forums at Renderosity and RuntimeDNA. In fact it's origins go back further, as I was able to find some documentation on the subject from circa 2001. But the benefits of it's use in 3D rendering are as important as ever, despite the fact that it remains widely misunderstood and frequently discarded, even by experienced users and major industry professionals. There are lots of reputable sources touting the importance of Gamma Correction in 3D rendering, and several decent explanations of how it works, though many are highly technical. Here are a few good ones:
From Pixar: http://renderman.pixar.com/view/LinearWorkflow
From VFX Wizard: http://www.vfxwizard.com/tutorials/gamma-correction-for-linear-workflow.html
From Shader Guru Bagginsbill, featuring his original public domain Poser Material Room recipe: http://www.renderosity.com/mod/forumpro/?thread_id=2738989
The indispencable book "Digital Lighting & Rendering: Third Edition" (2014) by Jeremy Birn, Technical Director at Pixar, has a great chapter (#8) on Linear Workflow (thanks to PhilW for sharing this find here in the Carrara forum): http://3drender.com/light/index.html
Anyway, since the technical details have been well covered elsewhere, I'd like to take a less technical approach, try to explain in common sense terms, and show exactly how to make use of two Gamma Correction methods in DAZ Studio with 3Delight - Render Settings Gamma Correction, and Shader Based GC (Shader Mixer).
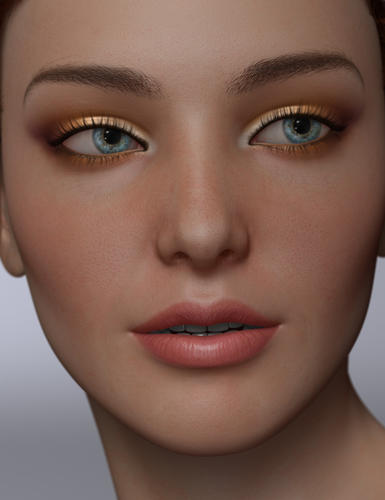
[Figure A: Example of a portrait using Gamma Correction and Subsurface Scattering]
Daz 3D is part of 
Connect
DAZ Productions, Inc.
7533 S Center View Ct #4664
West Jordan, UT 84084
Licensing Agreement | Terms of Service | Privacy Policy | EULA
© 2025 Daz Productions Inc. All Rights Reserved.
Comments
What's missing in a render without Gamma Correction
The three most common tell-tail signs of a render without Gamma Correction are:
1). Shadows that are entirely too dark (black).
2). Exaggerated specular burn out (a shiny spot that is too bright).
3). Color shift (a color you didn't intend to have in the scene).
If you've ever worked with traditional media paints, or spent time studying color photographs or even the world around you, then you may have already noticed that something is wrong with the exaggerated contrast you often see in 3D renders. Painters learn early on that you generally want to describe the shadowed part of a person or object with a darker version of the surface's basic color. So with a blue ball, for instance, you mix a portion of paint that is darker blue and often even more saturated in color, but rarely ever true black. Then you might use a lighter color blue for the brighter parts, and then sparingly a bit of white for the most light reflective parts. You can bring more of these transitional colors into the mix and utilize different methods of blending. But basically, what you would do to visually evaluate what paint colors look right to you is what Linear Workflow is arriving at scientifically - It's a better way to mix your pixel paint. In any case, a side by side comparison is probably the best way to show the benefits:
[Figure B: Compare Blue Balls (Gamma Correction - left, Photo - middle, No GC - right)]
Combine Gamma Correction and Subsurface Scattering
These days in DAZ Studio, with Subsurface Scattering based skin shaders being the standard, a more common sign is "waxy" skin, because too much SSS is being used. Without Gamma Correction it's difficult to light human skin properly, so by default DAZ's Original characters use SSS partially for it's primary purpose - simulating the light phenomena of translucent surfaces, and partly to compensate for the lack of Gamma Correction. So when you use Gamma Correction, you can combine it with Subsurface Scattering, and reduce SSS to physically correct levels.
[Figure C: Compare GC + SSS (left) with No GC + SSS(right)].
How to set Gamma Correction in render settings
In the Render Settings tab, under Gamma, set Gamma Correction to On and Gamma to 2.2. Then in the Surfaces tab, find your Diffuse Color image for a given surface. Left click the image thumbnail, then Image Editor... and set your Image Gamma to 2.2 as well. The first step tells the render engine to apply a Gamma Correction value of 2.2 for the finished render. The second step which is just as important, tells the render engine to anti-gamma correct the input image so that it can mix correctly with light and shadow and also so it won't be brightened twice.
[Figure D: Shows steps to turn on Gamma Correction in Render Settings and set input image gamma in the Image Editor]
How to setup shader based Gamma Correction using Shader Mixer (don't use both)
You never want gamma correction to occur twice or your images will look washed out. But if you want to apply Gamma Correction selectively to only certain surfaces in your scene, then leave the Gamma section of Render Settings at defaults (GC: Off and Gamma 1). You need to know the basics of using Shader Mixer for the next step.
This example below (Figure E) is the setup used for the blue ball with Gamma Correction in Figure B above. It's math is based on Bagginsbill's Poser Material Room recipe, extrapolated for DAZ Studio's Shader Mixer.
[Figure E: Shows a Shader Mixer recipe for shader based Gamma Correction. ]
Building on GC and taking it further:
Using one of these two methods to bring Linear Workflow into play, we basically apply Anti-Gamma Correction to all color inputs, so they can be mixed with light (black to white grayscale) properly, and so they won't be washed out when we apply Gamma Correction to everything at the end. The result is more color and detail in shadows, better preservation of detail where light reflection is brightest, and colors that are truer to our inputs: Notice in Figure B above how the prominent aquamarine specular halo in the default shader example is almost non-existent in the Gamma Correction render.
So now that we are using the correct amount of SSS for our translucent surfaces like human skin, we can make some other changes as well. Don't use SSS at all for opaque surfaces because it doesn't exist that way in the real world (you won't need it there once GC is doing it's job). You can then reduce your light intensity, if you want to match previous scene values. Many consider reducing by one third to be a good approximation. But be aware that Gamma Correction renders will perform better whether you are creating brightly lit scenes, darker, or more dramatically lit ones. You will still be able to get dark shadows when you need them. After that, you can also improve things by using a more suitable specular distribution model, like BSDF Blinn, to preserve more of your high quality diffuse detail. Also, when compared to SSS, GC & BSDF Blinn come at a lower cost to render resources, and it is more easily possible to fake/bake SSS for skin convincingly. So surprisingly, more realistic skin can be rendered in less time, not more.
Many of the tricks and advanced techniques we had to use to light our scene without Gamma Correction become less necessary and in some cases don't need to be used at all. But maybe this is enough to chew on for the moment. I hope this helps you get more realism out of your renders!
Superb article Parris. Thanks for putting this together.
I tried to create this kind of realism in Carrara but got so frustrated after 3 days and moved over to Daz Studio.
I'm a big fan of realism in 3D and you've helped me understand the DS workflow.
I was wondering just a few days ago "how do i do this is DS?".
You answered my prayers.
Thanks, scottidog2. I'm glad this was of use to you. I hope you won't find DS too frustrating, and will hang with it long enough to get the results you desire. Finding the answers can be pretty challenging, so don't be afraid to ask for help here in the forums.
I put some extra time into this article, because I wanted to encourage folks to start using Gamma Correction, obviously because I think it is important. But I can't really say my reasons are altruistic. I'm starting to put support for Linear Workflow into my products, and I'm concerned people won't get the full benefit if they don't understand GC. Often users or even software developers miss the part where you have to anti-gamma correct your inputs, and the result is a washed out image. This is usually the point where they get frustrated and/or decide Gamma Correction is not of value.
Thank you for this post. I have been using GC and 2.2 gamma since they show in Studio. I just wonder about set gamma to 2.2 in the image editor, as I to my knowledge 3Delight makes all calculations using anti-correction automatically if nothing is checked, as almost digital images just have a 2.2 gamma correction. Maybe I am wrong about this, but I should research the matter.
Parris - I love you.
DS users should finally start doing things the proper way.
--------
2.2 or "0" in the Image Editor, it does not matter; "0" is just a shortcut. Both these settings should give you the correct degamma. For control maps like bump/displacement/opacity, make it 1.
I'm definitely going to try this. Thank you!
2.2 or "0" in the Image Editor, it does not matter; "0" is just a shortcut. Both these settings should give you the correct degamma. For control maps like bump/displacement/opacity, make it 1.
Right. To put it another way (but basically saying the same), DS tries to apply the correct anti-gamma correction value to inputs automatically. But sometimes it may get things wrong. You can then help DS get it right by setting to 2.2 for color inputs and 1.0 for all grey-scale inputs in the surface parameter's Image Editor. I believe a value of 0 tells DS to guess.
Well...sort of. It's a somewhat weighted guess based on the location of the image map, as far as I can tell.
And after reading several articles last night, all those who don't think GC matters are in for a very rude awakening...it's even more critical in a PBR, like Iray. PBRs assume linear workflow and proper GC. Otherwise, they aren't simulating THIS universe any longer. And yes, as 3DL moves more and more to the raytracer, it is going be the same in 3DL, too.
Thank you for this information!
Can you select all the materials in the scene and apply the gamma changes to them all simultaneously, as with other things in Surfaces, or would you have to select each material individually? This is pretty much the difference between this being functionally usable or not usable in my workflow, because I usually need to do several renders over a relatively short period of time.
PhilW the Carrara Guru also advocates using Gamma of 2.2 for all Carrara renders.
This is what I am getting from Carrara using Gamma correction.
I want to use DS to create more realism than this.
With Render Settings GC, the answer is Yes and No. You can turn it on and set Gamma to 2.2 and DS will attempt to automatically apply the right anti-gamma correction settings to parameters like Diffuse. If it doesn't do it right and you need to set the Image Editor value yourself, then you need to do it once per image. So for instance, face, nostrils, and lips typically share the same diffuse map but you would only need to set the value to 2.2 for one of them. DS will remember the value for all instances of that image map.
With Shader Based GC the answer is Yes. For instance, with MacroSkin (a product I have in the Q now), you can select all surfaces that use the shader at once and then set GC to the value you want (between 1 and 2.2), the same way you turn SSS up or down (with a strength slider).
Scottidog2, beautiful image! But what are the specific things that you see that are not realistic enough? That's not a trick question. Realism can be somewhat subjective, depending on your goal for the image. You could try to find a photograph (ideally one that is properly exposed and not retouched) that has a similar pose and lighting to help you pick out what is not right in the render.
Things that stand out for me (which may or may not be as intended) are that the light is very even - kind of GC to the extreme, and I can't make out much diffuse detail in the skin, except for the lips and makeup which look beautiful. It could be that there is more ambient light in the scene then you want, caused either by a light in the scene or the ambient parameter or SSS strength on the skin shader. Or it could be that photo realistic detail is missing from the diffuse map itself. Anyway, if you see the same thing, then take a look at those elements. Let me know what you think. I can give you more specific recommendations once I know more about what you don't like and how your scene is set up.
GC is a per-image setting, not a per instance, so you need edit the gamma of any given image resource only once. This can be a problem if an image is used for diffuse and bump (though if an image is used for diffuse and bump GC is probably not the only problem).
Thanks for the clarification!
SickleYield,
I also responded to your question on the previous page. Did you see my reply? Richard's answer is more succinct, but you may find some helpful tidbits in mine as well.
Yes, I did, and my thanks was intended for both, sorry about that!
Regrettably, I still can't use it personally - one method excludes my using a number of shaders I need, and the other takes too long given the sheer number of maps in an average scene for me - but it will no doubt get some really great results for people who have more time to devote to each individual render and really want to get more photo looks from 3Delight.
Understood. You've just brought up a good reason why applying Gamma Correction as it is offered now may not be ideal for folks with complex shader scenarios in their scenes, but have you tried seeing how well Render GC will do without adjusting Image Editor values? Since it makes an assessment automatically, you might only need to edit a few.
Understood. You've just brought up a good reason why applying Gamma Correction as it is offered now may not be ideal for folks with complex shader scenarios in their scenes, but have you tried seeing how well Render GC will do without adjusting Image Editor values? Since it makes an assessment automatically, you might only need to edit a few.
I almost sure that every texture have a 2.2 gamma correction applied as this is a long time default in every image manipulation software. It is most possible that if you are using GC and gamma 2.2 in your render and something is showing wrong, the problem could be the shader settings, which were probably adjusted by the original artist working in a non linear workflow. My point is, before making adjustments to the gamma value using the image editor, which I still think is unnecessary once 3Delight applies anti-gamma automatically, is more productive take a look in the shader settings. As Parris said, you should try use GC and gamma 2.2 before give up. Maybe you just need adjust a few settings.
I did not use 3Delight a lot in my renders, but after GC and gamma controls were introduced to Studio, I made a lot of tests and the difference was water to wine.
I'll run some quick tests with 3Delight and Iray, see what I get.
This shows the uncorrected 3Delight version of a render with the Hachiro skin and Advanced Ambient lights, the corrected version with render settings only, and a version where I went to templates 1, 2 and 3 and applied gamma 2.2 to the textures as well.
The uncorrected one looks better to me. What did I do wrong?
Now, Iray has gamma of 2.2 by default in its Tone Mapping render settings, but changing the gamma of the textures didn't seem to make a difference.
Probably nothing.
You just didn't do enough. Generally, things like specular and SSS need to be toned down some after the correction is applied. It's easier to make the effects more natural and you usually end up with a wider usable range of values. It's easy to over do it, because everything responds 'quicker' to smaller changes...
Oh, and as someone pointed out in one of the Iray threads...unless you are rendering titanium dioxide, there's not much else out that is 255,255, 255 (1,1,1) white, so the whites are probably too 'hot', too.
Parris, thank you for your observations. you're spot on with the things you pointed out.
The problem with Carrara's lights is that they don't have fall off.
SSS is also a matter of guessing.
I have to create a primitive plane and use the glow channel as the light source.
I am a professional photographer and the tone mapping in Iray follows the principles of photography.
Am trying to bring some of that realism in photography to CGI.
this render is from 2010, using only 3Delight and shadow maps, many people play with SSS and a ton of dials but forget something...the EYES, the eyes are very important to achieve realism, even a toon face like Aiko3 below, have more "life" than your mayority of Victorias with zombie eyesight and dead texture eyes.
Gamma Correction?, better use Tonal Curves in Photoshop, my 2 cents.
I am very sorry but you misunderstand the key component of linear workflow - linearising the input maps. If your inputs are wrong, the output can be made to look good, but with a lot more hassle and "oldschool trickery". If you like trickery, good for you.
Along with what Mjc said, the lighting as a rule will also need to be redone when it comes to intensities and falloffs.
The manthra is: no falloff on distant lights (at infinite distance), quadratic falloff on spotlights, pointlights and area lights (those at a finite distance). The physically based settings.
(and if by any chance there is "velvet" enabled on skin, it will also need to be dialed down)
UPD: reflection maps should also be checked, when it comes to reflection intensity. Less so with raytraced reflections, but still a point as well. Your character appears to use a lot of reflection for the eye surfaces.
...what you are doing when gamma-correcting the output (again, which only part of the parcel) is similar to using those "curves" in Photoshop. Take a photo you like and apply an inverse 2.2 (approx. 0.45) gamma curve to it in an image editor. See how different it looks.
Now, if you were to set up physical lights to a new photo sesstion so as to get the scene in a thus "corrected" photo look the way it did in the original "normal" photo - imagine how different it would look to your naked eye.
The eye that essentially does the "2.2 correction" to all the linear luminosities of the real world.
John Hable has more on that, with examples: http://filmicgames.com/archives/299