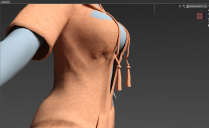
Transfer Utility help with Sweater/strings
I'm using Transfer Utility to fit a sweater .obj to my genesis 8 figure but I'm running into trouble with getting the strings of the sweater to conform to a specific body part as one piece.
I'm transfering the sweater to G8F with a single morph applied so I select the morph as the shape and also the 'Reverse source shape from target' option.
Everything transfers relatively fine and looks better with smoothing modifier (disabled in image for demonstration purposes) but the sweater strings get messed up when morphs are applied to the chest area.
How do I get the strings to confirm with a single body part so they aren't seperated into different body part morphs?
I'm sure I explained that terribly so I can provide more information you need.
Thank you!


Comments
You have to do weight editing.
Expand the bones in the shirt, and slect one of the bones, e.g. abdomen upper.
Then select weight editing tool, open tool settings and click general weightmap. Then the shirt will become red-blue-gery. Red means full weight, grey no weight. And then you can paint influence.
In this case, it might solve it if you instead do weight smoothinh. If you select the sting in the geometry editor, and then switch to weight editing, and then right-click and select smooth weight for selected.
Yeah I was hoping this wouldn't be the solution because I tried that before and it didn't fix the issue. I assigned the strings to the lower chest region with the general map editing and it did help with making the whole strings follow along with the lower chest when it's bent/twisted, but it doesn't affect which parts of the string move with morphs.
I also assigned the strings to the same face group that moves with the lower chest and morphs still affect different parts of the string.
Yeah - didn't pay attention to that it was a morph.
I don't really know how to handle that.
I can see some options.
A) Take it into a modeller and correct it there. Based on that you could make a corrective morph, or just use the updated model.
B) Rigidity groups, but that I am not really familiar with.
C) Something like this https://www.daz3d.com/sy-clothing-breast-helper-genesis-8-female
D) Set the sttring to dForce and expand the brest over the timeline.
This would be the most general option, set the free-hanging parts of the strings to be rigid and set a reference point about where they touch the breasts, that way they should move in/out with the morphs rather than tracking the nearest area of skin - though you might still gt issues with them rotating from vetical in some cases, which could be fixed with morphs or by giving them bones.
@Richard Haseltine
Can you then tell me how to create a rigidity group.
I can slect some polygons and then right click > Geometry assignment. According to some old documentation there should be a 'create rigidity group from selected', but that option isn't there any more.
That was when the Geometry Editor was the Polygon Group Editor. It can now handle edges and vertices now, and rigidity is a vertex property. Iyou already have the polygons selected, right-click>Geometry Selection>Convert Selection>Convert to Vertex Selection to get the needed mode and then you can right-click>Geometry Assignment>Create Rigidity Group.
Tricky - didn't think of that - thank you.