HDR artifacts and request for tips
 Diomede
Posts: 15,176
Diomede
Posts: 15,176
Is there a good HDR-in-Carrara introduction? I have been playing around with loading some HDR's in Carrara and am getting a lot of artifacts. I assume I am doing something wrong, or do not know how to choose a good HDR.
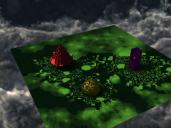
For this example, I set up a simple scene with a plane and a few primitives. I deleted the lights and set the ambient light to 0. I loaded an *.hdr file from one of Dimension Theory's products (one of the sky products). I made sure sky light was enabled in the render settings. I did a test render. You can see the spotty result.


Daz 3D is part of 
Connect
DAZ Productions, Inc.
7533 S Center View Ct #4664
West Jordan, UT 84084
Licensing Agreement | Terms of Service | Privacy Policy | EULA
© 2024 Daz Productions Inc. All Rights Reserved.
Comments
One of my problems is definitely picking out HDR files. I think the above artifacts might be driven by the unevenness of the clouds. This one seems better. It was part of the monterray.
And this beach HDR by Cake and Bob has the splotchy artifacts. How does one pick a good HDR?
DT's earlier ones do not work well in iray either
grab a Polyhaven one, they work better than any by DAZ PAs in anything
Thanks for the suggestion. I tried one of the seemingly standard indoor hdr's from that site. I still got splotchy results when I loaded the hdr version in Carrara. The site also had an exr version. Can Carrara use the exr versions?
no sadly
I have never experienced any kind of splotchy effect with an HDR, and I use them a lot. So, I am kind of at a loss here.
me either but I only enable skylight and use a sunlight light angled to match the direction of the HDR not indirect light
mostly I don't even enable Skylight either, the HDR will still contribute mostly to reflections, Philemo has a plugin to add matching replicated lights on a dome for it too which is another fake HDR option still using the image
I agree with Wendy about the quality of HDRIs in Polyhaven. Since I've discovered this site, I haven't felt the need to buy any HDR pack.
Sky lighthing without hard light is not very good in Carrara. That's the reason I've created the HDR light plugin. Honestly (Believe me, I don't get any money from it ), try it if you haven't already done so. See those 2 posts for setting examples.
Thanks for the suggestions, everyone. I will check out the HDR light plugin, Philemo. Thanks for that and all you do.
a quick one using Philemo's HDR light set with a Christmas hdri image from polyhaven
There are good hdr images that produces nice lightning and shadow and than there are not so good hdr images but also some of the settings are important like soft shadows and so.
On the other hand, i've got my eyes on HDR Light Studio for some time now as it looks pretty nice and you can make your own HDRI images with that.
https://www.lightmap.co.uk
Just the price of it was keeping me away of it :D
Argh. Tried one from Polyhaven called Alpine Field. Yuck. Splotches again.
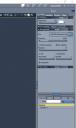
Render settings and source HDR attached as screengrabs.
Compared to how it looks on the Polyhaven site, your render looks way too dark.
Maybe run the HDR at 200% instead, or higher.
I suspect that some of the splotchiness you are noticing is normal at low light, and actually enhances the render if you you are not just posing smooth primatives.
used the same HDR image with lighting
Upon further review, I realize that I almost never light a scene with an HDR alone. I mostly use distant lights and bulbs, especially for highlights, but global illunination is also OK if you have it set high enough.
Stezza had his ambient up to 15. That alone might clean it up. I assume that his light dome was also activated.
Yep,
I mostly use this one for my scenes... good all rounder
yeah don't use a HDR without a light
I know it sounds counterproductive but it's how Carrara works
This is only using an HDRI from joelegecko's HDRI Photoshoot. (Iray render) These are not meant to be seen in the render, only to light the scene. I never render the actual HDRI in my renders - only use them for light.
I have purchased a lot of other HDRI packs but seem to only use this one. Polish's Cyberpunk Back Alley (I have the bundle, so not sure which it comes with) includes one for day and one for night, and the night version is what's lighting the scenery (Rosie and her car are composited into the back plate render). Those two are not meant to be seen either, but work great for lighting this intense piece of scenery.
I don't particularly care for using HDRI in Carrara. It's so helpful to be able to see the effects (at least somewhat) in working view, and be able to rotate the thing to get the result I want. Carrara makes me jump through hoops for that. But the Realistic Sky in combination with Sun and Moon lights are Su-freaking-perb in my opinion!
Oh... and I'm sorry for posting a DS/Iray image in the Carrara forum, but this is an important question. I wanted to show what HDRI do in a physically based engine.
I'm absolutely Not dissing Carrara for this. I love how I can light scenes in Carrara!
Stezza's Dragon
Cool Fricken Dragon!!!
Looks great! I see you have a distant light and a spotlight. Are you using the HDR as a light source at all? Do you have Global Illumination 'sky light' checked in the render room in addition to your distant light and spotlight? Will show why I am asking in the next post.
Here, I tried to copy Bunyip's settings (250% intensity). Also included a spotlight and a distant light. I have global illumination on with sky light checked.
Brash is still splotchy.
And here is same scene without sky light checked. I have the distant light and spotlight set at 30 each in both picks to emphasize the HDRI. Is the basic lesson here that many HDRI's will get yucky results if used as light sources in Carrara?
Good timing! That product is part joelegecko light HDRI product is in the 2.99 sale today. In the cart it goes.
I fricken Love it! I'm using #21 in the above image (on Rosie and the Car)
I wonder if the Carrara HDRI woes come from the fact that the HDRI background image gets nasty if we use Gamma Correction = 2.2?
All physically base render engines I've seen use GC = 2.2 as their base default - and it looks great.
I use GC = 1.8 on Rosie in Iray simply because of the darkish sort of scenes - I want the added contrast. Higher the GC the less black the shadows become.
Hello Diomede
I rarely use HDRIs as a light source, the main ways I use them are if I want reflections on chrome surfaces for example, and also as a quick scene setup for a render complete with shadow catcher which I use quite a bit. Have a collection of 66.2 GB of HDRIs in my Carrara folder.
Lighting in my scenes is usually with Tim Payne's now unavailable Carrara Skies with Lightdomes or a combination of distant & spotlights. Normally I have Global Illumination 'skylight' turned off for my scenes - use it on occasions.
I few years ago, I adopted a whole new philosophy on lighting in Carrara.
Since it's so easy to select what gets lit and what doesn't (light linking) using Carrara's light figures, I light my scenes how I need the scene to look independantly from the actors, and light the actors according to their need - again, completely independant from the rest of the scene - with at least one additional light to cast shadows from the actors into the environment - again, according to how I want the scene to look.
Before that, I'd (let's use an interior scene as an example here) create a separate light for everythiung in the scene that should emit light. I think it looked pretty nice and was meant to do things like: light the characters fingers as they approach the keypad - sort of thing.
That worked well but was very time-consuming to get it right.
After studying 'filmmaking' and VFX for a few years, I start to notice something similar with all of the film shoots: The cinematographer Lights Everything for the shots needed. Everything. The stage is completely independant from the actors, who get their own specific lighting - and it looks great!
Remember when I was going nuts on Iris Gleam? Cinematographers push that sort of thing, which is why it looks so amazing in movies - B&W, color, low rez or high... even those ancient movies done in B&W have done it this way.
So another example of how I do this is shown in my Volumetric Lighting Demo. I use Aura to tell the eye that light is being emitted, and use a single shape light (or a few, depending.... ) to provide the result of those lights - which is only adding the ambient light to the scene - with most of my focus on making shadows and light look really cool in the scene, getting the most out of the scenery's detail or at least the details I want the viewers to see, Then I add a volumetric light or two, maybe more to add drama. This emphasizes that there's something in the air besides just air. To further accentuate this, I use the Realistic Sky Editor's atmosphere to give depth to the air in the scene.
The more I started adopting this technique, the more I started liking my renders. Everything becomes easier to control, easier on the render engine and much faster to set up with confident results.
I use the word "again" too many times on purpose to emphasize the fact that each of these steps goes according to "What I Want the Viewers to See".
The scenery is a backdrop for the actors. Sometimes it's really important to see certain details, other times it's just necessary to give our actors a space to be in. In both situations, I'll light the scenery to look how it should look independently from the actors, who aren't in the scene yet.
Got it. Looks great. I didn't want viewers to get distracted by this, so I kept it subtle, yet cool-looking... perfect. Bring in the actors!
At this point I might even hide the scenery and just focus on lighting the actors. I'm going for a specific look, which is derived from highlights, midtones and, alomost most important of all: interesting shadows. In a Noir, we'll want deep, dark (black, even) shadows. But most of the time I just want the shadows (even if they're very light and subtle) to show off the details of what I want to show.
When it all comes together, it might need one or two more lights to have the actors project shadows into the rest of the scene. I only do this if it's needed. Most of the time I won't have to.
Comic books also show this technique very well.
The actors will have very strong highlights and obvious shadows - sometimes the shadows are all black - and midtones to provide color. I can't stress enough how valuable a Rim light can be. That is what outlines about one half of the character from behind, so we get a super strong, crisp highlighted edge on the actor. This keeps it from becoming part of the background. Even if we're using DOF (strongly advised!) it's still best to get that rim light back there ading that ever-important highlight.
We're usually not using the rim light for shadow detail. We need it to cast shadows to form that ever so wonderful highlight that it provides, but we need the Key light for the main shadow details. If we want really dark shadows from it, we might now add a Fill light, or our fill light might be very subtle.