Need Advice on Texturing for Custom Road/Driveway
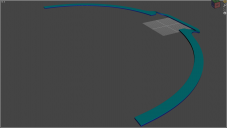
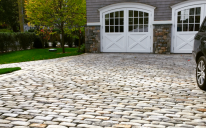
I had the attached OBJ road modeled to my specifications but without texturing. Now I need to figure out how to texture it. It's meant to be a driveway between an underground parking garage and Predatron's "Circulus Pacis" which is basically a motorcourt. Circulus Pacis has a cobblestone texture that I'd like the road surface to more or less match. Example below is similar. Of course you can see how huge the road model is based on the Daz ground grid in the screenshot. I've created two material zones on the model: the top, and the sides & bottom but after unwrapping it in UVMapper, hoping to apply at least a decent concrete or asphalt shader to it I'm not getting satisfactory results as I haven't found any tile settings that give me anything other than a solid color. I'm starting to think I might be better off hiring someone to texture it for me but due to the road curvature and the size of the object I'm wondering if that would be a huge amount of work and therefore very expensive.
Any comments or suggestions appreciated!


Comments
You made 2 mat zones and unwrapped it ... so we can assume that you uvmapped it? Solid color results tend to mean that the obj is not uvmapped OR that the uvmap is "out of bounds." If you send it over the bridge to Hexagon and look at the uvmap section - is the uvmap all on the Checker T [my term for the checkerboard]?
Thanks for reminding me about Hexagon. I have it installed but haven't really used it so far. But the checkerboard looks like a disaster on the model. It looks like what I should probably do is divide the top material zone into roughly equal sections with seams. Shouldn't be a problem to leave the "sides and bottom" zone as it is since it's no problem for that to be just a dark, solid color. Does that sound like the right approach?
Sounds like a start. If separate off the sides and there should be no bottom [if not visible in render it'll just add to render time, is useless], then make seams for the top until they will all be somewhat in good order ... then you can "carefully" match up the same sides for each seam and sew them back together for a better showing on the model. Weld the UV seams NOT the dots! All islands being sewn back together have to be in the same material zone too. {or simply remove all the mat zones until finished uvmapping].
Looks like I have more tutorials to find and watch! Need to figure out what you mean by "welding" and "dots". Are the "dots" pins? Still don't know what those are for.
I know from the other thread that Blender has been recommended ... these two programs work different but the concept for each "face normal" ["faces"] are the same everywhere. Welding is akin to sewing, joining two items together. "Dots" [points, vertex, vertices] - those things in the corner joining lines [edges] together. Pins are placed on the dots.
I just whipped up one to show you, after Hexagon flattened it to the bottom line, then I made the mat zones, then selecting one zone at a time asked for a new uvmap and now it's looking pretty good. The sides even matched up for the look would have if carving through rock.
Some maps are easier than others to do. This one required no welding, no pinning.