Applying Black Fingers to G8M
 Gemini Queen
Posts: 263
Gemini Queen
Posts: 263
I'm currently using the Zophael G8M model and I'm trying to apply the black hands material from the Hand Salon - Fake Nails and Jewelry product.
https://www.daz3d.com/hand-salon--fake-nails-and-jewelry
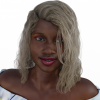
I do understand that this was made with G8F in mind, but normally, when there's a material that's meant for females, I ca still apply it to the males. However, this is the result that I get when I attempt to apply it to him (I tried to copy and paste the image right here into the body, but for some reason the forum system won't allow me to do, about to make a post about that next since I've seen other people do it.
To be fair, I do have another figure that has something similar to the black fingers that's actually meant for the male characters, it's just not as nice as this one (the other one is to the elbow, and I just wanted the finger tips).
I won't sit here and pretend like I know a whole lot about the anatomy of a product, BUT - At first, I thought that it might be because of the geometry that was originally meant for a female was now being applied on a male, but they're hands. Going into Wire Frame mode, the hands look like they have the same amount of ploygons (the little square bits that make up the geometry/shape of the object) but like I said, I have 0 idea what I'm talking about when it comes to that kind of stuff. So I'm bringing it here where professionals who know what they're doing can look at it and point me in the right direction.
Thanks in advanced!
Edit - I lied, the other materials that do the same thing don't work on thie figure cause their base figures have a different skin tone, so poo. This is my only one.
Daz 3D is part of 
Connect
DAZ Productions, Inc.
7533 S Center View Ct #4664
West Jordan, UT 84084
Licensing Agreement | Terms of Service | Privacy Policy | EULA
© 2025 Daz Productions Inc. All Rights Reserved.
Comments
Did you try changing the UV Set for the arms, in the Surfaces tab?
I have not tried that and if I'm being honest, I don't even know what that means, but I'm opening up the program right now to see if I can change that. I'll google what that means as well.
Edit - So I found the UV set for the arms in the surfaces tab, now I think it's a matter of changing it to something else.
Edit - I found out where I could load a new UV set onto the figure, but - I'm only able to change it to obj files. The hand salon doesn't have any obj files in there, so I don't think that I can change it there.
A UV is a coordinate that maps a polygon vertex to a texture. It defines how the texture is applied to the facets of your figure.
I have the option to change the UVs over to Base Female, but I'm not sure if that came default or if I got an addon or something. I know there's products in the store that let you cross-fit between male and female.
Well shucks, I guess I'll tuck this into the "don't really need it but would love to have it" box till I find a material that can kind of mimic what I was trying to do. Thanks for trying though!
UV Swap seems to go on sale, or packaged in various bundles often enough ...
The Product page mentions the existance of a .psd file. So between that and taking the .pngs into your image editor you might be able to rearrange the painted areas to match with the areas of G8M. [templates are in the Product Library] Or at least close enough that it's usable. Remember to have the colours extend over the seams a little.
To get the images showing in the posts, AFTER you have attached them to the post, open them in another window and copy the url. Then edit the post and using the little picture box icon, paste the url into that. Click in the big box to make it appear in that box, then the sizes show up to the left of it, put the largest size showing to be 800 or less. {not an issue for these images} Accept. Save post. The little thumbnails must be left attached as well.
Catherine3678ab - That sounds super techincal, but I will take a look into it and see if that works. But it would also be great if there was a product like this for the G8M. T-T
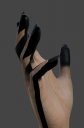
I though about what you are trying to do (which sounds simple and neat) but I don't have the fake nails product. This is what I tried instead as an example
The result is seen here and i attached the two jpegs:
You can paint whatever you want from gloppy liquids to electricity to plugging the jpeg into bump to make raised scars and save the geoshell to apply to any character.
nemesis10 - That sounds dope as all get out, and I appreciate you going through that stpe by step cause I surely would have messed that up trying to do it myself, lol. That is a really cool effect and I can't wait to try it out!
Let me know if I can help.... I could make the texture and mask if you like and an illustrated guide to what to plug into what channel if you need it. Geoshell are quite marvelous because we can even add normals, bunps, emmissives etc...