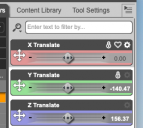
Can I get the Figures Xs Ys and Zs close to 0 and still keep these poses?
 inquire
Posts: 2,182
Don't know how I got the figures tranlations so disparate, but I did manage to form poses. I even have a group for these figures, and I locked 2 of the 3 translations. (First Screen Shot) The X translation is 0.0.
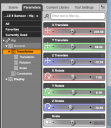
Now, for one of the figures, here are the hip translations: (Second Screen Shot) The X translation is 235.58
For the second figure, here are the hip translations: (Third Screen Shot) The X translation is -38.90
What I want is to save the poses so that they can be used together on other figures. So, is there any way that I can get all of the X translations close to 0.0? Is there any way to keep them together so that the characters do not fly to other parts of the viewport?


Screen Shot 2021-10-24 at 9.58.01 AM.png
262 x 234 - 32K


Screen Shot 2021-10-24 at 9.59.46 AM.png
401 x 463 - 75K


Screen Shot 2021-10-24 at 10.00.50 AM.png
275 x 466 - 68K


Comments
Select the figure, go to File > Save As > Pose Preset.
Once you've chosen a file name and location, a box appears labelled Pose Preset Save Options. Expand the Properties tree to show the values you want to exclude, and uncheck them.
Your pose will now be saved without the values in question - any character you apply that pose to will keep its current value of those properties.
@chris - 2599934: Ah, good to know: Thanks Chris. Now, for the poses already saved. Can I open them in TextEdit (Macintosh), just a text editor, and remove the values? If it's fairly easy to do, I can do it. Otherwise . . . eeps.
OK, I don't get it. I'd have to know specifically what under translations to uncheck in order for the character to keep its position. There are several options. I tried what I thought would work. But, nope, that does not work.
I think on Chris's image the wrong 'General' is accidentally ticked.
When I save a whole body pose, I never bother to expand the 'Hip' node, and just untick the 'General' data node that's visible two up from the bottom of the tree in Chris' image. I can't show an image myself, as I'm 1.5 miles from my DS machine. Anyway, this seems to have worked for the 130 freebie pose sets I have distributed on Renderosity. If you know the pose you have uses NO pose controls like 'Fingers Grasp', then the pose .duf file can be reduced in size by unticking 'Pose Controls', otherwise leave it ticked. Also, rarely are poses complicated enough to need 'Hidden' ticked (you'll know if it does, you'll have to explicitly set the hidden control), so that can normally be unticked too.
Common errors, and I am guilty of this, are having the feet/shoes above or below the floor when the character X/Y/Z translation & rotation are all set to zero. To get feet on the floor raise or lower the Hip Y value in the pose. Unless the character is relating to a particular object or another character, always try to keep the Hip X & Z translations to zero, this means the character won't appear to move when the pose is applied. If the character is relating to a particular object (like a door maybe), then the character should have the same origin as the object, and the hip X & Z should be used to move the character relative to the object so they are interacting correctly. Then the user can apply the same XYZ translation to both the object & character when positioning them.
It's best to try the pose out on a base figure before distributing the pose just to check everything. Also, if you are going to distribute the poses, take the time to create Iray thumbnail & tip images. They make a pose seem so much more informative and impressive for the users. The thumbnail is generally 91 px square, but now can be bigger (DS4.14 on) and I like to go for a .tip image 512 px square or 512 x 256 px dependant on the best fit shape. These are so much more useful for users to see the exact pose than the DAZ store standard 256 px square tip image.
Regards,
Richard
Well, in my case, there are 2 figures closely posed. I'm sorry, but in this case, I do not understand what I should untick to get the 2 figures to remain in the same space. The poses do involve positions of the arms and hands.
The figure itself and the hip should do the job, though you may need to leave hip rotations on
In the parameter dials for the top level of the figure, both figures, make them the same Translation X,Y,Z and Rotation X Y Z. Doesn't matter what the numbers are so long as they are the same, but 0,0,0 is probably best.
Now pose the two figures. From now on DO NOT TOUCH the top level parameter dials of either character, move the two characters about relative to each other using the HIP XYZ Translate and or the HIP XYZ Rotate and any other limb and feature posing necessary.
Now to save the Pose Presets.
Make the pose preset save options for each character as you save them look like the one below (edited from Chris's image above to get what I usually use):
I tend not to compress the file, so I can read it in a text editor if I need to.
Hope that answers the question
Regards,
Richard
@richardandtrachy: I'll have to try this. But I don't know that this would work. Don't I need pose controls? There are rotations and bends in the legs and arms, the neck and head, the fingers and hands. Why would I leave all of that out?
@RichardHaseltine: Well, maybe I'm just being an idiot, but I don't understand why I should use only the figure and hip.
Maybe I was not clear, but as I titled this, I want to Keep These Poses. The poses are already done. I don't want to repose. I just want to change the Translations, mainly the hip translations. I want to keep all the rest of the poses. Both characters are already posed.
Sorry, I had the wrong end of the stick. In that case you want a palcement pose, so you would want it to apply only to the figure node (ideally - but that shouldn't clash with the pose anyway) or the hip bone's translations. So check those after unchecking everything.
If you have only used the 'Bend', 'Twist' and 'Side-Side' and 'Translate' type sliders while posing the character, then everything you need will be saved in the above window. To see exactly what is saved expand every last box, and that will show you precisely what is saved, and the 'bend', 'twist' etc type components of the pose are saved, and are not missed out. If you have used combination pose controls like 'Finger Grasp', 'Eyes Close', 'Smile Open', then you will need to tick the pose controls checkbox. If you used the 'Power Pose' window to pose the character, then you will be saving all those pose components without needing to save the pose controls checkbox, as 'Power Pose' only affects the parts of the rig saved in the window above - even when creating expressions that way.
Regards,
Richard
Well, sorry, but now I do not understand what you mean by apply oly to the figure node. Would the figure node be the first "hip" that appears under the figure or character's name in the screenshot, in this case Swole 8 Samson? Or would the figure node be just selecting the entire figure in the viewport? Or, what would it be?
I think it just might be simplier for me to load the characters up, and then just change the figure's hip translations to 0.0 for each. After that, as they are close together, just alter their positions to get the pose I want.
How would I expand every last box? By opening up the pose file in a text editor? If I open the pose up in a text editor, I can't make any sense of it. Is it in machine language? (screen shot)
No, the figure node is the one with the figure name - e.g. Genesis 8 Male - as that and the hip bone are usually the two nodes that have translation options available.
OK, I think I understand it now. I also found this product to be very valuable: https://www.daz3d.com/pose-builder-for-genesis-3
It's for Genesis 3 and 8, and it has an option to keep the selected figure's hip just about in the zero position when you apply the pose. Just see the screen shot. It's under "Misc" in Pose Builder. Just check both options for Hip Rotation and Hip Translation. I can place two characters (or figures) close together with just a minimal amount of adjustment.