Error when applying colors Primavera hair [solved, sort of]

kyoto kidkyoto kid Posts: 40,937

...I keep getting the following message when I attempt tp apply a colour to Primavera  hair.

Error reading file, see log for more details.

Looking a the logfile there is this error 

Invalid hierarchy for selected node(s) and "preset_hierarchical_material" type; no root(s) found.

I can't find anything in the hair settings or the PDF manual to remedy the siotuation, so wondering if it is due to that buggered hierarchal issue (I thought that was fixed a couple months ago).  If so, how do I get around it.

Working in Daz ver. 4.12.0.47. 

Post edited by kyoto kid on
«1

Comments

  • felisfelis Posts: 4,197

    Are you selecting the character when you are applying the material?

  • kyoto kidkyoto kid Posts: 40,937

    ...no the hair itself. I even tried the each of the individual layers and still received the same error.

  • NorthOf45NorthOf45 Posts: 5,440

    Look in the preset to see what element it is looking for as the parent. Some composite hair products use the figure as the root node, i.e., #Genesis8Female. This hair was made for Genesis 8 Female, so that is probably the required root node. If so, ensure the hair is parented to the figure to ensure the proper hierarchy. If you are using it on another figure, like Genesis 3 Female, create a null called Genesis8Female (name and label, no spaces) and parent the hair parts to it. This will create the proper hierarchy without disturbing the fit.

  • kyoto kidkyoto kid Posts: 40,937

    ...I'm using it with G3F  I manually fitted it because when I applied it with autofit, the bottom half distorted badly

  • NorthOf45NorthOf45 Posts: 5,440

    So the trick with the Null should take care of it. I've done that for other hierachical presets that need a specific root node.

  • kyoto kidkyoto kid Posts: 40,937

    ..where do I find the preset?

  • NorthOf45NorthOf45 Posts: 5,440

    From the Content Library, right-click on the file and select "Browse to File Location". Edit the .duf file and search for "parent" and it should be obvious what it is. (The file might be compressed, so just open it with a compression utility and then edit the file inside). But, you don't have to change the preset file itself, we're just confirming what the root node needs to be. Just add the null to the scene (parented to the figure to keep them all together) and parent the hair parts to it. It might be faster to just try the Null first to see if it works.

  • kyoto kidkyoto kid Posts: 40,937
    edited October 2021

    ......how do I do that? When I click on the .duf file, it just opens as second instance of the Daz programme. When I open in Word Pad (the only other option) I just get a page full of gibberish. I know nothing about "editing" content files.

    Why did they have to make this so bloody arse complicated? It makes no sense. I've been working in Daz for over 13 years and never had to mess with such rubbish even when products had Poser materials.  I've never had to set up a "nuill" or edit the product file. just to apply a Mat file.  

    Post edited by kyoto kid on
  • AprilYSHAprilYSH Posts: 1,489

    NorthOf45 said:

    From the Content Library, right-click on the file and select "Browse to File Location". Edit the .duf file and search for "parent" and it should be obvious what it is. (The file might be compressed, so just open it with a compression utility and then edit the file inside). But, you don't have to change the preset file itself, we're just confirming what the root node needs to be. Just add the null to the scene (parented to the figure to keep them all together) and parent the hair parts to it. It might be faster to just try the Null first to see if it works.

    I don't have this hair but that's an interesting solution.  How about (quick n dirty workaround) just renaming Genesis3Female node to Genesis8Female to trick the hair h-mats?  

    Load G3F figure, [load the hair however you've already got working], select G3F and menu: Edit > Figure > Scene Identification
    Edit "Genesis3Female" to "Genesis8Female"

    h-mats (hierarchical) are great :) unless you are working outside the h (hierarchy) they were made for :}

    rename-node-1.jpg
    475 x 465 - 54K
    rename-node-2.jpg
    687 x 432 - 61K
  • AscaniaAscania Posts: 1,849

    kyoto kid said:

    ......how do I do that? When I click on the .duf file, it just opens as second instance of the Daz programme.

    That's why they asked you to right-click, not to click. Where you can choose to "Open with" and select a different program

    When I open in Word Pad (the only other option) I just get a page full of gibberish.

    No, it is NOT the only other option. It may be the one that is explicitly listed but you can choose a different program that is not on the list. You just have to select that option. Notepad is generally the better program to use (there a even better options out there, like Notepad++, but they would require extra installations) for that job, than WordPad. You're trying to edit a settings file, not write a letter.

    When you say "gibberish", do you mean text you don't understand or total nonsense characters? If it is the latter then the file is packed and needs to be unpacked first before you can open it for editing. Unless you have something like 7zip already installed the easiest method under Windows is to change the file extention to .zip and then extract it with Windows own function like you do any other zip file.


     I know nothing about "editing" content files.

    Then you learn.

    Why did they have to make this so bloody arse complicated?

    They didn't. It has always been this complicated under the thin veneer of useability. You just never looked underneath before

    It makes no sense.

    It does make sense. But for that you have to learn to understand what you're seeing instead of giving up.

    I've been working in Daz for over 13 years and never had to mess with such rubbish even when products had Poser materials.

    Then you're lucky or you never ventured very far, because I have been at it just as long and I had to from almost the first day.

      I've never had to set up a "nuill" or edit the product file. just to apply a Mat file.  

  • NorthOf45NorthOf45 Posts: 5,440

    AprilYSH said:

    NorthOf45 said:

    From the Content Library, right-click on the file and select "Browse to File Location". Edit the .duf file and search for "parent" and it should be obvious what it is. (The file might be compressed, so just open it with a compression utility and then edit the file inside). But, you don't have to change the preset file itself, we're just confirming what the root node needs to be. Just add the null to the scene (parented to the figure to keep them all together) and parent the hair parts to it. It might be faster to just try the Null first to see if it works.

    I don't have this hair but that's an interesting solution.  How about (quick n dirty workaround) just renaming Genesis3Female node to Genesis8Female to trick the hair h-mats?  

    Load G3F figure, [load the hair however you've already got working], select G3F and menu: Edit > Figure > Scene Identification
    Edit "Genesis3Female" to "Genesis8Female"

    That would work, unfortunately it also changes the ID for anything else you might later want to change or add to the figure, which could make it incompatible. With the Null (or Group), you don't have to worry about it any more.

    h-mats (hierarchical) are great :) unless you are working outside the h (hierarchy) they were made for :}

    Yes, sometimes the hierarchy encompasses too much. You don't need the figure to change the colour of the hair. Start the hierarchy with the hair (skull cap, or base, whatever).

    I started using H-Mats for the MFD and all it's Expansion pack items. I got tired of trying to figure out which ruffle and sleeve the outfit needed, then texturing each piece one at a time. Then if you wanted to change it... So I made some wearable presets and found that if they had a root element that was not the figure itself, but a named Group, I could load the whole outfit without having to load the figure and made some hierarchical material presets to go with it. Click-click, done.

  • WendyLuvsCatzWendyLuvsCatz Posts: 38,041

    as someone who repurposes stuff all the time, I am not fond of hierarchial poses angry

    but it seem this is the way now crying

  • NorthOf45 said:

    AprilYSH said:

    NorthOf45 said:

    From the Content Library, right-click on the file and select "Browse to File Location". Edit the .duf file and search for "parent" and it should be obvious what it is. (The file might be compressed, so just open it with a compression utility and then edit the file inside). But, you don't have to change the preset file itself, we're just confirming what the root node needs to be. Just add the null to the scene (parented to the figure to keep them all together) and parent the hair parts to it. It might be faster to just try the Null first to see if it works.

    I don't have this hair but that's an interesting solution.  How about (quick n dirty workaround) just renaming Genesis3Female node to Genesis8Female to trick the hair h-mats?  

    Load G3F figure, [load the hair however you've already got working], select G3F and menu: Edit > Figure > Scene Identification
    Edit "Genesis3Female" to "Genesis8Female"

    That would work, unfortunately it also changes the ID for anything else you might later want to change or add to the figure, which could make it incompatible. With the Null (or Group), you don't have to worry about it any more.

    h-mats (hierarchical) are great :) unless you are working outside the h (hierarchy) they were made for :}

    Yes, sometimes the hierarchy encompasses too much. You don't need the figure to change the colour of the hair. Start the hierarchy with the hair (skull cap, or base, whatever).

    You do if you need to change base hair and additonal elements, or skullcap and strands. It would be a nice feature to have Hierarchcial poses able to start from the selected node rather than the root node, but I suspect  it would also open the door to more user error so we may not  get it even if someone makes a request.

    I started using H-Mats for the MFD and all it's Expansion pack items. I got tired of trying to figure out which ruffle and sleeve the outfit needed, then texturing each piece one at a time. Then if you wanted to change it... So I made some wearable presets and found that if they had a root element that was not the figure itself, but a named Group, I could load the whole outfit without having to load the figure and made some hierarchical material presets to go with it. Click-click, done.

  • FSMCDesignsFSMCDesigns Posts: 12,722

    WendyLuvsCatz said:

    as someone who repurposes stuff all the time, I am not fond of hierarchial poses angry

    but it seem this is the way now crying

    same here. I am too a point I won't purchase a product if it is set up with hierarchy anything since i don't see the benefit of doing it that way.

  • NorthOf45NorthOf45 Posts: 5,440

    Richard Haseltine said:

    NorthOf45 said:

    AprilYSH said:

    NorthOf45 said:

    From the Content Library, right-click on the file and select "Browse to File Location". Edit the .duf file and search for "parent" and it should be obvious what it is. (The file might be compressed, so just open it with a compression utility and then edit the file inside). But, you don't have to change the preset file itself, we're just confirming what the root node needs to be. Just add the null to the scene (parented to the figure to keep them all together) and parent the hair parts to it. It might be faster to just try the Null first to see if it works.

    I don't have this hair but that's an interesting solution.  How about (quick n dirty workaround) just renaming Genesis3Female node to Genesis8Female to trick the hair h-mats?  

    Load G3F figure, [load the hair however you've already got working], select G3F and menu: Edit > Figure > Scene Identification
    Edit "Genesis3Female" to "Genesis8Female"

    That would work, unfortunately it also changes the ID for anything else you might later want to change or add to the figure, which could make it incompatible. With the Null (or Group), you don't have to worry about it any more.

    h-mats (hierarchical) are great :) unless you are working outside the h (hierarchy) they were made for :}

    Yes, sometimes the hierarchy encompasses too much. You don't need the figure to change the colour of the hair. Start the hierarchy with the hair (skull cap, or base, whatever).

    You do if you need to change base hair and additonal elements, or skullcap and strands. It would be a nice feature to have Hierarchcial poses able to start from the selected node rather than the root node, but I suspect  it would also open the door to more user error so we may not  get it even if someone makes a request.

    I started using H-Mats for the MFD and all it's Expansion pack items. I got tired of trying to figure out which ruffle and sleeve the outfit needed, then texturing each piece one at a time. Then if you wanted to change it... So I made some wearable presets and found that if they had a root element that was not the figure itself, but a named Group, I could load the whole outfit without having to load the figure and made some hierarchical material presets to go with it. Click-click, done.

    You don't have to modify the program, just ensure that there is a proper hierarchy and use some root node that is relevant to the presets. It would seem quite intuitive to expect the hair H.Material presets to apply when you select the hair. Selecting any part of the hierarchy will work, it's just the hierarchy itself has to be properly defined.

    To save an H.Mat for the hair (or anything else, for that matter), first, select the hair's root node in the scene, not the figure. If there are multiple pieces at the same level, the wearable preset should be made with one root element and everything parented to it, or make a group, or use a Null.

    Unparent the root node of the target item from the figure and then save the Hierarchical Material preset. The scope of the preset will be limited to what is under that node. If it is parented to anything, it will always look for that original root element. You can parent the hair back where you want it after.  You can apply the hair's new H.Mat Presets by selecting any part of the Hair hierarchy, regardless of what it is attached to. Same goes for clothing with Rigid Follow Nodes to be textured. They need H.Mats, but shouldn't require the figure...

    Interesting to note that when saving a wearable preset, it does not include, or refer to, the parent figure, the items themselves check for compatibility (SceneID, CompatibilityBase, PreferredBase, and all that). I suppose any programming change would involve preventing the Hierarchical Material preset from going any higher up the tree than the selected node, but I can live with it the way it is.

  • NorthOf45 said:

    Richard Haseltine said:

    NorthOf45 said:

    AprilYSH said:

    NorthOf45 said:

    From the Content Library, right-click on the file and select "Browse to File Location". Edit the .duf file and search for "parent" and it should be obvious what it is. (The file might be compressed, so just open it with a compression utility and then edit the file inside). But, you don't have to change the preset file itself, we're just confirming what the root node needs to be. Just add the null to the scene (parented to the figure to keep them all together) and parent the hair parts to it. It might be faster to just try the Null first to see if it works.

    I don't have this hair but that's an interesting solution.  How about (quick n dirty workaround) just renaming Genesis3Female node to Genesis8Female to trick the hair h-mats?  

    Load G3F figure, [load the hair however you've already got working], select G3F and menu: Edit > Figure > Scene Identification
    Edit "Genesis3Female" to "Genesis8Female"

    That would work, unfortunately it also changes the ID for anything else you might later want to change or add to the figure, which could make it incompatible. With the Null (or Group), you don't have to worry about it any more.

    h-mats (hierarchical) are great :) unless you are working outside the h (hierarchy) they were made for :}

    Yes, sometimes the hierarchy encompasses too much. You don't need the figure to change the colour of the hair. Start the hierarchy with the hair (skull cap, or base, whatever).

    You do if you need to change base hair and additonal elements, or skullcap and strands. It would be a nice feature to have Hierarchcial poses able to start from the selected node rather than the root node, but I suspect  it would also open the door to more user error so we may not  get it even if someone makes a request.

    I started using H-Mats for the MFD and all it's Expansion pack items. I got tired of trying to figure out which ruffle and sleeve the outfit needed, then texturing each piece one at a time. Then if you wanted to change it... So I made some wearable presets and found that if they had a root element that was not the figure itself, but a named Group, I could load the whole outfit without having to load the figure and made some hierarchical material presets to go with it. Click-click, done.

    You don't have to modify the program, just ensure that there is a proper hierarchy and use some root node that is relevant to the presets. It would seem quite intuitive to expect the hair H.Material presets to apply when you select the hair. Selecting any part of the hierarchy will work, it's just the hierarchy itself has to be properly defined.

    To save an H.Mat for the hair (or anything else, for that matter), first, select the hair's root node in the scene, not the figure. If there are multiple pieces at the same level, the wearable preset should be made with one root element and everything parented to it, or make a group, or use a Null.

    Unparent the root node of the target item from the figure and then save the Hierarchical Material preset. The scope of the preset will be limited to what is under that node. If it is parented to anything, it will always look for that original root element. You can parent the hair back where you want it after.  You can apply the hair's new H.Mat Presets by selecting any part of the Hair hierarchy, regardless of what it is attached to. Same goes for clothing with Rigid Follow Nodes to be textured. They need H.Mats, but shouldn't require the figure...

    Interesting to note that when saving a wearable preset, it does not include, or refer to, the parent figure, the items themselves check for compatibility (SceneID, CompatibilityBase, PreferredBase, and all that). I suppose any programming change would involve preventing the Hierarchical Material preset from going any higher up the tree than the selected node, but I can live with it the way it is.

    The parent does have to be a figure, though.

  • NorthOf45NorthOf45 Posts: 5,440

    I've tried those steps with figures, props, groups, nested groups, no problem, though I doubt many users will want to go through their existing H.Mat presets and wearables to change them. If you do make a new one for something, try it.

  • kyoto kidkyoto kid Posts: 40,937
    edited October 2021

    WendyLuvsCatz said:

    as someone who repurposes stuff all the time, I am not fond of hierarchial poses angry

    but it seem this is the way now crying

    ...same here. 

    This sort of contradicts the claim of "backwards compatibility" mentioned in the introduction of G8.  In the past there was no issue with using hair from an older or newer figure form the one being used. Until 8 and 8.1 there were no hierarchical materials  I could just fit/convert clothing or hair and use the materials ad normal without having to do a bunch of messing about..  I finally figured out how to create the Null node, parented that to the figure then after a bit of trial and error was able to parent the hair to the head so it stayed put when posing.

    However, when i applied the desired colour, I was expecting something more like what the character Merida's hair (from the film Brave) looked like, but the highlights are far too "shiny". I was almost going to return it (it is something of a resource drain as well) when on a whim I tried to see if Slosh's UHT hair shader would work, and it did,  So a lot of frustration and bother for nothing as I could have just manually fitted and parented the hair without having to bother with setting up nulls and nodes or altering the .duf file (I burned out on coding nearly 20 years ago)

    I may still return it (within teh 30 day limit) if I find the sImulation time is ridiculosuly long as I have a 4 generation old GPU. 


    @ Ascania  When I mentioned gibberish. The file was just a jumble of undecipherable characters when I opened it up.  When I tried to select another programme (notepad) I got the message:

    This file does not have a programme asscociated with it for performing this action. Please install a programme or if one is already installed, create an association in the Default Programme's control panel.

    ...which meant even more steps, making a simple job even more complicated.  It's like just needing to pound a nail into a piece of wood, but having to go through an involved process instead of just striking it on the head with a hammer.

    I don't mind using the tools provided in the programme like the Geometry Editor, for example, to create new surfaces, or delete unwanted polygons when kitbashing sets and props (simpler than going into a modelling programme). Just not into messing with the "behind the scenes nuts & bolts" of the software.

    Also when I started this I was glad to see software that actually let the user think more like an artist instead of a programmer. For years Daz has worked fine for my needs as an artist's tool just the way it is, until now.  It's almost as if it's pushing people to adopt G8 in order to use G8 resoruces which was not the case before. and as mentioned at the top of this post, sort of defeats the backwards compatibility claim. 

    Post edited by kyoto kid on
  • WendyLuvsCatzWendyLuvsCatz Posts: 38,041
    edited October 2021

    you actually can resave it uncompressed so it is editable in notepad.

    Its not all that different to how Poser had a compressed or uncompressed format so nothing new.

    My way to get around hierarchical presets is to load it all on the figure it wants then resave each thing the normal way ie a material preset, pose preset etc, is annoying but if using something again and again pays off.

    Post edited by WendyLuvsCatz on
  • NorthOf45NorthOf45 Posts: 5,440

    KK, again, it's not the base character that makes the difference, it's the hierarchy that causes the problem. I don't know how many PA's realize just how the H.Mats actually work and how they get created. Trying to edit and change the .duf file is not a good idea. There is a rigid structure that needs to be respected and mucking around in the various layers will probably cause you more trouble. I just wanted you to confirm what the actual parent is, and take the steps to get it working by manipualting the scene a little. As Wendy says, save the parts out as regular material presets, or, as I describe, save a hierarchical preset while it is unparented, and it will never bother you again.

  • AscaniaAscania Posts: 1,849

    kyoto kid said:


    @ Ascania  When I mentioned gibberish. The file was just a jumble of undecipherable characters when I opened it up.

    The file is compressed and needs to be decompressed first


      When I tried to select another programme (notepad) I got the message:

    This file does not have a programme asscociated with it for performing this action. Please install a programme or if one is already installed, create an association in the Default Programme's control panel.

    That indicates your Windows installations poo-pooed some file associations internally and messed up where it is looking for what to do. Sometimes it can be fixed by resetting the default association, sometimes it needs digging deep and cleaning up by hand.

    ...which meant even more steps, making a simple job even more complicated.  It's like just needing to pound a nail into a piece of wood, but having to go through an involved process instead of just striking it on the head with a hammer.

    ...after having grabbed a bent and rusty nail and a ball peen hammer.

    I don't mind using the tools provided in the programme like the Geometry Editor, for example, to create new surfaces, or delete unwanted polygons when kitbashing sets and props (simpler than going into a modelling programme). Just not into messing with the "behind the scenes nuts & bolts" of the software.

    Also when I started this I was glad to see software that actually let the user think more like an artist instead of a programmer. For years Daz has worked fine for my needs as an artist's tool just the way it is, until now.  It's almost as if it's pushing people to adopt G8 in order to use G8 resoruces which was not the case before. and as mentioned at the top of this post, sort of defeats the backwards compatibility claim. 

  • kyoto kidkyoto kid Posts: 40,937

    WendyLuvsCatz said:

    you actually can resave it uncompressed so it is editable in notepad.

    Its not all that different to how Poser had a compressed or uncompressed format so nothing new.

    My way to get around hierarchical presets is to load it all on the figure it wants then resave each thing the normal way ie a material preset, pose preset etc, is annoying but if using something again and again pays off.

    ....unfortunately, that only works if the figure is G8/8.1  When I first fitted the to G3, it distorted terribly, hence my having to manually parent and adjust the fit of the hair to the character.  I've done this pretty much from when first started in 3D scene building (was necessary for some freebie hairs as well as cross generational/gender, and even hair content unique to Poser characters) and never ever had an issue applying materials until now.

    Doing so preserved all the bones for movement and styling when applying Gen3/4 and Poser hair to Genesis based characters. 

  • WendyLuvsCatzWendyLuvsCatz Posts: 38,041

    you only need use G8F once to save the preset

  • AprilYSHAprilYSH Posts: 1,489

    NorthOf45 said:

    Trying to edit and change the .duf file is not a good idea.

    I've text edited mine and have worked out fine :)  After making a couple of dforce (strand) hairs where the strands have to be parented to the scalp I noticed the inconvenience of hmats when not used on the right figure, so I manually edited them since then.  Just a couple of blocks of text to search and destroy in the scene>node section.  

    NorthOf45 said:

    save a hierarchical preset while it is unparented, and it will never bother you again.

    This is even better, thanks for the idea :) TIL. I just tried it and it saved my scalp (root node) mat and the strands mat.  I was worried it would ignore the root node, but I have been used to unchecking that I suppose (since it's usually g8f!)  My scalp is a figure... did not test the case when the scalp is a simple prop.

  • kyoto kidkyoto kid Posts: 40,937
    edited October 2021

    NorthOf45 said:

    KK, again, it's not the base character that makes the difference, it's the hierarchy that causes the problem. I don't know how many PA's realize just how the H.Mats actually work and how they get created. Trying to edit and change the .duf file is not a good idea. There is a rigid structure that needs to be respected and mucking around in the various layers will probably cause you more trouble. I just wanted you to confirm what the actual parent is, and take the steps to get it working by manipualting the scene a little. As Wendy says, save the parts out as regular material presets, or, as I describe, save a hierarchical preset while it is unparented, and it will never bother you again.

    ...I feel this was a "it wasn't broke and didn't need fixing" situation.  As I don't much care for the super glossy appearance of the hair materials and am experienced using Slosh's UHT shaders which giove more control over colur, transparency, and shine, I find that a reasonable workaround. Also seem to reduce the texture load in memory as render test times were fairly reasonable. 

    Tonight it's testing dForce to see how the sim goes time wise.  If it's really, really slow.  The product page mentions sim time on an Ampere RTX 2070 (that has Tensor compute cores and better FP32/64 performance) of around 3 to 5 min, I'll enter a ticket for a refund.. 

    Post edited by kyoto kid on
  • kyoto kidkyoto kid Posts: 40,937
    edited October 2021

    ...I get into enough trouble altering texture files and accidentally having them overwrite the original when saved (particularly during long work sessions as I have short term memory issues after taking a serious fall a couple years ago).  Not about to make a similar mistake with the actual .duf file itself.

    Post edited by kyoto kid on
  • NorthOf45NorthOf45 Posts: 5,440

    AprilYSH said:

    NorthOf45 said:

    Trying to edit and change the .duf file is not a good idea.

    I've text edited mine and have worked out fine :)  After making a couple of dforce (strand) hairs where the strands have to be parented to the scalp I noticed the inconvenience of hmats when not used on the right figure, so I manually edited them since then.  Just a couple of blocks of text to search and destroy in the scene>node section.  

    Great, if you know what you are doing. Sometimes it's easy, sometimes not so much.

    NorthOf45 said:

    save a hierarchical preset while it is unparented, and it will never bother you again.

    This is even better, thanks for the idea :) TIL. I just tried it and it saved my scalp (root node) mat and the strands mat.  I was worried it would ignore the root node, but I have been used to unchecking that I suppose (since it's usually g8f!)  My scalp is a figure... did not test the case when the scalp is a simple prop.

    I've done it with rooms that have only props. Pick one piece as the root, like the floor, and parent everything to it. 

  • kyoto kidkyoto kid Posts: 40,937
    edited October 2021

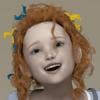
    ..OK here's the end result of the Sim tests Total time, a whopping 19m:17s for the simulation which is four times the estimate listed on the product page. 

    The first image is the results following the base simulation.

    The second is using a few of the built in movement morphs 

    The render time for both was just over 5m so at least it isn't heavy on the poly or texture side, though having created a custom hair shader with UHT may have helped reduced the texture load particularly since there is no metallicity map.

    While it looks nice, that took wya too long, much more than cloth simulation.   Until I can get an RTX GPU (whenever that may be) not going to be doing much of this.  Sad, as I got if for a really good price (5.20$) in the closing week of the PA sale on a blink sale.

    annika test A.jpg
    927 x 1200 - 280K
    annika test B.jpg
    927 x 1200 - 281K
    Post edited by kyoto kid on
  • PerttiAPerttiA Posts: 10,013

    kyoto kid said:

    WendyLuvsCatz said:

    you actually can resave it uncompressed so it is editable in notepad.

    Its not all that different to how Poser had a compressed or uncompressed format so nothing new.

    My way to get around hierarchical presets is to load it all on the figure it wants then resave each thing the normal way ie a material preset, pose preset etc, is annoying but if using something again and again pays off.

    ....unfortunately, that only works if the figure is G8/8.1  When I first fitted the to G3, it distorted terribly, hence my having to manually parent and adjust the fit of the hair to the character.  I've done this pretty much from when first started in 3D scene building (was necessary for some freebie hairs as well as cross generational/gender, and even hair content unique to Poser characters) and never ever had an issue applying materials until now.

    Doing so preserved all the bones for movement and styling when applying Gen3/4 and Poser hair to Genesis based characters. 

    G8/G8.1 hair can be fitted on a G3 with the Scene Identification trick, after which it fits and works just as it was a G3 Hair to begin with.

    Without selecting a figure first, load the hair into the scene, select the hair and go Edit->Figure->Scene Identification and change the "Preferred Base" from G8/G8.1 Female to G3 Female (the three dots will open a list of base figures) and ok/accept - Now the hair can be fitted normally to G3 with the original bone structure and functionality intact.

  • kyoto kidkyoto kid Posts: 40,937

    ...I get the same result manually parenting/fitting.  Hair (at least from my experience) is one of the easiest components to do a manual parent and fit with, and like I mentioned, I've been doing it for years so it's become "second nature". The issue here is this hierarchal rubbish we are now running into when applying texture maps.

Sign In or Register to comment.