The Darkness...
 Midyin
Posts: 221
Midyin
Posts: 221
I feel like im in here everytime i want to do a project... >_>
Anyway. I've talked 100+ times about how much i hate how IRay handle lighs. and this is the same kind of situation.
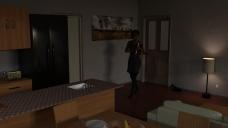
I have a scene where a woman has just come home and despite the fact that the entire wall ahead of her is a giant window with sun light shing in, and the spotlights I added to the lamps in the room, the room is still very dark... Is there a fix for this? like some way to just brighten the whole image without having to add 30 more lights?
The image is only a half-bake(30mins-ish) I just wanted to get something made to post here and show what my issue is. its 1080P, and the spotlights are set for raytracing.
Daz 3D is part of 
Connect
DAZ Productions, Inc.
7533 S Center View Ct #4664
West Jordan, UT 84084
Licensing Agreement | Terms of Service | Privacy Policy | EULA
© 2025 Daz Productions Inc. All Rights Reserved.
Comments
What kind of light are you using for the ourside light since it doesn't look like there is any? Also in the environment settings, do you have dome AND scene lighting on
Create>New Tonemapper Settings (if there isn't already one in the scene) and adjust the exposure. You can also use a ghost light (emissive object, usually a plane, with very low but non-zero Cutout Opacity to add light if Scene lights are enabled.
For the lamp shade, turn on "Translucency Weight" so that the light can pass through it like it would in real life. You will need to play around with it of course to find the best setting for your scene.
For all mesh lights and spot lights, change the "Luminance Units" to Watts as it is the easiest to use.
If you are using an HDRI for exterior lighting, go to the Environment section on the Render Settings Tab and look for "Environment Map" The default value is 2 but you can set it higher to cast more light. Also, lower down is "Dome Rotation" which will allow you to change how its casting light on the scene.
If you need free HDRIs, best place to go is here - https://polyhaven.com/hdris
- Adjust exposure or ISO in Render Settings -> Tone Mapping
- Add Ghost Lights
- Use IRAY section planes to cut away off panel walls. Apply an HDRI that more or less fits your scene, like this one.
https://www.daz3d.com/forums/discussion/comment/7048791/#Comment_7048791
If you're in a hurry, just look for part about "cm^2 Factor".
If you look on the refrigorator, you can see the greatly distorted reflection of trees and stuff(green and brown blobs), thats the dome outside. the lighting I used is the lighting that came with the appartment, and I put a couple of spot lights in the lamp shades with maxed out "Spread Angle" of 180 and ray traced shadows.
Render settings:
Environment intensity: larger number, brighter light. Available with all but "Scene only"
Shutter speed: Lower number, brighter
F/stop: lower number, brighter
Film ISO:higher number, brighter
CM^2 Factor: Higher number, brighter.
Depending on what 'look' you're going for, you could add a, or multiple, distant lights to improve the outside lighting.
For the interior, a single spot light, with it's angle set to 180, at the center of the room could work. you can also use the 'Light geometry' setting to change how the light interacts in the scene. Depending on the geometry and size you choose, this will show up in reflections and if 'in frame' will show up in the render, blocking part of the scene.