Render settings: Help me understand what's happening here.

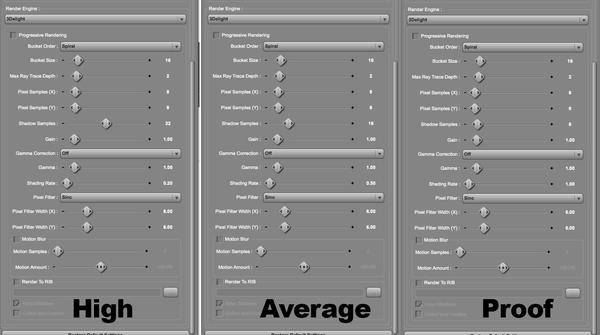
Ok, to begin, I'm using Adamr001's awesome render setting presets.
http://www.daz3d.com/forums/discussion/16085/
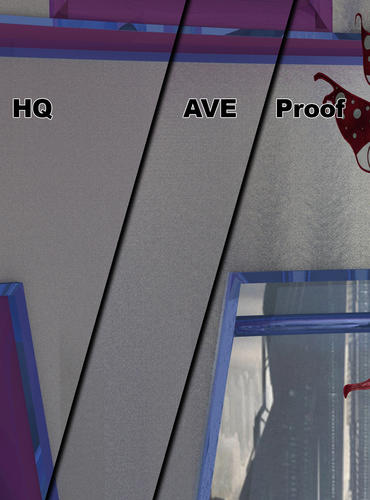
The screen shots tell the story. When I rendered a picture I'm working on, the wall in the background, with a textured chrome ..texture, to my eyes, looks better..more.. textured...in the less render settings. Why is this? I figure this is a teachable moment if someone can maybe explain why the settings are causing these results.
(the pattern shown in the proof looks to be the christmas tree that's in the picture, it repeats across the area in the proof but not in the others..it's smoothed down)
(render times between Proof and High were basically the same, while Average was about two times as much, though I was using the computer during that one, so that data is corrupt)
Daz 3D is part of 
Connect
DAZ Productions, Inc.
7533 S Center View Ct #4664
West Jordan, UT 84084
Licensing Agreement | Terms of Service | Privacy Policy | EULA
© 2025 Daz Productions Inc. All Rights Reserved.
Comments
It's because of the combination of shading rate and shadow samples.
And it's not that it looks more textured. That wall has grainy shadows in the proof and they are more smoothed out in the High quality.
Since you wanted a teachable moment, I guess I'll share what I have learned about renderman settings over the years.
Progressive Rendering
Progressive rendering will render a general outline of your image first and then start filling in details as it renders. The rule of thumb is, the more complex your scene, especially with transparency and reflective surfaces, the more time you will save on render with progressive. On really simple scenes however, this can slow you down a bit. You can also use progressive to give you a general outline of how shadows will look in the scene since it will fill the entire window with that base outline first. And as of 4.7, progressive will no longer revert your pixel filter to box.
Bucket Order and Bucket Size
When you render, the renderer splits your image off into small boxes called buckets and works on them, one at a time, in the direction you specify with bucket order. The bucket size setting just determines how big that box is. It's not that important. And really is a matter of preference, Though you shouldn't set this too low or too high. 16 or 32 is just fine for a bucket size. And bucket order is a matter of preference. You could use it to render parts of a scene earlier than the others to determine how it will look as part of a draft render. But I found that progressive works better for this.
Max Ray Trace Depth
This setting determines two things.
1. How deep into a model Light rays will go through transparent and translucent surfaces.
2. Quality of reflections on a reflective surface.
At 1, most hair and glass will look like crap
At 2-4, most transparent surfaces will look fine
At 6, you are probably getting physically correct nuances in the render that can still be determined by the untrained eye.
Beyond 6, it's probably wasted CPU cycles. Unless you are trying to do something crazy like get a perfect reflection of someones face onto a thick glass orb or something.
Pixel Samples X Y
These settings act like Anti-aliasing and there is no real way around them to get quality renders. You can fuss about with different renderman settings to get a good render detail to CPU cycle ratio but Pixel Samples do have the largest impact. Especial if your render has a lot of fine detail, or extensive bump, displacement or normal maps to mimic such. The X and Y should be equal to each other and ludicrously high settings tend to crash daz like a meteor.
General rule of thumb to follow
1-4 = Draft render
8-12 = Quality render without Depth of Field
16-24 = Quality render with Depth of Field
If you are using DoF on a camera you need to set samples to at least 16x16 to get rid of most of the grain you'll see otherwise. 24x24 might be pushing it though. Past this, there is little noticeable effect and the chance to CTD increases the higher you set it.
Shadow Samples
The higher you set this the less grainy shadows will be, to a point. This should be set like 1,2,4,8,16,32.
If your system can run modern games no problem you can leave this at 32 and forget about it entirely. Otherwise, if it's a slow system and you need a draft, then set it to like 4 or 8. Note that past 32, you are probably better off fussing with pixel samples or the dreaded pixel filter to smooth out shadows. Also, a lot of advanced lights that you can buy at the store here on Daz3d tend to have shadow samples built into the light itself. So if you have a scene using only those, you can set this to 1 and forget it. Since you will be setting the shadow samples per light.
Gain, Gamma Correction, Gamma. aka Make Daz Studio optimize images for 5 minutes everytime you touch these settings.
These settings control the brightness of your scene and how dark shadows are. In truth though, because fine tuning these settings tends to cause daz to re-optimize textures, you are better off doing that in post with gimp or photoshop.
Shading Rate
This has to do with something called micropolygons. Setting this to 1 treats each pixel as if it contained 1 polygon for purposes of light simulation. Setting it lower increases the number of polys per pixel. The real secret of shading rate is you can get away with a smaller number of micro polys with higher resolution images. So small res under 720p should be set to .10 or .20 and 4k res could get away with .50 or higher. Shading rate does have a large impact on image sharpness. So if you think the final render is too blurry then try lowering this setting in .10 increments. Also, if you want a draft render and your Computer is chugging along at 1, there is nothing wrong with setting this to 10 or even 20 to get that draft to actually render in a reasonable amount of time.
Pixel Filter
Show of hands, how many people leave this at default settings? This is probably the most misunderstood setting in the whole render settings window. So much so that I had to find documentation for it off site, for a different 3d application that used the renderman engine, to figure out what these settings do.
Ok, here is the deal with the Pixel filter. It is a sharpening or blurring filter, much like you can find in photoshop, that works on individual pixels as they are being created. So the effect is of much higher quality than what you can get using photoshop. There are different filters to use, depending on the effect you want, and they work on a grid of pixels you set in the X Y settings.
And here is a quick list I made a year ago for optimal settings of the different filters. From Least processor intensive to most.
Box Filter - 1x1: This is if you don't want to use a filter at all.
Gaussian - 2.5x2.5: Gaussian is a blurring filter that will actually let you get away with lower pixel sample and shader rate settings on renders using DoF and motion blur. The trade off is that the parts of the render that shouldn't have these effects will not be as sharp as they would otherwise be. It is however a great way to get a draft render of DoF and Motion blur that doesn't look grainy.
Catmull-Rom - 4x4: Sharpening filter that acts as a midway point between Box (no filter) and Sinc (best sharpening filter). These settings help a bit for rendering complex scenes on slower machines.
Sinc - 8x8: Best sharpening filter and the most processor intensive of the two.
Which leaves triangle. Which is slightly better than box apparently. I never use it simple because Box or Gaussian tend to get the job done for draft renders.
OOO. Thanks for posting this. Just what I needed.