Identifying items used in renders and promos

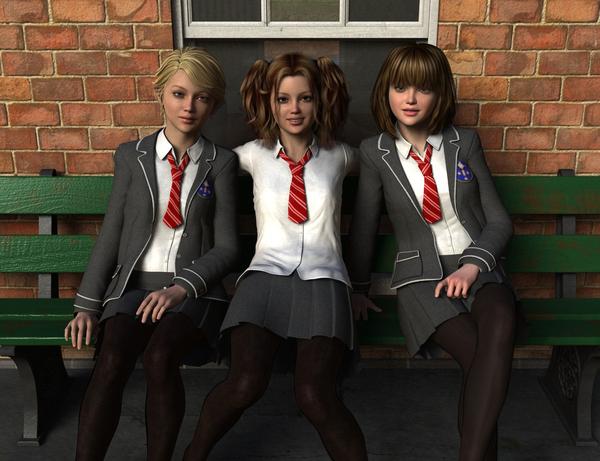
Probably a stupid question, but is there an easy way to find stuff without literally going through dozens of pages? I am currently wrestling with the issue of hair which seems to be generally expensive and difficult to find in a specific style (eg formal mature hairstyles for women). I have also been looking at the Time for School promos, for which a list of additional items is provided (which seems to be the exception rather than the rule, so thanks) but I can't find several of the hair types used in the promos. There is, for example, an image of three girls seated on a bench, one with uncertain hair, one with side ponytails which is not Josie Tails, and one with a sort of bob cut. None of these matches the styles mentioned in the additional items listing. Does anyone know what they are, or how I can find them in the catalogue, please? I have tried to upload the image with this, but in case it doesn't work I am appending the image url.
Malcolm
http://www.daz3d.com/media/catalog/product/cache/1/image/9df78eab33525d08d6e5fb8d27136e95/0/3/03-time-for-school-for-genesis-2-females-daz3d.jpg
Daz 3D is part of 
Connect
DAZ Productions, Inc.
7533 S Center View Ct #4664
West Jordan, UT 84084
Licensing Agreement | Terms of Service | Privacy Policy | EULA
© 2025 Daz Productions Inc. All Rights Reserved.
Comments
left one is Elite Ponytail http://www.daz3d.com/elite-ponytail-for-genesis-2-female-s
the rigt one is Janna Hair http://www.daz3d.com/janna-hair-for-genesis-2-female-s-and-victoria-4
Merchants on daz are usually very good about this. Just look at the notes section on the bottom of the ad in question and they give a list of stuff they used for the promo shots.
It's not like merchants on other sites that are tight lipped about what they use. To the point where they won't even link base models for texture sets they are trying to sell. :down:
What's up with the "hair" anyhow? Why don't they just have an option to include the hair with your purchase?
Almost every new figure model I purchase is because of the first impression I get from the promotional images,
and which from a humanistic standpoint focuses on the head first.
It is nice when a seller includes the names/links for items used in the promos, but sometimes it still requires some searching.
From the product store page
Dream Hair
Elite Ponytail for Genesis 2 Female(s)
Janna Hair for Genesis 2 Female(s) and Victoria 4
NJA Ponytail Hair for Genesis 2 Female(s)
Short Ponytail
Were items used in the Promos, all with clickable links from that page.
Thanks for all this. I had seen the attributions on the promo page, and looked at every one of them. None seemed to match what is shown in the image though. Janna looks better in the render than it does on site, and of course the ponytail is invisible on the Elite. It still doesn't explain the middle girl, which looks similar to, but seems very different from Josie Tails.
Finally found it. It was bothering the heck out of me because I knew I saw that hair before.
It's called Paradise Hair and it's sold on renderosity. It's a V4 hair though so that means you will have to deal with autofit shenanigans. And that hair has tails so...
Not sure what the policy for off-site links are so I won't post a direct link but it's easy enough to search on their site.
It is simple: they can't, because they don't own the hairstyles. In the example you chose, Dogz is the creator of the school uniform. And each hairstyle used is from another vendor. The trick with DAZ is that you have freedom of choice when it comes to assets unlike many other programmes that force you to use preset figures with hair, skin, clothes and so on.
You can find bundles, which let you buy several things at once, but DAZ has to approve of the selection, so at the time I'm writing this, there is no option to choose your own bundle's contents. You can, of course, buy separate pieces in the same purchase - this is what we do - but you won't retain the discount.
Thanks all, especially lorde5656 for identifying the tails - ironically, it was on my wishlist already. Dooooh!
Great helpers, though.
Just spotted this thread, yes its paradise hair for V4, good detective work - sorry i omitted it from the list, but its a rendo product so we cant reasonably expect Daz to link it :).
Anyway- It wont auto fit as its not a conforming hair prop, i loaded & parented it to Gen2F, got it to fit with scale and translate tools then ran transfer utility on it - and saved it out as Genesis 2 hair.
I do this for alot of old skool V4 hair these days as there seems to have a been a bit of a decline in vendors making hair for Generation 6. Particularly the 'NON glamour/ fantasy' variety that I like, seems to have become something of a rarity sadly.
BTW If unsure of something used in a promo its always worth dropping the vendor a PM to ask em :)
Dogz said 'got it to fit with scale and translate tools then ran transfer utility on it - and saved it out as Genesis 2 hair.'
The bit about adjusting fit I understand, but what is the transfer utility, and how do you 'save it out as Genesis 2 hair'?
Sounds useful.
I would use a smiley too, but I don't know whether I would send the wrong message!
Transfer Utility gives you a quick and dirty rig for a hair/prop or clothing item you want to make conform to Genesis / follow the body parts.
So you got your Genesis 2 loaded, and your item mesh you want to conform, loaded in DS.
Select either one in the scene tab, then click the top left button on the scene tab (the one with a little > arrow and lines)
and go, Assets / Transfer utility.
The utility loads, select Genesis 2 as the source and the item as the target. then choose an appropriate template, (follower/ hair or what ever)
Click show options 'Leave general options as they are by default, but choose a 'content type' from the list and maybe check 'add smoothing modifier' too.
Click accept and viola, you have a conforming item.
To save it, first make sure everything else in the scene (e.g Genesis 2) is hidden apart form the item you want to save.
if its hair for example save it under, Genesis 2 Female/Hair/Hair name, so its easy to find it again in your runtime.
Then go file>save as> Support asset > Figure/ Prop Asset and fill out the fields as you see fit.
Job Done, you can now load that item from your run time.
The problem with autofit is it tends to clobber the models rigging when you autofit it. Some things, like skin tight outfits, autofit fine. But if it has random bits and dongles and doodads all about that had their own rigging or just plain fit to the feet, it looks like crap. And hair with tails are notoriously destroyed.
Now the transfer utility is a plugin that transfers the rigging of one model to another. And when you make hair or clothing, you usually transfer the rig from the model you are fitting the hair or clothing onto to the hair or clothing. Makes sense. Since you want that shirt to bend with the chest properly after all. It also has an added benefit of keeping any control bones, like for tails, where they should be. As well as transferring morphs as well.
Problem is. It doesn't have the most intuitive interface and I think successful transfers work on the IFM principle sometimes. But there are quite a few tutorials out there on how to use it and it's best to learn how to if you really want to use v4 or even genesis outfits and hair with G2.
yeah its works better on some things than others, trial and error really, but when it does work its great, your right though - On properly rigged tail hair, the tails should NOT auto-follow, they should be given their own bones, but that's a whole other tutorial.
I get pretty cheesed off when i buy tail hair to find it hasn't been rigged this way. It looks particularly bad on unsupported shapes too.
But if i just need a quick and dirty conversion,for my own personal use, its fine. I can always stop the tails from following by renaming the bones/nodes. But unless you go the whole hog and re- bone them, you get lumbered with rigid gravity defying tails which is worse than auto follow distortion.
Transfer utility is basically a starting point of rigging a conforming item, but its by no means the entire process (if only it was :P).
Oh this a thousand times. I actually took the plunge and learnt how to use the weight mapping and joint editor tools because of this.
Thanks to Dogz for the quick intro to transfer utility. Like most men I am not good at reading the manuals.....
I did what you suggested for Dawn's Glam Hair, but I still only have one version, and when I tried to load it again onto Gen2 and V4/2 I still had to adjust - it fitted Dawn fine. This is an easy one to fit, so it is not to much of a problem if I wanted to repeat it, but others may need more tweaking. Am I missing something, since I didn't anywhere see a 'save as' option?
Now you're trying to confuse me more with talk of bones and nodes......
Bones and nodes are pretty much the same thing, just in different context.
When you are posing a figure and are digging through the scene tree or the drop down or just clicking on the arm. You are working with nodes.
When you are rigging the arm to bend a certain way. You are working with bones.
Of course, props are nodes that don't have bones...
Thanks. I think I understand. But can you 'change' bones/nodes or add to them, or is it only that you can move things around. have been using Josie Tails with some success, but it doesn't always want to fall where I want. In some ways it is easier to work in post-render, which I would rather avoid as far as possible if software can do it.
Nodes is for moving them around
Bones | Rigging is for adding to them or changing them.
The latter is very complex and sadly is not well documented for daz studio. It requires 3 separate tools to be used effectively. The gist of it is you use the Geometry Editor tool to select the polygons you want to manipulate then the Joint Editor to create and assign the bone that will manipulate those polys and then the Weight Map editor to determine how it deforms when you bend the bone.
There is an excellent series of video tutorials on this using a practical example on youtube
http://www.youtube.com/watch?v=8cV3VaC7eIs
http://www.youtube.com/watch?v=k52wwyv234U
http://www.youtube.com/watch?v=rIIM1oAan7o
Keep in mind it's a lot of work and you might not be able to wrap your head around everything at first, but it's the best way to deal with models that have... well frankly, crappy rigging.
If it's clothing you want to make, you probably want to start from transfer utility before you start doing custom bones and maps.
https://www.youtube.com/watch?v=7abESLvn0yg