metal and light rendering

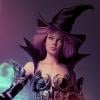
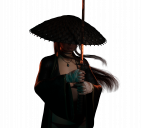
Hey everyone! I'm working on a new piece and it's my first time actually lighting my scene with spotlights (I usually add a point light just to make the textures better).
My problem is that the sword (https://www.daz3d.com/tara-outfit-for-genesis-8-females) is not rendering properly and neither is the pendant on the neckalce. Basically any metal is just made of fireflies.

Here's what I have:
1 - Iray rendering
2 - 6 light sources
3 - textures form the original products (no added shaders)
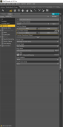
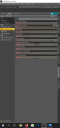
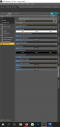
4 - render settings below (I use ones I found on this forum)

Thanks everyone! :)

Screenshot (43).png
567 x 1144 - 73K
Screenshot (66).png
563 x 1200 - 105K
Screenshot (68).png
565 x 1200 - 106K
Screenshot (70).png
571 x 1200 - 102K
test.png
3000 x 2731 - 4M

Comments

  • chris-2599934chris-2599934 Posts: 1,798

    They're shiny metal surfaces that will (at least in part) reflect the surrounding environment. Except in your case there isn't any - your girl is in a completely featureless white universe with nothing for the metal to reflect. It looks weird because it is weird, real life insn't like that.

    Maybe find an HDRI to provide the lighting instead of/as well as your spots? That would give you some reflections.

  • margravemargrave Posts: 1,822

    From my experience trying to render a trumpet, shiny metal objects look like garbage unless there's something for them to reflect. IIRC, turning off an HDRI's "Draw Dome" will still cause reflections to appear, so choose something dynamic like stormy clouds.

    Also, your render settings won't make much of a difference for fireflies unless you're using the denoiser (which I don't). Fireflies are caused by either textures being too shiny or lights being too bright (or both). Since tampering with textures can ruin everything, adjusting the lights is the safer option.

    Since you mentioned this is your first time using spotlights, some tips:

    The bigger a light is, the brighter you make it. If you change the geometry to a 100cm by 100cm rectangle with a 120 degree angle, then crank it up to a few million lumens, it'll give your character nice, even lighting. If you then turn it down to 10cm and a 15 degree angle, a swarm of angry fireflies will explode over your character, since those millions of lumens are being concentrated in a much smaller space.

    There's also beam exponent to contend with, which is a major source of fireflies in its own right. A value of 1.0 means the spotlight is evenly spread across its geometry, while 100.0 means the beam is tightly concentrated in the center and probably slathering fireflies on whatever it's pointed at.

    Use very large spotlights with wide angles and low exponents to give your whole character illumination. If you want a moody shot, you don't have to make it too bright, but it shouldn't be pitch black either (unless you like those ugly white dots all over her stomach and thighs). Then use concentrated spotlights with less lumens and tighter angles to add highlights where you need them.

  • lumiasartlumiasart Posts: 126

    margrave said:

    From my experience trying to render a trumpet, shiny metal objects look like garbage unless there's something for them to reflect. IIRC, turning off an HDRI's "Draw Dome" will still cause reflections to appear, so choose something dynamic like stormy clouds.

    Also, your render settings won't make much of a difference for fireflies unless you're using the denoiser (which I don't). Fireflies are caused by either textures being too shiny or lights being too bright (or both). Since tampering with textures can ruin everything, adjusting the lights is the safer option.

    Since you mentioned this is your first time using spotlights, some tips:

    The bigger a light is, the brighter you make it. If you change the geometry to a 100cm by 100cm rectangle with a 120 degree angle, then crank it up to a few million lumens, it'll give your character nice, even lighting. If you then turn it down to 10cm and a 15 degree angle, a swarm of angry fireflies will explode over your character, since those millions of lumens are being concentrated in a much smaller space.

    There's also beam exponent to contend with, which is a major source of fireflies in its own right. A value of 1.0 means the spotlight is evenly spread across its geometry, while 100.0 means the beam is tightly concentrated in the center and probably slathering fireflies on whatever it's pointed at.

    Use very large spotlights with wide angles and low exponents to give your whole character illumination. If you want a moody shot, you don't have to make it too bright, but it shouldn't be pitch black either (unless you like those ugly white dots all over her stomach and thighs). Then use concentrated spotlights with less lumens and tighter angles to add highlights where you need them.

    Thank you so much! I did change my spotlights to rectangular since I read it made them softer. I'll try making them larger as well and play with the lummens while lowering the intensity :) Hope that's the correct general lesson to get from your advice ^^

  • lumiasartlumiasart Posts: 126

    chris-2599934 said:

    They're shiny metal surfaces that will (at least in part) reflect the surrounding environment. Except in your case there isn't any - your girl is in a completely featureless white universe with nothing for the metal to reflect. It looks weird because it is weird, real life insn't like that.

    Maybe find an HDRI to provide the lighting instead of/as well as your spots? That would give you some reflections.

    Thanks :) I'll try that!

  • lumiasartlumiasart Posts: 126

    Thank you both! It looks much better now :) The face became too bright but I changed the environment tint and it's perfect now (not sure if that's a thing ppl do but I used the same background I'm going to use in photoshop for the environment). Also got rid of a couple of spotlights - I had way too many xD
    The rest I'll be working on Photoshop which is most definitely my strenght ^^

  • margravemargrave Posts: 1,822
    edited March 2021

    UnderlandDigital said:

    Thank you so much! I did change my spotlights to rectangular since I read it made them softer. I'll try making them larger as well and play with the lummens while lowering the intensity :) Hope that's the correct general lesson to get from your advice ^^

    To be honest, I don't think I've ever even touched the intensity slider. I believe it's a holdover from 3Delight.

    I always focus on what kind of lights I need before I worry about the lumens. If it's an ordinary domestic scene, or an outdoor scene, I'll just blast the character with 300cm by 500cm spotlights. Set the spread angle at 90 - 120 to fill the space with light, and set the beam exponent down to 1.0 to make sure it's even. Then I crank the lumens up till the lighting is nice and even.

    Sometimes I'll put point lights throughout the environment. Change the geometry to a sphere, set the radius to 200 or so, and set them at a couple hundred thousand lumens or so. As long as you keep them away from the walls, they'll create some excellent uniform ambient light to keep the fireflies away.

    In fact, recently I wanted to make a render with sunlight coming through an off-screen window. Rather than use an HDRI and try to angle the sunlight the right way, I just made a huge spotlight in the sky, cranked the size up to 2000cm, and set it to like 100,000,000 lumens. It worked perfectly. Lots of nice uniform lighting spilling into the room, and coupled with the ambient point lights I mentioned above, the scene came together exactly how I pictured it and rendered in no time at all.

    If I want to do a spookier scene, I'll do exactly the same thing as above, but turn the lumens way down and give the light a bluish or greenish tint. Give the space a nice base color of spooky ambient light. Then I'll create a smaller rectangle or disk spotlight, maybe 25cm, and aim it at the character. I might go larger if I'm mimicking a natural light source like a door or window. I'll narrow the angle so it doesn't splash on the environment too much and ruin the mood. Something like 15 or 30 degrees. If I want a very small pool of light with a hard shadow, I'll crank the beam exponent up to something like 30 or 50. Once that's done, I'll turn the lumens up, but not nearly as much as with a larger light. With a light that tight, sometimes you only need about 2000 to 5000 lumens before you get fireflies.

    Light Portal is useful when you have an HDRI you want to let into a building, say to mimic a window.

    Post edited by margrave on
  • SevrinSevrin Posts: 6,305
    edited March 2021

    It all depends on what look you are going for.  With the Tara katanas, the Iray materials give you a much darker metal than do the 3DL materials.  What you can do, if you need for the katana to stand out against a dark background, is first apply the 3DL materials, and then apply the Iray Uber shader to it, and change Metallicity from the default 0 to 1.  In the attached, the original Iray materials are on the right, and the 3DL materials converted to Iray are on the left.

    I think the hilt looks better with the original Iray materials, but if you're in a situation where the shininess of the blade is important, the hilt won't be as big a deal.  The weapon is a single material zone, so you can choose one or the other,  or else you can create create separate material zones for blade and hilt with the Geometry Editor and fiddle with the textures, if you want to go down that rabbit hole.

    Tara Katana.jpg
    1108 x 1440 - 229K
    Post edited by Sevrin on
  • lumiasartlumiasart Posts: 126

    margrave said:

    UnderlandDigital said:

    Thank you so much! I did change my spotlights to rectangular since I read it made them softer. I'll try making them larger as well and play with the lummens while lowering the intensity :) Hope that's the correct general lesson to get from your advice ^^

    To be honest, I don't think I've ever even touched the intensity slider. I believe it's a holdover from 3Delight.

    I always focus on what kind of lights I need before I worry about the lumens. If it's an ordinary domestic scene, or an outdoor scene, I'll just blast the character with 300cm by 500cm spotlights. Set the spread angle at 90 - 120 to fill the space with light, and set the beam exponent down to 1.0 to make sure it's even. Then I crank the lumens up till the lighting is nice and even.

    Sometimes I'll put point lights throughout the environment. Change the geometry to a sphere, set the radius to 200 or so, and set them at a couple hundred thousand lumens or so. As long as you keep them away from the walls, they'll create some excellent uniform ambient light to keep the fireflies away.

    In fact, recently I wanted to make a render with sunlight coming through an off-screen window. Rather than use an HDRI and try to angle the sunlight the right way, I just made a huge spotlight in the sky, cranked the size up to 2000cm, and set it to like 100,000,000 lumens. It worked perfectly. Lots of nice uniform lighting spilling into the room, and coupled with the ambient point lights I mentioned above, the scene came together exactly how I pictured it and rendered in no time at all.

    If I want to do a spookier scene, I'll do exactly the same thing as above, but turn the lumens way down and give the light a bluish or greenish tint. Give the space a nice base color of spooky ambient light. Then I'll create a smaller rectangle or disk spotlight, maybe 25cm, and aim it at the character. I might go larger if I'm mimicking a natural light source like a door or window. I'll narrow the angle so it doesn't splash on the environment too much and ruin the mood. Something like 15 or 30 degrees. If I want a very small pool of light with a hard shadow, I'll crank the beam exponent up to something like 30 or 50. Once that's done, I'll turn the lumens up, but not nearly as much as with a larger light. With a light that tight, sometimes you only need about 2000 to 5000 lumens before you get fireflies.

    Light Portal is useful when you have an HDRI you want to let into a building, say to mimic a window.

    I saw some tutorials by WPGuru in youtube and he used intensity so that's where I got it from but I do like your way better. ThinkDrawArt also has some for mesh lights and those are basically how I learned. I'll have to do some experimenting but I'll be honest - lighting scares me xD
    Thanks again!

  • lumiasartlumiasart Posts: 126

    Sevrin said:

    It all depends on what look you are going for.  With the Tara katanas, the Iray materials give you a much darker metal than do the 3DL materials.  What you can do, if you need for the katana to stand out against a dark background, is first apply the 3DL materials, and then apply the Iray Uber shader to it, and change Metallicity from the default 0 to 1.  In the attached, the original Iray materials are on the right, and the 3DL materials converted to Iray are on the left.

    I think the hilt looks better with the original Iray materials, but if you're in a situation where the shininess of the blade is important, the hilt won't be as big a deal.  The weapon is a single material zone, so you can choose one or the other,  or else you can create create separate material zones for blade and hilt with the Geometry Editor and fiddle with the textures, if you want to go down that rabbit hole.

    Oh I didn't know we could use 3DL and Iray together. I'll give that a try next time! Thank you so much! :)

  • SevrinSevrin Posts: 6,305

    UnderlandDigital said:

    Sevrin said:

    It all depends on what look you are going for.  With the Tara katanas, the Iray materials give you a much darker metal than do the 3DL materials.  What you can do, if you need for the katana to stand out against a dark background, is first apply the 3DL materials, and then apply the Iray Uber shader to it, and change Metallicity from the default 0 to 1.  In the attached, the original Iray materials are on the right, and the 3DL materials converted to Iray are on the left.

    I think the hilt looks better with the original Iray materials, but if you're in a situation where the shininess of the blade is important, the hilt won't be as big a deal.  The weapon is a single material zone, so you can choose one or the other,  or else you can create create separate material zones for blade and hilt with the Geometry Editor and fiddle with the textures, if you want to go down that rabbit hole.

    Oh I didn't know we could use 3DL and Iray together. I'll give that a try next time! Thank you so much! :)

    You don't want to mix 3DL and Uber shaders.In this case it's only the maps from the 3DL materials, but the shader is Iray Uber.  It's kind of weird that the difference is this big, and I may have missed sticking a map in somewhere it belonged, but if you want the sword bright and shiny, this is one way.

Sign In or Register to comment.