WTF? I need help?

ShawnBoothShawnBooth Posts: 465
edited September 2014 in New Users

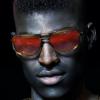
LEE 6 + Future Wilderness Pants + UberEnvironment2 (w/environment sphere, park)

EDIT
Here's a dif image...

has a key light, spec light and the uber...

uber.png
1280 x 480 - 275K
Post edited by ShawnBooth on

Comments

  • ShawnBoothShawnBooth Posts: 465
    edited December 1969

    Spec light only -

    sun_spec_only.png
    1280 x 480 - 178K
  • ShawnBoothShawnBooth Posts: 465
    edited December 1969

    Key only -

    sun_only.png
    1280 x 480 - 216K
  • ShawnBoothShawnBooth Posts: 465
    edited December 1969

    Key/spec together -

    sun_and_spec_only.png
    1280 x 480 - 229K
  • ShawnBoothShawnBooth Posts: 465
    edited December 1969

    Fill only -

    fill.png
    1280 x 480 - 180K
  • ShawnBoothShawnBooth Posts: 465
    edited December 1969

    backlight only -

    backlight.png
    1280 x 480 - 160K
  • ShawnBoothShawnBooth Posts: 465
    edited December 1969

    Fill and backlight only -

    backlight_and_fill.png
    1280 x 480 - 206K
  • ShawnBoothShawnBooth Posts: 465
    edited December 1969

    All four lights -

    all.png
    1280 x 480 - 250K
  • ShawnBoothShawnBooth Posts: 465
    edited December 1969

    All lights plus the UberEnvironment2 -

    What am I doing wrong?

    all_uber.png
    1280 x 480 - 271K
  • ShawnBoothShawnBooth Posts: 465
    edited December 1969

    I adjusted my lights and dumped the uber for now...

    no_uber.png
    1280 x 480 - 223K
  • ShawnBoothShawnBooth Posts: 465
    edited December 1969

    ANY suggestions on tweaking the skin?

  • SzarkSzark Posts: 10,634
    edited December 1969

    well with all those lights I would have used UE2 on about 30% intensity

    As for the Skin what shader are you using?

  • ShawnBoothShawnBooth Posts: 465
    edited December 1969

    Szark said:
    well with all those lights I would have used UE2 on about 30% intensity

    As for the Skin what shader are you using?

    Even with ONLY the UBER it's all screwed up though. The lights I went with are just standard lighting.

    Honestly, not sure which shader, or how to tell... I have tried playing with settings with nothing good coming of it. I'm just not sure what is actually doing what.

    Untitled.jpg
    1000 x 533 - 95K
  • ShawnBoothShawnBooth Posts: 465
    edited December 1969

    Here's just the Uber, no other lights whatsever...

    just_uber.png
    1280 x 480 - 248K
  • ShawnBoothShawnBooth Posts: 465
    edited December 1969

    I upped the Occlusion Samples to 300...

    This is just UBER -

    just_uber_fixed.png
    1280 x 480 - 205K
  • SzarkSzark Posts: 10,634
    edited December 1969

    First lets deal with UE2, Did you apply one of the presets to UE2 or just leave it White? And by the looks of your images it doesn't look like you applied a Quality Preset either. ;) Here is a great UE2 tutorial http://www.daz3d.com/forums/discussion/5320/

    Next select the figure and go in to the Surfaces Pane, select a skin surface and look at the top of the pane it will tell you what the shader is. It could be AOA SSS shader but not having this figure I don't know. The first adjustment would be Specular and check to see if Reflection is off or at best really low. Given it will be a preset that comes with the figure I would say reflection will be OFF. But again I don't know. The other setting I would look at is Diffuse Strength, lowering it should help but it does depend on what setting it is on and adjusting it may have an effect on the Subsurface Scattering. If it is AOA SSS shader base then AOA has a nice Tutorial in the store you may want to get.

  • SzarkSzark Posts: 10,634
    edited December 1969

    Occlusion samples only needs to be 128 max. Another thing to take a look at for Quality is in the Advanced Render settings, Shading Rate. When usinh UE2 this should be set to 0.20 or lower. Yes lower is better quality. This is not to be confused with UE2 Shading Rate, that doesn't need to be that low. Use the Quality Preset 4X in your Library and adjust the render setting and you should be fine for quality.

  • ShawnBoothShawnBooth Posts: 465
    edited December 1969

    Here's my lights plus uber -

    uber_plus_lights.png
    1280 x 480 - 215K
  • ShawnBoothShawnBooth Posts: 465
    edited December 1969

    Szark said:
    Occlusion samples only needs to be 128 max. Another thing to take a look at for Quality is in the Advanced Render settings, Shading Rate. When usinh UE2 this should be set to 0.20 or lower. Yes lower is better quality. This is not to be confused with UE2 Shading Rate, that doesn't need to be that low. Use the Quality Preset 4X in your Library and adjust the render setting and you should be fine for quality.

    Okay - Thank you for the info. Let me apply your knowledge.

    As for skin shader - I posted a pic of what is in there... Really have no clue though.

  • ShawnBoothShawnBooth Posts: 465
    edited December 1969

    Based on your info -

    szark_info.png
    1280 x 480 - 247K
  • ShawnBoothShawnBooth Posts: 465
    edited December 1969

    I used this with UBER... No good?

    uber.jpg
    1000 x 534 - 234K
  • ShawnBoothShawnBooth Posts: 465
    edited December 1969

    Here's changing from the HDR KHPark to the 4XHi...

    eh... Looks better with Park IMO -

    szark_info_w_4x.png
    1280 x 480 - 251K
  • SzarkSzark Posts: 10,634
    edited December 1969

    exumbra23 said:
    Szark said:
    Occlusion samples only needs to be 128 max. Another thing to take a look at for Quality is in the Advanced Render settings, Shading Rate. When usinh UE2 this should be set to 0.20 or lower. Yes lower is better quality. This is not to be confused with UE2 Shading Rate, that doesn't need to be that low. Use the Quality Preset 4X in your Library and adjust the render setting and you should be fine for quality.

    Okay - Thank you for the info. Let me apply your knowledge.

    As for skin shader - I posted a pic of what is in there... Really have no clue though.Ok but you didn't click on a skin surface to show what the shader is. :P See my image below. If you click on Skin it will select all the skin surfaces in one go and let you adjust them in one go.

    AOA_copy.jpg
    504 x 894 - 239K
  • ShawnBoothShawnBooth Posts: 465
    edited December 1969

    Szark said:
    First lets deal with UE2, Did you apply one of the presets to UE2 or just leave it White? And by the looks of your images it doesn't look like you applied a Quality Preset either. ;) Here is a great UE2 tutorial http://www.daz3d.com/forums/discussion/5320/

    Next select the figure and go in to the Surfaces Pane, select a skin surface and look at the top of the pane it will tell you what the shader is. It could be AOA SSS shader but not having this figure I don't know. The first adjustment would be Specular and check to see if Reflection is off or at best really low. Given it will be a preset that comes with the figure I would say reflection will be OFF. But again I don't know. The other setting I would look at is Diffuse Strength, lowering it should help but it does depend on what setting it is on and adjusting it may have an effect on the Subsurface Scattering. If it is AOA SSS shader base then AOA has a nice Tutorial in the store you may want to get.

    It is AoA_Subsurface...

  • SzarkSzark Posts: 10,634
    edited December 1969

    Park is the Light Preset which applies a light map to UE2 and 4 x is the quality setting so use both. ;) Now lower the light intensity of UE2 to 30%.

    UE2 is what we call Image Base Lighting (IBL) which uses a map (image) to light your scene. It extracts lighting information from the map so different maps will give different lighting. The Park preset has a bright spot representing the sun, blue sky and green grass. So you will get a white light from the sun, blue from the sky and green from the grass.

  • ShawnBoothShawnBooth Posts: 465
    edited December 1969

    Szark said:
    Park is the Light Preset which applies a light map to UE2 and 4 x is the quality setting so use both. ;) Now lower the light intensity of UE2 to 30%.

    UE2 is what we call Image Base Lighting (IBL) which uses a map (image) to light your scene. It extracts lighting information from the map so different maps will give different lighting. The Park preset has a bright spot representing the sun, blue sky and green grass. So you will get a white light from the sun, blue from the sky and green from the grass.

    Got it. Thank you so much for your help. I'm gonna have to check that tut out.

  • SzarkSzark Posts: 10,634
    edited December 1969

    exumbra23 said:
    Szark said:
    First lets deal with UE2, Did you apply one of the presets to UE2 or just leave it White? And by the looks of your images it doesn't look like you applied a Quality Preset either. ;) Here is a great UE2 tutorial http://www.daz3d.com/forums/discussion/5320/

    Next select the figure and go in to the Surfaces Pane, select a skin surface and look at the top of the pane it will tell you what the shader is. It could be AOA SSS shader but not having this figure I don't know. The first adjustment would be Specular and check to see if Reflection is off or at best really low. Given it will be a preset that comes with the figure I would say reflection will be OFF. But again I don't know. The other setting I would look at is Diffuse Strength, lowering it should help but it does depend on what setting it is on and adjusting it may have an effect on the Subsurface Scattering. If it is AOA SSS shader base then AOA has a nice Tutorial in the store you may want to get.

    It is AoA_Subsurface...Ok now look for the Specular channel as see what setting it is on. Try lowering it and test but if it is low already then try lowering the Specular light instead. Most of the time when making scenes you will need to adjust either lights or surface or both. There is no one set of settings that will suit every figure or scene. Yes a lot of test renders to be done. But as time goes by the number of tests you do should diminish.

  • SzarkSzark Posts: 10,634
    edited December 1969

    exumbra23 said:
    Szark said:
    Park is the Light Preset which applies a light map to UE2 and 4 x is the quality setting so use both. ;) Now lower the light intensity of UE2 to 30%.

    UE2 is what we call Image Base Lighting (IBL) which uses a map (image) to light your scene. It extracts lighting information from the map so different maps will give different lighting. The Park preset has a bright spot representing the sun, blue sky and green grass. So you will get a white light from the sun, blue from the sky and green from the grass.

    Got it. Thank you so much for your help. I'm gonna have to check that tut out.my pleasure and yes check it out as it is worth it. But trust me don't try a learn about it all in one go. There is a lot to take in and may addle the brain. :) I was there once and it took me a bit to get my head around it all.

    Ok since it is now 3.30 AM I am off to bed. So any more q's I will answer them tomorrow, unless someone else steps in. I also have a few tutorials listed in my render thread (link in my sig) that you might want to take a gander at a later date.

  • ShawnBoothShawnBooth Posts: 465
    edited December 1969

    I'm very much aware that settings vary per scene/project/etc. I'm just new to 3D and trying to get a grasp of things. For example, SSS - I have no clue where to begin but I keep playing with it.

    Finally achieved something I really like (skin wise). Thank you for your assistance -

    final.png
    1280 x 480 - 252K
  • Cris PalominoCris Palomino Posts: 11,673
    edited September 2014

    I would recommend you render from each of the lights. Take them to Photoshop and layer them over each other. You can do a base layer of black. Set all layers to screen. Now you can play with the blend modes, opacity, etc, and have greater control over the lighting from each of the lights. This includes lights set only to specular, etc. You can even intensify light by doubling a layer or using a layer mask to add or delete from specific areas.

    Post edited by Cris Palomino on
  • ShawnBoothShawnBooth Posts: 465
    edited December 1969

    I would recommend you render from each of the lights. Take them to Photoshop and layer them over each other. You can do a base layer of black. Set all layers to screen. Now you can play with the blend modes, opacity, etc, and have greater control over the lighting from each of the lights. This includes lights set only to specular, etc. You can even intensify light by doubling a layer or using a layer mask to add or delete from specific areas.

    Mahalo Chris - I'm actually playing with that technique now :)

Sign In or Register to comment.