Make a prop posable
 kaotkbliss
Posts: 2,914
kaotkbliss
Posts: 2,914
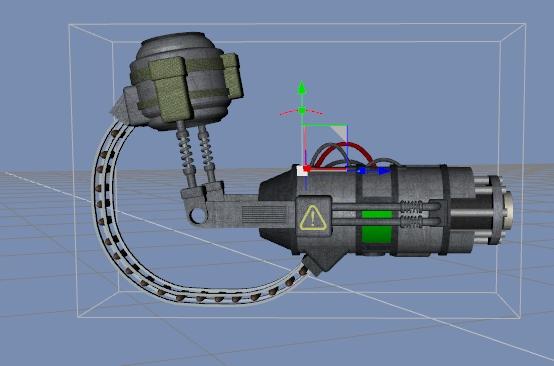
I found this item through the Freepository section of the forums, sent it to Hex and removed some parts of the model I don't want. It looks great but the model is all 1 piece and not posable.
How would I go about making it able to bend and twist at the joint?
I've tried reading through a tutorial on a wiki page, but it's all greek to me and they keep linking back to previous tutorials for refrence on other things.
FBG.jpg
554 x 366 - 88K
Daz 3D is part of 
Connect
DAZ Productions, Inc.
7533 S Center View Ct #4664
West Jordan, UT 84084
Licensing Agreement | Terms of Service | Privacy Policy | EULA
© 2025 Daz Productions Inc. All Rights Reserved.
Comments
You would need to create several groups at the joints and then rig that in DS
Ok, so starting with the first part, what do you mean by creating groups and how would I do that?
*edit*
I think I should mention that when I go to the surfaces tab for the object in Daz, it does have different parts that can be colored separately.
Not sure what that means for making the object posable, but it may mean something.
Here's the readme which has a website if someone wishes to have the object to help me through this (but mind you I don't have poser it's on page 10 of the sparky uk website)
MrSparkys - FBG - (C) MrSparky - October 2013.
--------------------
DESCRIPTION OF MODEL
--------------------
The FBG - Flipping Big Gun - is a traditional sci-fi weapon.
Presented as a static poser prop, scaled to Dawn. Though can be used on any poser figure from Daz's A3 to VP's Vincent Parker. Even fits some toon characters!
Load your figure then load the FBG prop. Dial the prop to the desired arm, adjust the arm so it fits the gun. Hide the hand and fingers, then simply parent the gun to the figure.
If any advanced users wish to make the prop a figure, theres 3 groups within the OBJ, all pretty obvious how it should work.
-----------------------------
COPYRIGHT/OWNERSHIP STATEMENT
-----------------------------
Made by MrSparky.
-------------------
SYSTEM REQUIREMENTS
-------------------
Poser 4 or Higher.
No other files are required.
Not tested in studio.
--------------------
INSTALLING THE FILES
--------------------
Unzip this zip file into your Poser directory using paths.
---------------------
HOW TO LOAD THE MODEL
---------------------
1. Load Poser.
2. Open the Props library.
3. Locate the Sparkyworld folder.
4. To load the model double click on the icon(s) named:
FBG
---------------------
USEAGE TIPS
---------------------
See Top Of Readme.
-------------------------
OTHER FILES IN THIS PACKAGE
--------------------------
..\Runtime\
License.txt - Please take some time to read the licensing terms.
Readme_FBG.txt - this file.
FBG_Sample.jpg - sample image of these models.
..and some other stuff that I'm too bone idle to list.
----------------
NEED SOME HELP?
----------------
Visit : http://www.poserdirect.com or http://www.sparkyworld.co.uk
I've managed to mostly figure it out. I've at least got it to bend at the joint using the x,y,z rotation using this tutorial (https://www.youtube.com/watch?v=N56wo8iHM-Q)
I would like to eventually get parts to spin (like the gun barrels on the front) and fit to characters (like clothing where the upper part will move with the shoulder and the lower part move with the Forearm) However, for now I will just parent it with the shoulder and manually line up the forearm for poses.
I do still have a problem though, there's a lot of "inside" parts that I can't get to, to weight map to the forearm bone. so they aren't moving with the rest of the forearm of the gun like I want. What's the best or easiest way to fix this?
*edit*
for clarification
Ok, so I'm making some progress. I've got the forearm to rotate without the insides pulling out (That took a lot of work) and I'm now creating separate bones and groups for the ammo belt as it was all part of the shoulder piece so it would slice through the forearm piece when rotated.
Now I'm not finished with the ammo belt bones and groups yet but I've started them from the end of the forearm bone (the barrel of the gun) and am working my way back up to the shoulder piece. When I get to the shoulder piece, how would I connect that bone to the shoulder bone so that the top of the ammo belt would stay connected to the shoulder piece? (almost like a loop)
There's not much response so maybe this thread would be better in another section?
In Google, I typed in "joints and rigging in daz studio" and got a lot of very good links. Try that :) I haven't messed with it yet or I would be happy to help you. There appears to be some good YouTube videos.
I attempted to google some tutorials before, but I just couldn't understand the ones that I found. I did find the one video I linked above which has allowed me to at least move parts of the prop, but it just still isn't quite right.
the bone structure goes: Control bone from the top shoulder piece to the elbow, Child bone from elbow to barrel of the gun, then 7 children bones linked from the barrel of the gun but starting at the ammo feed at the back of the gun following the belt back up to the shoulder harness.
I can rotate the gun at the elbow now (couple artifacts I just saw that I'll need to go find and weight map to the correct piece) and I can rotate the joints in the ammo belt
But because the 7th bone isn't connected to the shoulder bone, when I bend the gun, I then have to go back and try to adjust the ammo belt so it lines up at the end.
Is there a way to "attach" the top of the ammo belt to the shoulder harness so when I bend the elbow, the bones for the ammo belt move automatically to keep the start and finish of the belt connected to their spots?
Also I don't think I was supposed to use a control bone because I tried to parent the gun to a shoulder, but it doesn't move with the figure :(
So close, yet so far
Um, I wouldn't try making this more complicated than need be. As was said in the information, the item is already grouped. Load it in the Figure Setup, legacy rigging, adjust the directions for the bones and create the figure. Use the joint editor to make minor bone adjustments such as for the twist factor. Colour it as desired and export out the new .cr2 file.
Prop figures do not 'fit to' any figure. Once created, they are 'parented' to an appropriate figure part.
I'm not sure if that would work. The different groups I was seeing are separate mat zones (I think that's what they are called) There are no actual separate pieces on the object so I would still have to manually assign the surfaces to bones.
So I'll need to convert it to something other than prop figure to be able to parent it? I'll keep playing with it and see what I can come up with.
Yes it works fine. I had tried this quickly you know before saying so.
But ... you have to use the FigureSetup Tab ... not the loading dock for starters.
And set it for legacy rigging.
After getting it made with the bones in the right direction, then on the created figure, use the joint editor tool on the object created in the loading area ... and then export that out as the .cr2 file.
Basic legacy rigging works fine this way.
For legacy rigging that is more complex as in for clothing items is more complex but still doable.
Ok I have the model weight-mapped rigged (I guess that's what you call it) and it works, but is a very manual process for posing and lining up with the person's arm and getting the ammo feed to line up.
So now I want to try it your way and see if the finished product works better. However, I am totally lost and have yet to find a good tutorial I can follow (I'll keep digging in the meantime)
So far I have opened the object in Daz, opened the figure setup tab, selected "Parametric (legacy rigging)" for the rigging type and "Prop/Arms" for the content type. And now I don't know what to do next :(
I'll keep looking
*edit*
Many of the tutorials I'm finding I have to skip over as the models they are using have different "regions" such as with a Daz figure where you can hover the mouse over the forearm and it highlights, or the chest and it highlights, etc.
I can't do that with this model as it's not broken up into different regions. The only selectable piece is the entire thing unless you go into the surface tab, then it has different areas for different textures (Not sure how they did that)
regions are not a factor for this ... I have a tutorial for legacy rigging of sets in my DA Gallery [patience55anotherone] ... very basic one. I don't recall going into grande detail for directions of side to side, etc. so may take a closer look at this item for rigging.
But let's start with the "item as is" before you start cutting off pieces, okay.
Fair enough, you're the teacher :)
How do I view your gallery, I can't seem to find it.
*edit*
DA = Deviant Art lol
no wonder I couldn't find it on Daz...
;-) yeah ... all kinds of stuff over there. I'll also fav other people's tutorials 'cause there are many people who know lots of stuff :-)
Here's a basic what I did today ...
And we discovered that the bullet must be a separately created prop or figure. I chose a figure .cr2 so we can pose that along with the gun.
some more pics ...
Remember, "PowerPose" is your friend when rigging. All one really needs to do with it is "reset pose" :-)
And the last two images ...
Thank you Sparky, this is a neat great big gun alright :-)
Thank you so much for this :) it will definitely help a great deal and looks easy to follow!
You're welcome, have fun :-)
oooo, this seems to be working for the one I broke apart in Hex (I was able to separate the gun barrel from the forearm gun piece so that it could be rotated like a gatling gun)
I'm aligning all the bones right now :)
Ok, so it's ben a couple days
What I ended up doing was first setting up the legacy rigging, but that would twist up the forearm piece when I tried to rotate the barrel
So I ended up doing a combination. I used the first part of your tutorial to bring all my pieces over into Daz, then parented the items in the figure setup. Instead of choosing legacy rigging though, I chose the weight-map rigging.
I then aligned all my bones and weight mapped the pieces of the gun to the correct bones :)
The final product?
My motion blur skills are still a bit lacking but it should look at least a little like the gun barrel is spinning around as it's firing :)
Well that's an interesting derivative, glad you got something working for you.
[and here I was thinking it was just for shooting off that one big bullet! - goes to show what I know about guns lol ...]
Yes
Thank you for all of your help! I sure did learn a lot :)