Lighting
 Gemini Queen
Posts: 263
Gemini Queen
Posts: 263
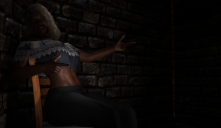
I've been using the prgram for a couple of months now for laughs and giggles, but now I'm getting down into the nitty gritty of things. I'm getting better at posing, but my renders are coming out dark, or with the default lighting option. I'm trying to get a handle on how to set up the lighting so it doesn't look like they're sitting in a basement. I looked on Youtube and saw a couple of basic tutorials, but nothing as in depth as what I'm looking for. If anyone could give me the rundown on how to use the lights, or point me in the direction of the tutorial here on Daz for lighting, that would be great.

Daz 3D is part of 
Connect
DAZ Productions, Inc.
7533 S Center View Ct #4664
West Jordan, UT 84084
Licensing Agreement | Terms of Service | Privacy Policy | EULA
© 2025 Daz Productions Inc. All Rights Reserved.
Comments
If you're using iray, try from the top menu, select "create" > "new spotlight" > then a new window will appear, select "perspective" and this will put a spotlight directly into along the path of your perspective view. A spotlight will appear in your Scene named spotlight if you kept the default name. You can then select this spotlight and change the luminance (just increase the numerical value) and brighten whatever that spot is pointed at.
I tend to stay away from spotlights since they can cause harsh light and take longer to render. I like using plane emitters, They are easy to set up and pretty versatile. Just go to the top and create a new primitive - plane - 1 division - whatever size you want (the smaller the size, the more specular you get). The select the surface and apply any iray light shader, the go into the surfaces tab and adjust the temperature and luminance.
Ghost lights are great also, but don't give much specular on metal or shiny objects.
this free light set is pretty versatile and works great http://www.valzheimer.info/2016/11/va2016-rgb-hdri-soft-lights-for-daz.html
- It looks like you' might be working with the Auto Headlamp, which is on by default. I recommend always switching it off, because 1) it doesn't look great most of the time, and 2) you have very little control over it in terms of brightness, colour, and light temparature.
You can switch it off under Render Settings -> General.
- It also looks like you're rendering an actual interior scene, which is to say, your character is completely surrounded by walls/ceiling/floor. IRAY is not good at that. It's better to fake interiors by removing off-panel walls and let the surrounding light in.
Most sets let you delete walls or make them invisible. You can also research IRAY Section Plane Nodes, a handy tool to remove unwanted walls.
Once you get rid of some of your walls, your scene may be flooded with too much light, which is all coming from the surrounding HDRI. The default HDRI is a blurry outdoor environment called DTHDR-RuinsB-500. You can find it under Render Settings -> Environment -> Environment Map.
Replace the outdoor HDRI with a more appropriate indoor one. Here's a free one that might fit your scene: https://hdrihaven.com/hdri/?c=indoor&h=mutianyu
You can rotate your HDRI (Render Settings -> Environment -> Dome Rotation) and you can adjust its brightness (Render Settings -> Environment -> Environment Intensity)
- I recommend always starting with a good HDRI, then refine your result by setting up additional lights. You can do emissives, like FSMCDesigns describes. I also find Point Lights useful. What you need to know about Point Lights is that in IRAY, you need to leave Intensity alone and regulate its brightness with Luminous Flux (Lumen). You might need to turn up the lumen quite a bit, the default brightness is quite low.
I tend to stay away from Point Lights and Distant Lights.
- Lastly, it's worth looking into Render settings -> Tone Mapping. There's a lot going on here, but my extremely short explanation is: Film ISO is at 100 by default, which is good for outdoor renders. For indoor renders set it to 200-400. Do this before you fine tune all your lights!
Hope at least some of that was useful to you! Good luck!
You can dial the harshness down by using the Geometry setting on the Spotlight. Just switch the setting from Point to Disc (I use this one most often) and decide on a Diameter size (I think it's measured in centimetres).
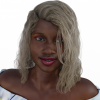
So, I went back and adjusted the Luminous Flex like you said, and it made a world of difference as you can see. Before, all I was changing was the intensity of the light, thinking that would be it. I still want to go through what the other people were suggesting to see what looks the best. But thank you so much for that, cause I was just going to keep messing up the settings for ages.
I'm was trying to figure out how to use the Primitive Plane, and I'm not having a good time firguring that part out. It sounds inmportant, so do you know of a tutorial video or text document somewhere on the web where I'd be able to learn more about how to do that? If you don't mind explaining it, that would be cool too. Thanks.
So, I went ahead and changed the render settings like you said, and it brought about quite the result, but I dind't mess with the dome settings or the environment settings. As for the walls, I'm a little lost on what you're saying. I know that I can remove them from the shot using the Parameters tab on the right and make them not visible in the render, but I'm lost on what more I should be doing with it. If you had anymore clarity or a tutorial online that I could read, I'd appreciate that. Thanks.
Yes, that's what was wrong. The Intensity parameter is only for 3Delight-mode lights, if you're doing an Iray render you must use Luminous Flux instead.
I wonder if it would be worthwhile to put in a feature request — as it is now, changing the render engine setting (in the Render Settings pane) from 3Delight to Iray turns on the Photometric Mode parameters on your scene lights that are used in Iray. Would it be possible to also hide the Intensity parameter?