I cant understand a step in this tutorial
 halfmast88
Posts: 63
halfmast88
Posts: 63
Im trying to follow a tutorial on how to make custom faces for Daz models using Daz studio/Hex/and photoshop (Gimp in my case). I Should probably just quit now because I'm only on step 3 and it make no sense to me whatsoever. Here is an excerpt from the tutorial. The whole thing can be found on deviant art here: http://deslea.deviantart.com/art/Tutorial-Lookalike-Faces-in-Daz3D-and-Hexagon-426158536.
Step 3: Set Up Your Workspace
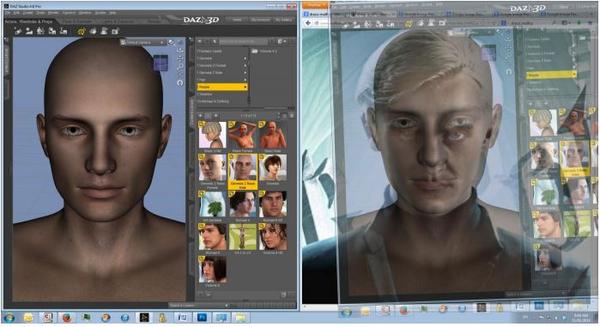
Your workspace consists of: Daz on one half of your screen with your base figure loaded, your browser on the other
open to your full-frontal picture, and Photoshop open in the background. Use your Default Camera and zoom and
angle on your base figure so that the view is a very close match for your reference image (this much I understand).
Take a screenshot of your workspace and paste it into a new document in Photoshop. Paste another copy of the
screenshot, make it semi-transparent(1), layer the figure over the photo to check your angle, and correct your zoom
and angle on your base figure if necessary (2). You want the head lengths to exactly match, because this grounds your
other measurements. (ie, the head length is the same on your figure view and your picture).
1. If i have a picture why am i screencapping anything? I made a semi transparent image in Gimp by selecting the photo from the layers pane and sliding the opacity down to about 50%, flattened the image and then saved it.
2. I now have a semi transparent photo, but the back of gimp isn't transparent and cant be successfully layered over anything. Do i somehow open it as a template in daz? is there some way to make the whole of gimp transparent? Am I missing something completely? Whats going on? I would normally google a problem like this but there isn't even enough information to know what to google.
Can someone kindly list the steps containing enough information for me to figure out? I have included an equally unhelpful photo from the tutorial, but maybe someone else can make some sense of it? Thanks in advance
Daz 3D is part of 
Connect
DAZ Productions, Inc.
7533 S Center View Ct #4664
West Jordan, UT 84084
Licensing Agreement | Terms of Service | Privacy Policy | EULA
© 2025 Daz Productions Inc. All Rights Reserved.
Comments
the best way is to actually use the layered image editor after fitting your photo to the template for the face
http://docs.daz3d.com/doku.php/artzone/pub/tutorials/textures/misc-text10
http://docs.daz3d.com/doku.php/artzone/pub/software/lie/start
the template is a UV coordinate reference for the model
these are found in a link for each figure in the store
you can then dial in morphs to match the face,
buy facial morphs and look for freebies on shareCG
http://www.daz3d.com/morphs/genesis-evolution-head-morphs
http://www.daz3d.com/morphs/genesis-head-morph-resource-kit-4
http://www.daz3d.com/morphs/ethnicity-for-genesis-bundle
http://www.daz3d.com/morphs/handsome-head-morphs-for-genesis
free
http://www.sharecg.com/v/58198/gallery/21/DAZ-Studio/DieTryings-182-V4-Morphs-for-Genesis?interstitial_displayed=Yes
Thanks for the links it looks like there is some good information there i can use, but my question was how do i fit a photo to the template for the face? Do I use one of the skin maps included with the daz character? Where specifically in Daz do I Upload the template (the transparent photo i made right?) into daz is it the diffuse color, ambient, opacity? Is it actually applied to the surface of a daz model or is it somewhere different for templates?
I use gimp but same as Photoshop etc
You import the template and you photo as layers
Resize transform skew the photo to fit the template
Export that layer as an image
You can use LIE to layer it over an existing skin
You can for your own renders do this in gimp or Photoshop too
To redistribute you need a merchant resource skin and must be sold not given away
Unless you create your own skin or use a redistributable skin texture
You would have been better to ask this on the comment page for the tutorial instead of on a completely different site. I only stumbled across this thread by chance, whereas I get notifications on DA.
The idea of step 3 is to organise your screen to give you a basis for direct one-on-top-of-the-other comparison. While some side-by-side work is necessary for a lookalike, if you put two things side by side, as your only basis for comparison, you'll never get a really good match. This is because our ability to compare for tiny size variances is not very good. In other words, if you look at your in-progress morph of Genesis 2 beside a photo, you'll never know if the thing that isn't quite right is the nose is a fraction too big or the eyes are a fraction too high or whatever. Our eyes are just not precise enough for that. To compensate for that problem, the idea is to have half of your screen open on Daz (the left side of the screenshot) and the other half on Photoshop (or Gimp, or whatever) to be a place to do ongoing overlay comparisons (as well as side by side work).
So just to be clear, the right hand side of the screen in the screenshot is not part of Daz. We're not laying Gimp over Daz, or anything else. The layering is two different screenshots - the reference picture and the current state of the morph. It's all within Gimp. The only reason it looks like two different programs overlaid is because I was using a zoomed web source in that instance - that is, the screenshot of the reference picture includes browser buttons.
(To pick up on a misunderstanding elsewhere in this thread caused by seeing the screenshot out of context, we're also not pasting a texture onto Genesis. The tutorial doesn't cover textures. It's strictly about morphs).
The idea is to have Daz on one side to make your morph. The other side is Gimp with your reference picture, so you can look at it as you go, and also for overlay comparisons from time to time. Every so often you take a screenshot of Daz, go into Gimp, and paste it as a transparent layer over the top of your reference picture, so you can identify the tiny problems (the nose being a fraction too small, etc) - the tiny mismatches we can't identify just looking side by side and we need to see in overlay.
The fine detail of the step is talking about lining up a dedicated camera that matches the angle and size of the reference picture so every screenshot is the same. Otherwise you'll make little moves and then you'll be re-doing the same comparisons at different angles.
Thanks for answering you cleared it all up for me.