How to add Navel details to Erika HD by lyoness

Only a NoobOnly a Noob Posts: 37

I got this product

Erika HD & Brickhouse Beauty Morphs for Genesis 8 Female


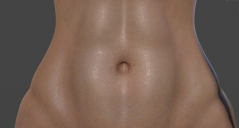
but it has a flat navel and its not realistic as you can see in the image.  I then checked my other characters navels and they have better navels like they have sort of dark texture inside navel like a line or something.

How do I make it better, can you guys guide me?
Untitled.png
2237 x 1196 - 3M
Post edited by Only a Noob on

Comments

  • So you want to bake the shadowing onto the map? I dislike that, but if you use a template resized to match the tecture you can use it as a guide to use the burn tool in your image edior, with a soft brush, to darken a copy of the map.

  • fastbike1fastbike1 Posts: 4,077

    @Only a Noob

    Have you checked your lighting? You won't get a shadow in Iray unless the lighting angle casts one. Your example looks like the main lighting is direct from the front. If you look closely, you can see that there is a shadow at the top of the navel.

  • fastbike1 said:

    @Only a Noob

    Have you checked your lighting? You won't get a shadow in Iray unless the lighting angle casts one. Your example looks like the main lighting is direct from the front. If you look closely, you can see that there is a shadow at the top of the navel.

    No this is just a refernce image whereby I purposefully did the lighting this way to show inside the navel. Look at the attached pic in this comment and compare it with the above. You can see the difference, thats what I am talking about, Flat vs realism

    Untitled.png
    1648 x 1036 - 2M
  • The OP is trying to say that there's no color variation on the torso texture for the area within the belly button. It just looks like a pit without any detail. In a situation like this where you want more detail, you can either use a different skin, or you can opt to give the belly button a different shape to hide the concave area more. The G8F body morphs has a morph "Navel Horizontal" that I use if I desire a certain kind of vertical aspect to it. Go to Shaping tab --> Waist --> click the cog-wheel looking thing on the top right side of the Navel Horizontal box, select Parameter Settings, and uncheck the Use Limits box. Then I would just dial in a negative value, which would hide the pit area more and tighten it up horizontally. I've used Navel Vertical morph, but I like the results I get from using negative values with Navel Horizontal in conjunction with the other Navel morphs. 

  • FSMCDesignsFSMCDesigns Posts: 12,754

    The OP is trying to say that there's no color variation on the torso texture for the area within the belly button. It just looks like a pit without any detail. In a situation like this where you want more detail, you can either use a different skin, or you can opt to give the belly button a different shape to hide the concave area more. The G8F body morphs has a morph "Navel Horizontal" that I use if I desire a certain kind of vertical aspect to it. Go to Shaping tab --> Waist --> click the cog-wheel looking thing on the top right side of the Navel Horizontal box, select Parameter Settings, and uncheck the Use Limits box. Then I would just dial in a negative value, which would hide the pit area more and tighten it up horizontally. I've used Navel Vertical morph, but I like the results I get from using negative values with Navel Horizontal in conjunction with the other Navel morphs. 

    If it were me and for my own personal use, then i would just combine the two torso maps in photoshop with the detailed one on the bottom and the less detailed one on top, then erase the belly button on the top layer to show the detailed one underneath, adjust the hues and saturation, then merge and viola, new belly button.

  • fastbike1fastbike1 Posts: 4,077

    @Only a Noob

    Nothing stops you from using a different texture, modifyinh the existing navel through the Parameters tab, or using a different navel morph.

  • Only a NoobOnly a Noob Posts: 37
    edited October 2020
    fastbike1 said:

    @Only a Noob

    Nothing stops you from using a different texture, modifyinh the existing navel through the Parameters tab, or using a different navel morph.

    True and it would not be an issue, but this particular skin and adjusted shape is already used in an established character with like alot of renders in a story and lol I just noticed this due to lighting in a particular scene.

    I would like to modify the texture map and add the details myself and I already have photoshop, but I am having trouble identifying which texture maps I have to edit theres like so many of them, also all of them image, displacement and the sss one I think I need to change simultaneously with similar changes? its so confusing. Also, since I have already made this separate character with many  changes from the original, does Daz save separate texturemaps for characters we create? if so then where? I tried using daz to photoshop bridge but when I try the (export maps) button in photoshop nothing happens in daz :(

    Post edited by Only a Noob on
  • The OP is trying to say that there's no color variation on the torso texture for the area within the belly button. It just looks like a pit without any detail. In a situation like this where you want more detail, you can either use a different skin, or you can opt to give the belly button a different shape to hide the concave area more. The G8F body morphs has a morph "Navel Horizontal" that I use if I desire a certain kind of vertical aspect to it. Go to Shaping tab --> Waist --> click the cog-wheel looking thing on the top right side of the Navel Horizontal box, select Parameter Settings, and uncheck the Use Limits box. Then I would just dial in a negative value, which would hide the pit area more and tighten it up horizontally. I've used Navel Vertical morph, but I like the results I get from using negative values with Navel Horizontal in conjunction with the other Navel morphs. 

    If it were me and for my own personal use, then i would just combine the two torso maps in photoshop with the detailed one on the bottom and the less detailed one on top, then erase the belly button on the top layer to show the detailed one underneath, adjust the hues and saturation, then merge and viola, new belly button.

    hey there thanks for the info, yes I want to do something to the textures in photoshop and do something like you described but can you read the reply I posted above and guide me a lil bit. Thankyou so much.

  • SevrinSevrin Posts: 6,306

    The OP is trying to say that there's no color variation on the torso texture for the area within the belly button. It just looks like a pit without any detail. In a situation like this where you want more detail, you can either use a different skin, or you can opt to give the belly button a different shape to hide the concave area more. The G8F body morphs has a morph "Navel Horizontal" that I use if I desire a certain kind of vertical aspect to it. Go to Shaping tab --> Waist --> click the cog-wheel looking thing on the top right side of the Navel Horizontal box, select Parameter Settings, and uncheck the Use Limits box. Then I would just dial in a negative value, which would hide the pit area more and tighten it up horizontally. I've used Navel Vertical morph, but I like the results I get from using negative values with Navel Horizontal in conjunction with the other Navel morphs. 

    If it were me and for my own personal use, then i would just combine the two torso maps in photoshop with the detailed one on the bottom and the less detailed one on top, then erase the belly button on the top layer to show the detailed one underneath, adjust the hues and saturation, then merge and viola, new belly button.

    hey there thanks for the info, yes I want to do something to the textures in photoshop and do something like you described but can you read the reply I posted above and guide me a lil bit. Thankyou so much.

    You should be fine with only the diffuse map, unless you're doing belly button close-ups. 

    I would use a lowish opacity brush with 0% hardness and use the multiply blend mode to add some texture from a skin with the characteristics you're looking for.  This will help preserve the tone of the original skin.  It might take a try or two until you're happy with the results.

  • Sevrin said:

    The OP is trying to say that there's no color variation on the torso texture for the area within the belly button. It just looks like a pit without any detail. In a situation like this where you want more detail, you can either use a different skin, or you can opt to give the belly button a different shape to hide the concave area more. The G8F body morphs has a morph "Navel Horizontal" that I use if I desire a certain kind of vertical aspect to it. Go to Shaping tab --> Waist --> click the cog-wheel looking thing on the top right side of the Navel Horizontal box, select Parameter Settings, and uncheck the Use Limits box. Then I would just dial in a negative value, which would hide the pit area more and tighten it up horizontally. I've used Navel Vertical morph, but I like the results I get from using negative values with Navel Horizontal in conjunction with the other Navel morphs. 

    If it were me and for my own personal use, then i would just combine the two torso maps in photoshop with the detailed one on the bottom and the less detailed one on top, then erase the belly button on the top layer to show the detailed one underneath, adjust the hues and saturation, then merge and viola, new belly button.

    hey there thanks for the info, yes I want to do something to the textures in photoshop and do something like you described but can you read the reply I posted above and guide me a lil bit. Thankyou so much.

    You should be fine with only the diffuse map, unless you're doing belly button close-ups. 

    I would use a lowish opacity brush with 0% hardness and use the multiply blend mode to add some texture from a skin with the characteristics you're looking for.  This will help preserve the tone of the original skin.  It might take a try or two until you're happy with the results.

    Hey man I did it. Thankyou soo so much mate.

    I know its nothing for you guys but for me as a newbie it was a big deal and I am proud of myself, also learnt alot in the process.

    So how did I do?

    basically after trying the brushes and not getting the result I wanted I figured why not copy paste the characters own textures in small snippets cover the surrounding area so that no one could notice the change in texture between the cropped navel from another character and this ones skin surrounding the belly button.

    Untitled.png
    2196 x 1138 - 2M
Sign In or Register to comment.