Lighting and Shaders

Daz 3D is part of 
Connect
DAZ Productions, Inc.
7533 S Center View Ct #4664
West Jordan, UT 84084
Licensing Agreement | Terms of Service | Privacy Policy | EULA
© 2025 Daz Productions Inc. All Rights Reserved.
Comments
I think it looks quite good, but as the background is just a solid color, I don't know what the lighting is supposed to look like. It appears to me as though there is a light source in that direction (rather than just ambient or sunlight). I'm not seeing the discoloration on the nose, although once again I don't know what the original material looks like without lighting.
Thanks for the reply, sorry I didn't load the BG up. I see and read about the realistic looking renders and how the lighting and the skin is so important. I'm trying to get my head wrapped around it all. It's basically just a portrait with a distant light and UE2. I tinkered with the skin some to try to get it to look realistic. On the face it looks flesh colored but a bit pale across the bridge of the nose and under the eye brows but, maybe that's just me.
Ok, I see the pale area that covers the eyebrows and top of the nose now. It's very faint, but yes, it is there. Not sure why that is happening though.
If you first look right between the eyes at the bridge of the nose and then swap to that light area of the right cheek (left side on screen) you will notice it too is almost the same in a place or two. That to me says it is the figures texture and how the light reacts to it.
Thanks for the responses. So, looking at realism, what should I be looking to improve on?
It is hard to say what is causing the blue/grey patch. My guess is it has something to do with how the skin materials are setup.
I would start by looking at the diffusion texture in the layered image editor. What does the diffusion texture look like? I'm assuming the blue/grey color is not on the diffusion texture, but what color is? Is it whiter than the surround area? (You cannot post an image of the diffusion texture because it is a copyrighted image.)
Here are some things to look at:
First, are you rendering this at gamma 1.0 or gamma 2.2 with gamma correction?
I have seen some characters in the store that use AoA skin shaders that have bluish areas on the skin when rendered at gamma 2.2. These skins are using a bluish color in the diffusion channel. This is done to make the skin look paler. Basically they are trying to take some of the red color out of the diffusion channel on the expectation that the SSS will add that red back. My wild guess is that the gamma correction is applied to the texture, but not the diffusion color, so the diffusion color works differently at gamma 2.2. Sometimes I have had to reduce the amount of blue that has been added in the diffusion channel to get good results.
Sometimes the skin has strong blue color in the specular channel, but where that blue spot is doesn't look like specular to me. You could check and try turning the specular 1 & 2 strength to zero.
You might look at other settings for blue color. I have seen some funny effects from velvet settings, but this does not look like velvet to me. Usually velvet is pinkish, although I have seen character with blue velvet color.
When trying to track down artifacts like this, my usual approach is to start turning effects off (strength 0 or color white) in the face surface tab and using spot render to check for the effect.
Thanks, it's in the map. I'll have to see if I can fix it I guess.
Well, that is not what I would have expected.
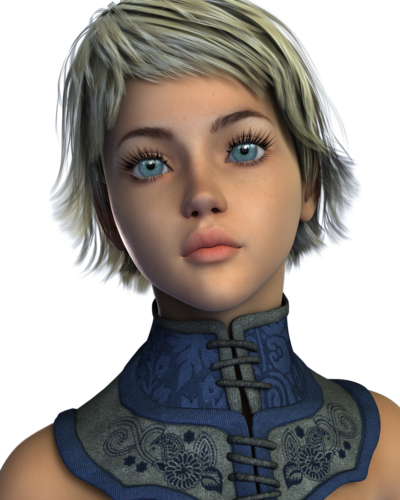
What character is this?
It's Giselle, maybe I'm wrong but it looks like the discoloration is in the map. Maybe I don't know what I'm looking at, I'm still pretty new to this.
You are right, what you are seeing is actually cause the both effect. (around eye, and under front nose area)
though it is not so hard, but when get light ,and mixing other shader property effect , it get more clear.
I usually try to modify diffuse map in gimp (etc), when I feel such area is problem for me.
But if you show your shader setting, ( subsruface, and specular etc)
of surface tab, and what map are setted already,
I believe, others can advice good way to reduce the area color.
or to use LIE, if there is good way to reduce problem easy.
mark 128 adviced you about gamma correction, and I think it sometimes cause problem
then I need to re-adjust map gamma again for non colored texture
( I usually use gamma correnction of ds, so that often meet problem too ^^;)
I do not know, how ds auto-set gamma of each texture, usually they work well,
but sometimes, about specular map, or bump mup, I need to adjust them again,
when use gamma correction. then did you use gamma correction in render setting already?
can you show same color border in specular, and subsurface texture map?
I think if you tweak specuar, you can reduce problem.
then you said you have tweaked skin setting, already,
but when you re-apply default setting of mat which offered , how the area changed?
I really hope to know, how other user will adjust and modify the area,,
it is good learning for me ,(thank you good topic)
Thanks for replying. Here my settings and the other 2 maps. Gamma is at 1.0
Here is with the defaults...
The Brow issue is most assuredly the Diffuse Texture... Highlights and shadowing should not be built into a skin texture but often are. It is the lighting's job to do shadowing but some resource sets still come with cooked on effects that are not needed.
First off, I don't think you should have posted the textures. Those are copyrighted images that belong to DAZ or whoever the PA is.
I don't own Giselle, but if you look at the promo pictures you can see something like the bluish area between the eyes on some of them.
Having looked at the diffusion texture, it looks really white to me in that area. The specular color is light blue (225,237,255). Try changing that to white and see if it makes any difference.
sorry not mentioned about texture copylight,,yes we should not ,, I msitake to say show,, ^^;
I just wanted to say to check specular map too as same as diffuse texture,,,
Then,, I feel specular map border, and blue color should effect the nose area pale by direction light angle,
As for me,, I feel problem around nose more than eyeblow area.
(the border of specular map , seems a ltitle bit clear, and make the round border in front of nose,,
when I compare other character specular map,, they usually around nose edge line shape,,)
then I may turn direction light as diffuse only. then check specular effected around nose too.
if it not reduce problem, concentrate on diffuse texture and subsurface setting.
if it change hard,, may adjust specular texture ,more normalize around border
or weaken specular effect ( light angle etc)
Yes, sorry about posting those. I took them down. I had scaled them down to 50% so hopefully they are useless if anyone wanted to get it.
Trying some of your suggestions, thanks so much guys.
Haven't had much luck with it, plan on tinkering with it some more this afternoon. I have been playing with this. Figuring out how to make maps and lighting still befuddles me.
Don't feel bad, I still haven't figured out lights like I would like to (I have the "SpotLight..." in the Create menu down, and that's about it). I did notice with some figures (Wachiwi), Shadow Bias can make or break how the figure looks. Especially with clothing on skin shadows, and plastic hands.
Unfortunately, it is a value that seams to be optimum in a range relative to the size of the render. (1.0 looks good at less then 800x800, 0.1 is ok up to 1600x1600, etc). You kind of need to fuss with it based on the render size, and the textures in the scene.
If your doing SOI chip logic bump-maps on the floor, forget it, it's just not going to look good, lol.
Thanks, playing with the bias now. I changed the pose up a bit and tried to clean it up some, I may have overdone it.