Water Woman Geograft & Rigging Help
 CrissieB
Posts: 195
CrissieB
Posts: 195
Hi All,
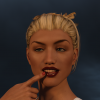
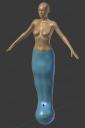
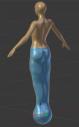
I'm doing the art for a comic book featuring the Water Woman character I created. Below are a full body shot and portrait of the initial character design. The relevant bits of her story: during a sailing trip in the Bermuda Triangle, her soon-to-be-ex girlfriend knocks her out and throws her overboard, leaving her to drown. Magical beings transform her into a non-Newtonian fluid, basically seawater with variable viscosity. Her scientist mom makes a suit that helps her have a more human form. When the suit is at full power, she appears fully human. At partial power, she's more fluid and, without her suit, she's just articulable water.
I've sculpted a geograft to replace her legs with a single limb, for when she's in more fluid form. Below are front and back screenshots of the geograft mesh.
In Blender, I've assigned vertex groups for 6 bones: Hip, Pelvis, Upper, Lower, Base, and Tip. I want the Hip and Pelvis to match the rigging for G8F. The Upper bone will replace G8F's thighs; the Lower will replace G8F's calves; the Base will replace G8F's feet; and the Tip will replace G8F's toes.
Ultimately, I need to use either morphs or rescale/ERC Freeze controls to reshape her lower body into a:
- Tail - Reduce the Z (front-to-back) scale of the Base and Tip, so the sphere becomes a manatee-like tail for swimming.
- Puddle - Reduce the Y (top-to-bottom) scales of the Upper, Lower, Base, and Tip, and increase the X and Z (front-to-back and side-to-side) scales of the Lower, Base, and Tip, so it looks as if she's rising from or sinking into a puddle.
- Funnel - Reduce the X and Z (front-to-back and side-to-side) scales of the Lower, Base, and Tip, so it looks as if she funnels down to a near-point. I can then twist her Upper, Lower, Base, and Tip so it looks as if she's swirling from or into a drain or pipe.
As I understand the geograft and rigging process, I need to:
- Use Figure Setup to import the obj file and create the bone hierarchy: hip > pelvis > upper > lower > base > tip
- Use the Joint Editor to adjust the Upper, Lower, Base, and Tip bones if necessary.
- Use the Weight Map tool to change triax to general weight, clear triax weight, fill by bone selection groups, and smooth the weighting of the Upper, Lower, Base, and Tip bones.
- Use Transfer Utility with 'Merge Hierarchies' to transfer the G8F rigging to the Hip and Pelvis bones, then Memorize Figure Rigging.
- Use the Geometry Editor tool to select the top ring of the geograft geometry for grafting, and to select the G8F polys below that ring for auto-hide.
- Create morphs (if needed) or (better) rescale bones as described above and ERC Freeze to create the Tail, Puddle, and Funnel controls.
- Save As > Figure/Prop Asset to save the geograft as a G8F modification.
- Apply the saved geograft to my Water Woman character.
- Verify that the geograft bones adjusted to my Water Woman's body morphs (Height, G8F Body Morphs, Cartoonized morphs). If necessary, Adjust Rigging to Shape and create an FBM. (I'm not sure how to do this.)
Do I have those steps in the correct sequence? Or should I use the Transfer Utility before I make adjustments with the Joint Editor and Weight Map tools?
From tutorials I've watched, it seems I need to set both G8F and the geograft at Base Resolution (Subdiv 0) before I do steps 2-4, and un-parent the geograft before I do step 5, then re-parent the geograft to G8F before I do Step 7?
What else have I missed?
Thank you all for your help!
Crissie
Daz 3D is part of 
Connect
DAZ Productions, Inc.
7533 S Center View Ct #4664
West Jordan, UT 84084
Licensing Agreement | Terms of Service | Privacy Policy | EULA
© 2024 Daz Productions Inc. All Rights Reserved.
Comments
For an item to work as a fitted GeoGraft it needs to exactly match an edge loop (ring of connrected vertices) and it's joint centres need to match the base figure for the common bones - using the Figure Setup pane will let you add correctly named bones, but it won't make them match the existing bones on the base - you probably can copy-and-paste, or you can use the Transfer utility and then change the child bones as needed.