[Resolved] "No Suit for G8M": Any other users out there? Not understanding how this works!
 DMax
Posts: 637
DMax
Posts: 637
On the product page, it says "Whether you need gloves, or socks/tights, or full body ninja wear, this set has all the variables."
So I am testing this out, trying to create a normal human skinned G8 but with, let's say, only socks that are made using "No Suit". I have been failing miserably...
The instructions said "edit your suit as you wish, by deleting any geografts you do not wish to use, and adjust the morphs (Actor/People/Stylized/No Suit) to suit your choices of grafts. Then in Surfaces tab select different surfaces and apply the different colour property presets, or input any colour of your choice in the diffuse colour section of the surface. Replacing Geografts can be done manually by clicking on the individual geograft you need in the Grafts folder. You may have to manually apply your skin settings to areas you choose to have skin showing instead of the No Suit materials. "
- How do I delete geografts?
- I haven't even been able to select individual geografts
- What does it mean to replace geografts?
- How does one even begin manually applying skin settings?
This product definitely doesn't seem to be catered to new users, my apologies for sounding dumb!
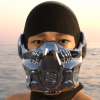
In the attached image, I applied M8 skin on top of the No Suit Base hoping it would work somehow but as you can see, it looks terrifying! :P
Daz 3D is part of 
Connect
DAZ Productions, Inc.
7533 S Center View Ct #4664
West Jordan, UT 84084
Licensing Agreement | Terms of Service | Privacy Policy | EULA
© 2024 Daz Productions Inc. All Rights Reserved.
Comments
I think I can help you!
Basically, No Suit for G8M is a version of the Genesis 8 Male with a) extra texture surfaces, morphs for wrinkles, and geografts to create the effect of sock toes, glove fingers, covered ears, masks etc… It is pretty easy to use once you understand the parts.
Right click on the Arm surface, copy its texture and paste onto Arm Upper, Arm Middle , and Arm Glove.
Next go to the Scene Tab, and delete the geografts that you don’t want to use.
Oh my dear Nemesis! What you just did is EXACTLY what I have been trying to do!
A lot of your steps still sound very complicated to me as a total newbie but I am going to take a screenshot of your instructions and perform them step by step to digest all that knowledge! I will definitely post back once I have succeeded (or not) hahaha ... but I am so happy to see that the product actually does what I had expected it to do... I just have to really understand it. THANKS SO MUCH KIND SIR!
ps. that's a very hot material for the boxer briefs :P
I chose gold glitter because it was handy. I think that the first thing that newbies need to learn is the difference between a shader and a material. A shader is a texture/bump/normal whatever that is applied to a given surface like a face, a pupil, or a torso. A meterial is a set of hierarchal shaders applied to a set of surface such as Victoria 8 default texture which applies shaders to everything from arms to pupils... A geograft is literally like a grafted limb as opposed to a garment which merely covers a the limb. In any case, this will become second nature to you...
Figuring out the no suit was what taught me all about surfaces, shaders and materials. It really is incredibly useful once you figure it out.
So I followed your instructions fully and managed to get NoSuit to work! The most significant lightbulb moment was copying and pasting the surface textures... I never knew that this was possible! I then played around with materials for the balaclava, shorts and socks to get a better grasp of that. I also managed to add a body tattoo and deepened the lesson... the tattoo down the full length of the arm did not work at first on the middle and upper arms so I had to recopy and repaste textures from the arm surface (wonder why though).
As a final challenge, I tried to add on Jepe's Bodyhair (which I guess is yet another surface texture) but that failed miserably... parts of the body disappeared and other parts became entirely white. Since it's aleady almost 4am, I shall try this again tomorrow after a good night sleep and report back. :) THANK YOU SO MUCH kind sir!
Ah, the Jepe Bodyhair is probably the Geoshell one
Ah, you tried something complicated and easy at the same time! Jepe's BodyHair Project 78 is a geoshell. Geoshells share the same geometry as the figure they surround. So your body hair has all of those new surfaces the Nu suit adds. Fortunately, we know how to copy and paste in the Surfaces Tab to deal with that.
Sad morning! I have been unable to "copy and paste" as before and keep ending up with this. No matter what I do, I am unable to copy the surfaces of the brown areas to those of the white. I feel so silly and apologetic.
Yes I did apply all 3 steps of the geoshell and all in M8 format. I can't imagine the joy of the day that I will get NoSuit to work simultaneously with Jepe BH and the tattoos!!
There is a quirky Daz Studio bug that might be the problem. Select all of those No Suit surfaces and apply the default IRAY shader. After that, try the copy and paste...
Did it but doesn't work on my Mac. Doesn't matter... I will content myself with NoSuit and normal, hairless skin :)
You've been amazingly kind mister! Thanks so much :) :)
Oh, let's not give up! Please tell me step by step what you are doing so we can solve this... the skills will be useful for dealing with other products.
(1) New Scene, load "G8M No Suit 01 Base" Actor via Content Library (search "no suit")
(2) Scene tab, select Genesis 8 Male and applied Smart Content > Materials > Iray > Wardrobe > "G8M No Suit 01 Base MAT" and "G8M No Suit 01 Grafts MAT"
(3) Scene tab, select Genesis 8 Male and applied Smart Content > Materials > Iray > Masculine > Genesis 8 Male > "Base MAT All Maps"
(4) Scene tab, select Genesis 8 Male and applied My DAZ 3D Library > People > Genesis 8 Male > Materials > Base Materials > Jepe > JP BH P78 Iray > "G8M Bodyhair Shell Iray"
(5) Scene tab, select G8M Bodyhair Shell and applied My DAZ 3D Library > People > Genesis 8 Male > Materials > Base Materials > Jepe > JP BH P78 Iray > JP BH P78 Without Genitals > "JP P78 BHNG 01a" (this is for G8)
(6) Scene tab, select G8M Bodyhair Shell and applied My DAZ 3D Library > People > Genesis 8 Male > Materials > Base Materials > Jepe > JP BH P78 Iray > JP BH P78 Utilities> "JP P78 BH Color Black" (this is for G8)
(7) Scene tab, selected all nine No Suit Grafts (eg. G8MButt_Graft)... Loaded Surfaces > Shaders > Iray > "Iray Uber Base"
(8) On the actual model, selected "Arms" using Surface Selection Tool, then Edit > Copy > Copy Selected Surfaces
(9) On the actual model, selected "Arms_Middle" using Surface Selection Tool, then Edit > Paste > Paste to Selected Surfaces
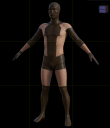
And voila I get this monster of a man hahahaha :P
After #3, did you do all of that copying and pasting to the Nu Suit base as we discussed above? The G8M Bodyhair inherits the settings of the Nu Suit so that you should do all the stuff you need to the base first and the apply the geoshell.
Yes this is what my model looks like just prior to loading the geoshell.
And then as soon as I load the geoshell (first step of the three), it becomes this.
Then this after I do the 2nd and 3rd steps of the geoshell. And then nothing changes anymore after I copy and paste textures.
This may be the bug where geoshells get set to 50% opacity. You need to go through each geoshell and check the surfaces that aren't looking right to find if any that shouldn't be displaying, like the torso of the no toes one, is not 0% opacity.
Sorry for taking so long... I think I left out a step or two. I loaded the Nu Suit and added the brown leather material and shaders to the figure and geografts. I then applied the geoshell of Jepes Project 78 and it looks like this:
I went and selected all of the new Nu Suit surfaces and geografts and applied the default Iray uber shader (it will look the same but the surfaces are now all iray surfaces rather than the default 3delight surfaces). I did the copy and paste thing with the hair shaders of the geoshell so that all the arm parts share the same arm hair shader etc... I went to the Visibility settings of the Parameter Tab of the geoshell and turned off visibility of the head, hood, geografts, and hip. As a purley esthetic thing, I set the wrinkles on the arms, legs and torso to zero in the Parameters of the N Suit but if i left them on, they would match the wrinkles of the face and hood. Normally, i would paint myself a bump map and exlude areas... but again, that is purely esthetics.
I think I know where my errors were.
(1) Most of the actions had to be done within the Surfaces tab whilst selecting the "G8M Bodyhair Shell" in the Scene tab. Once I did that, and applied Iray Uber to all those body parts, it worked after I copied textures also from within the Surfaces tab. In the previous failed attempts, I had always selected the "arm" on the actual model (where I now marked with a "O") which failed to copy and paste "surface" properly.
Curious as to why everything worked except my right hand finger tips but never mind, it's probably a little error which I can correct later.
In my excitement, I also went to turn off too many No Suit body parts (to rid of the wrinkles) but I might have over done it coz now the hood, pants and socks have lost their surfaces and cannot have materials applied to them. Hahaha but I am sure once again it's but a small error and this is the furthest I have gotten with these products THANKS TO YOU!
I am going to report back later after I have successfully applied No Suit + JP Body Hair + Tattoos :D
I must say that I definitely gained a lot more insight into surfaces, textures and materials through this exercise, in large part owing to your professorship and patience!
100% Success! NoSuit + JP Bodyhair + Tattoos! A full surfaces project! MY HAPPY DAY thanks to your kindest and generous support!
ps. learned that it was necessary (as you had mentioned) to select the white parts (mask, pants and socks) and turn off the JP BH so that the No Suit surfaces would be able to come through... of course, since I suppose the both of them are surfaces.
I am glad... With your newfound knowledge about shaders, I want you to look at a crazy product: search the store for "dark matter shaders". There are emissive shaders which make surfaces and objects glow but if you set the values to negative numbers, you get shaders that absorb light like a black hole. They are wild!
Does sound very wild!! Will go check it out!
Apologies for reviving this thread :P
So I seem to be making things difficult for myself of late... to use the NoSuit only for the pants, I am having trouble loading the ears... :(