Quality of hair render
I have seen some renders where you can see every single strand of hair. I haven't been able to copy that.
What determines the quality of the hair render?
Is it the hair prop itself? (If so, what should I look for when i puchase hair?)
Is it the render settings? (If so, what settings?. I have tried with very low shading rate settings, but that doesn't do the trick).
Is it the render engine? (If so, which should I use?)
Would greatly appreciate input on this one, cause I am spending lots of time on this, without "getting there". :)
EDIT: My spellchecker/translator objects to the term "strand of hair", but I can't find a better term. Hopefully you get what I mean anyway. :)
Daz 3D is part of 
Connect
DAZ Productions, Inc.
7533 S Center View Ct #4664
West Jordan, UT 84084
Licensing Agreement | Terms of Service | Privacy Policy | EULA
© 2025 Daz Productions Inc. All Rights Reserved.
Comments
Can post a screen shot of you render settings
Thanks Frank for super fast response.
In the pics you can see "City dove hair" and the settings it was made with.
This is nowhere near what I am aiming for.
Can you give some examples of the end result you want?
There's a pretty good chance that what you are looking for is down to the hair prop (or in some cases not prop, but rather hair system) used.
@mjc1016
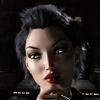
Attached is a good example of what I would like to do.
And here are two - not as good examples, but still good - I found browsing through the galleries:
http://www.daz3d.com/gallery/#images/23604/
http://www.daz3d.com/gallery/#images/22437
I'll be following this thread reserv888 - I've had the same question myself!!
Well, this is getting to be comparing apples to oranges to bananas....
That first render, I can't find where the artist specified what hair it was, so it could be anything...since it was done in Poser and then exported to Octane for rendering it could be a 'fibermesh' hair...which means, yes, it is individual strands or a 'standard' transmapped hair. Octane can do some amazing things, but at a cost (not just for it, but it NEEDS a pretty high-level Nvidia video card with minimally 3 GB of RAM).
The other two...the first one, with the Spiderqueen Hair, uses the UberHair presets for the UberSurface shader. This pretty much means it is rendered in Studio/3Delight. The UberHair presets do help a lot, but work best on 'good' hair.
The third one doesn't specify anything special. So it could be anything...
In general, though you need 3 things to do good hair...
1. If you are using transmapped hair, it must have 'clean' transparency maps. None of the big white 'blobs', but individual hairs showing. A well made diffuse map, with well defined strands and a purpose crafted displacement/bump map. Pretty high resolution is a bonus.
2. A good shader setup, with the ability to exclude occlusion or control raytraced shadows, or your render times will become astronomical.
3. Plenty of patience to keep trying and adjusting settings...because there is no 'universal' setting for hair that will work at all camera angles or with all lighting sets.
In this thread (in the later pages especially) are a lot of good hints and details on hair in 3Delight rendering.
http://www.daz3d.com/forums/discussion/21611/P330 (back a few from that post, even)
Hair and how it renders depends on many many things. First is the Detail of the Texture map itself, if the texture map is not detailed then your not going to get that every hair shows render. Second is the all the other maps at play on the hair, Is the Transmap made well is it really Clear were it should be and detailed enough to pull the hair to that life like look. Are Bump or displacement in use if so are they set for a close render or a far shot render. Do the Spec and or Reflect maps enhance the effect or do they blur the final render. If set well and made well they should help pull that each strand is separate look off. And all this is just the hair.
Now add in your Lighting and you really need to pay close attention to it all. The Lighting can and will cause you to need to adjust every thing to get one good render for the hair. Here is the one I think I did the best hair in...
Nice job Jaderail!
So if you are going to purchase hair from DAZ, is there anything I should look for?
I.E. if I see "7 Texture and Transparency Maps (3000 x 3000)" in the description it looks like good quality hair to me. Would you agree?
To me I look hard at the Promos, do they show the Detail? If they do that tells me with work I should be able to do as good a render myself. Then I check for Number of Maps and Map size, keep this in mind the larger the Texture map should equal more detail, but that may or may not always be the case.
Got it. Probably the same logic holds true for clothes (maybe?).
Thanks for the link mjc1016 - I'll be reading that.
Pretty much, in clothing you want to see many maps, bump, displacement or normal maps are often the texture detail or weave of the cloth so If I see a good Promo and it lists one of those maps we as users should be able to get that detail in our renders as well if we try.
Do to the layered nature of hair props/figures and their use of trans maps you really need Max Ray Trace Depth set to at least 2 and I prefer setting it to 4. I don't see that renders are much slower at 4 than at 2 but I do see better image quality.
@mjc1016
Thanks for the link. I will read it carefully.
I am still quiet green when it comes to 3D art so I don't fully grasp " If you are using transmapped hair, it must have ‘clean’ transparency maps", but this is a good reason to learn!
@Jaderail
Good pic! That is pretty much what I am talking about.
@jetsmart
Thanks for tip about MRT. I seldom use anything beyond 2. I will test that.
I understand that I have recieved a lot of great tips. At the moment some of them are technichalwise beyond what I get. But as said previously; this is a good reason to learn.
I am truly grateful for your valuable input.
Many transparency maps for hair are just white 'blobs' on a black background...right there is a big hit to the detail level. Also many of them if they do have some individual strands show artefacts, jagged edges or signs of just being desaturated color maps...not purpose built transparency maps. Yeah, most of those short comings are on older products, but many of those items are still in circulation and widely used. Low bit depth is another big problem that, by itself can lead to some of those other failings. An 8 bit greyscale map isn't going to be as smooth/clean as a 16 bit one...and going to be far below a 24 or 32 bit one (yeah, 32 bit greyscale maps aren't very common....not even all image editors can do 32 bit, yet).
@Jaderail
I see now that the two hairs I use the most and have the greatest problems with are made by the same vendor. Though they look great from some distance, they are not suitable for close-ups. Pitty.
So while trying to understand the technical aspects of the products (I still don't understand what a SSS-shader does...) I am going to go with your suggestion to check the promos more in detail.
One other question.
I have seen photoshop brushes to make hair , like Mane Attraction. Are they only used for making entire "hairs" or can you improve existing hair in photoshop, or will it just look weird?
Of course you can paint over existing hair and change its style and length. It only depends on the brushes you use (if you work in Photoshop) and of course your painting skills :-)
A graphics tablet (like Wacom) is essential if you want to do some serious painting on your PC.
This is an example of an older image where I have used brushes to bush out the hair model, an also the mane on the horse
https://s3.amazonaws.com/bw-1651cf0d2f737d7adeab84d339dbabd3-gallery/media/folder_115/file_1142533.jpg
Of course you can paint over existing hair and change its style and length. It only depends on the brushes you use (if you work in Photoshop) and of course your painting skills :-)
A graphics tablet (like Wacom) is essential if you want to do some serious painting on your PC.
Thank for your reply.
I only intend to make the parts that I consider to "massive", get finer details, not create new hairdos. And I only intend to make this as postwork, not change the hairsystem. Do you still think I need a Wacom? My drawing skills are mediocre, at best...
Thank for your reply.
I only intend to make the parts that I consider to "massive", get finer details, not create new hairdos. And I only intend to make this as postwork, not change the hairsystem. Do you still think I need a Wacom? My drawing skills are mediocre, at best...
I only use a mouse.
Of course you can also use your mouse only. It may be enough if you really just want to add some details. But a graphics tablet gives you much more control. You get pressure sensitivity and drawing with a stylus is like drawing with a pencil. It feels much more natural and your strokes will have much more flow.
I have been very happy with hair from 3Dream/Mairy. This is Gregoria Hair. Besides that fact that they render nicely, I like that they come with lots of colors and styles. The styles are poses for the hair that you can just click on to apply - very handy. In this picture I used autofit to apply the Genesis hair to the G2F Norma character. The autofit causes some strange kinks in the hair, but it is not too bad, I think.
I noticed that your render settings have unusual fractional settings for Pixel Filter Width X and Y (near the bottom of the render settings). The default value is 6, and that usually works fine with the Sinc filter. I'm not sure why you changed to the values shown in your render settings screenshot. Try 6 and see if that improves anything for you.
I have attached a screenshot of an image I rendered with Gregoria Hair and the settings I used, as an example.
Edited to fix product link.
@Barbult
I checked out 3Dreams hair. They seem to have fine details. Looks promising. Thx for the tip.
The Pixel Filter Width setting is another example of me not fully grasping the knobs and sliders. I just noticed when experimenting that higher values punched holes in the picture and I therefore just assumed that "lower is better". So I lowered the setting... Test rendered the City dove hair a few minutes ago with the default setting of 6 and it was no difference, neither better nor worse, than a setting of 2.
I think Gregoria Hair is the one that was used in your "good Hair" image posted here.
OK... getting it. Just took this off of a product in my Wish List -
Tenera Morphing Armor for Genesis 2 Female(s) http://www.daz3d.com/tenera-morphing-armor-for-genesis-2-female-s
165 Texture, Bump, Specular and Displacement Maps (2048x2048).
I think it looks pretty outstanding!
Thank you for your input Jaderail! Don't mean to turn this into a clothing thread!!