Studio 4.12 Render script outline setup question
 Crystalwizard
Posts: 102
Crystalwizard
Posts: 102
I'm hoping that there are still people using this rather than iray or the sketchy package and that someone can help me with the setup for the 3Delight scripted outline render.
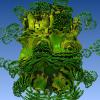
When I render with just the defaults, I get solid colors but no outlines.
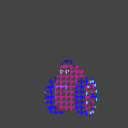
When I try tweaking the normal line width and color ID line width settings, what I get are a bunch of squares all over the image, but still no outlines. I've attached images with all three showing what it looks like.


Daz 3D is part of 
Connect
DAZ Productions, Inc.
7533 S Center View Ct #4664
West Jordan, UT 84084
Licensing Agreement | Terms of Service | Privacy Policy | EULA
© 2024 Daz Productions Inc. All Rights Reserved.
Comments
I have somewhat of a similar issue.
The Outline render script works fine: it renders the solid color image and the 3 "lines" image as expected.
However, if I set line width > 11px, I get black rectangles all over the solid color image, so of course the "lines" images are also ruined. See below, left image with lineWidth=10px, right image with lineWidth=12px.
To get Ouline rendering , you need to setup where the outline will be stored . Its not auto compile / auto layering in (your)Render preview . It saved directly in your HD but first you need to tell DAZ studio where to save those outlines.
To use it, you need 2D image or movie editor with layers ablities . Meanwhile Color ID used as masking purpose when doing editing in some area ( Just like FLAT COLOR Stage in Comic Coloring ) . Depending on your need or workflow . You can save or just ignore it ( close it without save )
The correct order to get outline rendering are :
1. Render Engine >Scripted 3Delight . It will show several options
2 . In Render Script > Outline
3.RENDERER FILE > Outline Directory > Open the arrow pointer and choose Browse . Point to folder or create new one
4.File Prefix > Type Unique prefix for each projects( to avoid overwrite when you want to render outlines for another project)
5. Click Render . Now the viewport will show you sillhoute . Sometimes it only showing Black Silhoutte , but if you setting COlOR ID for each group of surfaces , the render preview will showing multi color based on your COLOR ID setup .
6. After render process finished , check in folder you`ve been creating in STEP 3 . Those outline render images should be in there
7. Use your 2D image editor and ovelay those lines above your normal render
This YT video explaning the basic , it doesnt cover COLOR ID but if you just need the outlines , this video will be enough