Transfer Utility Help
 Marmalade Boy
Posts: 103
Hi there,
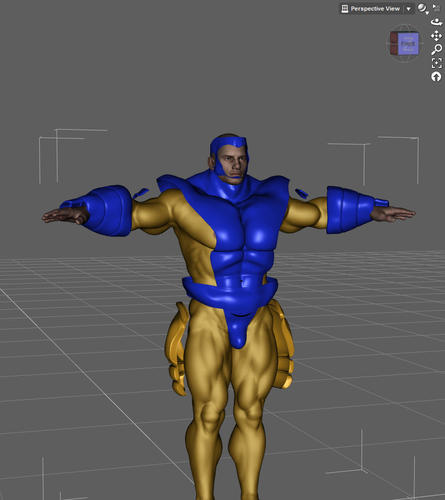
I am attempting to create Jean Grey's 90s style costume for M6. Unfortunately, when I use the transfer utility to rig the darn thing, it turns out OK for the most part (will need some tweaks) except for the face mask area. I have tried all the suggestion that were offered up on this topic but I think I am doing something wrong. The first image is the unrigged and the second is rigged. Also pictured, is a close up of the face; unrigged and rigged.
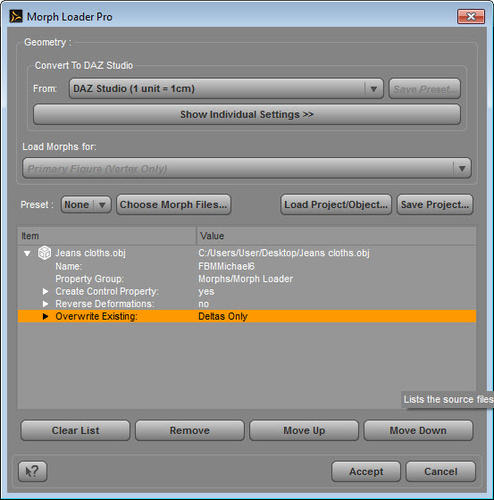
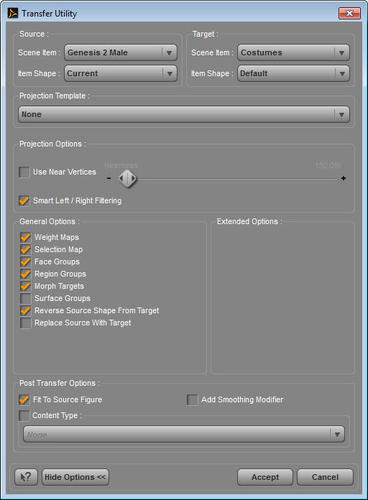
I tried fixing this by reimporting the original fine as a morph but when I do that, the entire thing is scaled up. Can someone let me know what it is that I am doing wrong? The settings I am using are also below.

1-5-2014_7-24-41_PM.jpg
885 x 994 - 93K

1-5-2014_7-24-14_PM.jpg
553 x 560 - 75K

1-5-2014_7-23-00_PM.jpg
512 x 696 - 77K


rigged.jpg
1296 x 632 - 372K


Un_rigged.jpg
1440 x 625 - 300K


Comments
Pendraia:
I made it myself in Maya. I modeled it over the reshaped M6 figure. I then cut up the figure and attached it to the uniform. You can see the completed WIP in this thread (http://www.daz3d.com/forums/discussion/26115/P600/). I am holding off on texturing the darn thing until I solve this problem. The X symbol is an issue as well but I think I will just parent it to the pelvis instead of rigging.
First question...have you tried adding a smoothing modifier? Don't add smoothing in the parameter tabs leave at the default but see if by adding it the poke thru disappears.
Can you also post an image of the wire frame for that area?
Cheers
Pen
Pen,
I am not sure I know what you mean by not in the parameters tab. I tried adding it via the transfer utility but to no avail...wires are below.
You do need to make sure that the collision object is set to M6, but not up the iterations or anything like that.
Select your item in the Scene tab.
At the top right hand side of the scene tab is a triangle.
Click on the triangle and go edit/apply smoothing modifier.
You can alter the smoothing modifier settings in the parameter tab its under mesh smoothing.
What I was suggesting was to leave it at the default setting. This will add a collision against the figure you have it conformed to and will generally fix many things without even changing the settings. If this doesn't work playing with the settings may help or post a close up image of the wire frame for that section for us to look at and we may be able to suggestion other ideas. Smoothing modifier is probably the easiest option to try first.
Edited to add...I can't see anything obvious in the wire frame. I have noticed sometimes when rigging that an item goes from very close fitting to slight poke thru...I'm not sure why. Fingers crossed the smoothing modifier works.
mjc,
it is set to the Genesis 2 male figure that I used.
Pen,
I did as suggested and it solved it YEA!!!!! Now I have a new problem. :( BOOOOOO The Blue is sinking into the yellow. I will play around with the setting to see if I can solve it. Below is a screen grab and a quick and dirty render.
I am a bit of a newbie myself when it comes to building clothes so my suggested solution will not be the most technically correct but could possibly help. I've talked to a friend who had problems as have I, myself with an improperly conforming headpiece. We both resolved it by separating the head section and making it a prop (parented rather than conforming). We both arrived at the same conclusion independent of one another but it worked for both of us. Don't know if it'll help you but figured I'd toss it out there.
BTW, don't you mean Gene Grey? :cheese:
Thanks for the suggestion Leroy. I had thought about that but don't really want to break up the mesh. I think the faces of the yellow are the items that are poking through when I changed the smoothing iterations to 3. I think All I have to do now is readjust the mesh under the blue. I may end up deleting it tomorrow. Alternatively, I will make it two separate parts. the blue one part and the yellow the other.
Her name is actually Jean Grey-Summers. http://en.wikipedia.org/wiki/Jean_Grey
Yay, that it worked. : ( that it caused a problem elsewhere...unfortunately that does happen sometimes.
This is a really good suggestion having it as a separate piece would most likely solve the issues with the chest.
You could adjust and send it back as a morph also...
I think he was being punny...
It is reasonable,, because,, maybe usually user do not recoginize
the difference of Genesis2men > M6 and genesis1>M5
your transfer utlity setting can work if you use it genesis>m5
because, M5 need only one FBM to make the Full shape
but M6 may use two morph, (FBMM6 and FHMM6) it is clear difference, about genesis2 series figure. I think.
so that, if you use option "current" and reverse defomation,
it usually only work about first modification to make the current shape.
if you make the shape more than two morph, it may not work.
I reported about it before mantis, but many do not understnd them still.
if you use it, your clothing shape must fit only FBMM6 shape. not actuall Micheal6 shape.
that means, you need to make clothing shape for, (under neck is M6, but head shape need to keep, genesis2male)
as your pic clear show me,, ONLY FBMbody part delta are considered when Transfer utility,
auto-deform the shape.
I believe you have good knowledge for modeling, then you can easy re-adjust shape as obj。
I strongly suggest, when make clothing for daz figure, make obj as same as
bese figure at start points.
that means, about your case, you hope to make bodysuit for M6shape.
so that you need to make bodysuit obj for genesis2Male.
after that adjust auto-genearted morph, for M6.
take care, I said, M6 use two morphs to make the M6 shape.
that means, you need to adjust about two morphs (head and body)
we can change M6 shape by one controoler, but it simply use ERC and move
two morph (for body part and head part) at same time.
if I make it, I may check M6 morph (body ) use scale or not.
Unfortunately,, I have seldom buy mans shape,, without it is appendix^^;
but I believe, some user can clear tell what I mean.
Thanks for the info kitakoredaz, I wasn't aware of that as I don't use the Gen2 figures. I haven't even looked at the male figure...glad you posted!
to escuse for me^^;
I do not check about gen to M5,
if M5 use other morph to make, eg if it need genesisMen shape, I do not know.
but I can say,
1 usually we do not rely much about at "current" and reverse defomation setting.
if you hope to make clothing for another character,
use only one morph shape.
2 everytime we need to care,, if the moprh change body scale
by ERC too , or not.
(I think it is well known,, many of user have experienced, to use TU,
or try to overwrite morph for Vic5 etc,,)
if it change body scale, TU do not consider it at all,
and it is same, when we make obj to overwrite generated morph.
3 my conculusion is,, to avoid these problem,
simply keep make clothing shape for base figure.
4 if you have made the shape for other character, and hope to use overwite generated moprh,,
need to consider, the shape fit for mix morph shape, or one morph shape.
if it fit mix morph shape, it may not be used to overwrite generated morph.
about body suit type ^^;
When I made clothing for original cute gril shape, about genesis2female,
usually I divided the my character, FBM and FHM to keep the standard rule of gen2female,,
so that I made clothing shape for FBMcutegirl only.
set genesis2female by FBMcutegirl,
her face is same as genesis2female, but just body (Uunder head, daz category,, Fullbody, I think)change FBMcutegirl
then export the shape as template of clothing.
but usually we do not think about mask or face about shirt or dress, so that, we do not understand clear.
if I make shirt or skirt,, I need not to care them.^^;
then if I use , "current" option, I may prefer choose, "morph" and point out what I used, clear.
it should be one morph. (and can easy check which changed scale or not)
So let me try and wrap my head around this...the blue, on the body suit, is not just a material zone, but a second layer to the mesh?
So let me try and wrap my head around this...the blue, on the body suit, is not just a material zone, but a second layer to the mesh?
That's what it looks like...
it sems to be second meshes (not jointed actually, but made as one obj, one figure)
but even though he jointed mesh by vertices ,if cover outer poligons on inner poligons, may be happen easy,,
(I know yours understand clear more than me, to reduce the problem,
may need more subdivided mesh, for innner and outer part. :roll:)
Then I believe, his plan to divide as two obj (two rig figure) for each part is good idea. :)
.
because, when apply smooth modifier, we can adjust value for each.
and more good thing is, we can change collison target for each part
I may apply geometry shell for Actor,or inner part, first,
then off set from Actor mesh a little.
apply smooth modifier innner part clothing with Actor.
next apply smooth modifier outer part with collison geometry shell.
it often keep good distance between inner part and outer parts,,
Hi Kitakoredaz,
Many thanks for the informative post. I had not idea about the FBMM6 and FHMM6. I had proceeded the way I always did when making cloths for other figures in the past. This would explain why the replace morph option didn't work. I will try one more thing (making it one mesh instead of two) before splitting the mesh. This has been a most educational experience. i will post my results later after work.
mjc1016:
Yes, they are two separate mashes. I didn't want to set a material zone because I wanted a raised surface (thickness).
Then make them two separate items...because if they aren't actually one mesh the smoothing/collisions aren't going to be applied to the blue part. But being one 'item' means that you can't just apply additional smoothing/different collision object to the blue part. If it were two separate items, you could set it to collide with the yellow part of the suit and the problem would take care of itself.
Making layered items like that is always a bit of a pain in the posterior...
Maybe SickleYield can drop some hints (or one of the other clothing PAs that frequent the forums...).
Now, on a side note, I can't remember if the blue part of that suit clung tightly to Jean's chest or stayed flat across her breasts...but that could be another potential issue if you want it to stay flat...
Update gang...
As suggested, I rigged the two main parts of the suit separately and it turned out perfectly.... Many thanks Pendraia, mjc1016, Kitakoredaz and Leroy. below are the results and a quick pose render; now it's on to texturing.