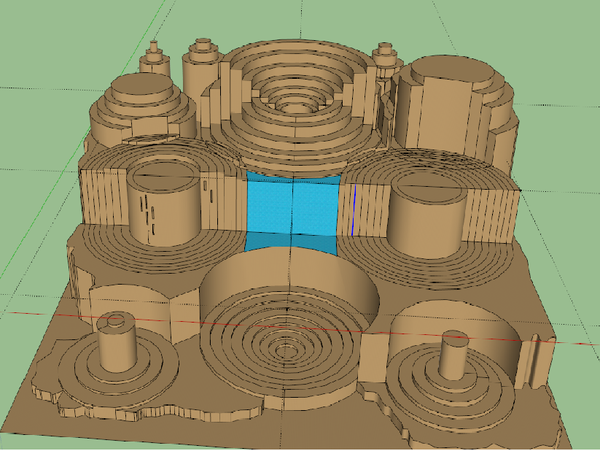
help in creating a realistic 3d enviroment for open sim
hello there and thanks for taking a minute to read this
ive been self teaching my way threw various 3d rendering and mesh creating programs. im trying to create mesh content for an open sim that i host for a group of role players. this has roadblocked me as i cannot seem to create a smooth or realistic looking area.
the concept is an island that is mirrored in a sense by the good and evil of the area. the theme is Elven. and i hope to incorporate a grecko roman type mythological feel to it with plateau mountains, trails, a floating island and waterfalls.
the related sim area is 256 x 256 with unlimited elevation.
this has become somewhat complex but i continue to try my hand and reach out for help. anyone willing to contact me may do so and i would like to work with someone to bring this to a reality.
i would like to compliment the amazing artists that are working on these types of projects and hope to become as good at some point.
(wouldn't mind skills advice and tips as this is a direction i hope to move in to achieve a future career path in as well)


Comments
Not a bad start on the scene. Does your modeler have 3d texture painting capabilities?
i dont think so there are smoothing tools in the sandbox ive used Google sktechup to create this but its not the greatest.
Smoothing is going to take adding poly into it. I don't know what your limits are for the sim. It looks pretty smooth to me from your screen shot.
well its very boxy and poly would mean rounded edges? the opensim allows a high level of mesh content. the grid is called inworldz. very similar to the ones known as Secondlife. ive had some great mesh builds that ive modified and textured threw sketchup buts its a limited program was a good one to start learning the ways in mesh but would love to learn more about this and using the better programs as well
Yes you would get rounded edges if you subdivide the mesh.
Smoothing and such will require resurfacing with a different modeler, The problem is that the polys are not distributed evenly with Sketchup and many CAD type modelers, nor grouped for materials etc. There are some tools there do "per-pixel" painting that can make a texture map for this that would make it look fine. like Blacksmith3d and 3DCoat. However re-topo with evenly spaced polys may be a good idea if you want to bring DAZ. Have you seen Pixeologic's (makers of ZBrush) free and super easy "Scupltrix"? its a fun clay like 3d modeler that includes a 3d paint tool that would allow you to make more organic looking props for your scene. Much easier and simpler than Blender.org's super sophisticated modeling, animation and UV tool. You may want to doanload and install that (free too) to provide UV (texture) and advanced modeling capabilities. Ask more questions... they will come up as you explore your options.
OMG! this is what i was hoping to find i knew there was something out there i would be able to mold and sculpt! oh the ideas now! thank you so much im going to have fun with this i hope that i can save it into a .dae file type and add textures to it as well this will give me the tools to sculpt and create as i have needed to
much appreciation and gratitude
3d Pipeline help, from Scupltris shape your mesh as OBJ. The in same app, paint it and save off texture maps as .png or .jpg. Save obj again when done and you shoudl have 3 files minumum: yourmodel.obj yourmodel.mtl and yourmodel.jpg (or png) If you edit .mtl in texture editor you will see how obj defines the texture map filename to each of its poly group names. This is key concept. Then import the OBJ into DAZ Studio and you can rig the mesh by defining joints (bones) and/or vertex smoothing of joints by weightmap for animation. For instance a door, or gate can be riged to open close, or waterwheel to revolve on its axis. Morphs can even be made to deform mesh too. Each feature has a bit aof a learning curve so take it one step at a time. And you will be certain to hit dead ends, and re-do work becasue sequence of operatiosn in a development pipeine and that takes some experience. Go with the flow....dont get frustrated as mistakes are lessons. Save often, and save as sequence number revisions when you make a new feature. Delete interim revisions only... only if and when final project is done. BTW for games, its typical to scuplt way high detail with excessive polys (too high for game engines and maybe even DAZ) . What you need to do is reduce the mesh afterword and reapply (COPY) your UV from the high res to a lower res so it can retain the original high res texture maps for max detail compromise. Ask more later about "retopo", "poly reduction" or "decimation" -as thats the tools that are needed for that. Hint Google Brad Bolthouse and his awesomne UUWrap 3d or the free LithUnwrap version of UV editor. Its a 3d swiss army knife, that gets you out of a pipeline jam like no other tool can.
Human and Animal Figures have their own recommended poly group and skeletal standands. I do recommend Blonde's tutorials here if you get into that.