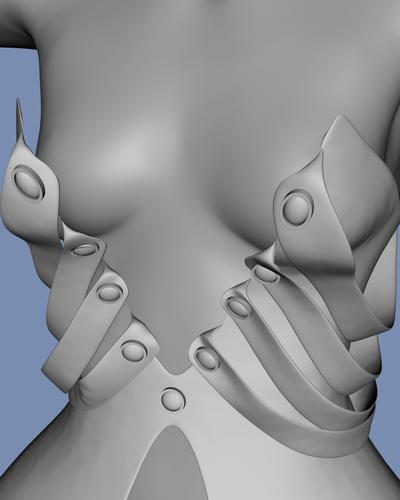
Rigidity maps are not rigid.
 ghastlycomic
Posts: 2,531
I cannot get the hang of rigidity maps.
I set the entire button as the participant.
I set the polygons under the button as the reference
Fill the weight map 100%
Morph or post the character and the button deforms.
In fact the rigidity maps seem to just make things worse because now buttons sink into the figure.
How do I make it stay round and stay on top of its reference polygons?
[EDIT] Okay I figured out how to keep the shape. Have to disable the secondary and tertiary scale maps. But how do I keep it on top of the reference polygons so the buttons don't sink into the figure?


i_hate_you_rigidity_map.jpg
1000 x 1250 - 363K
Post edited by ghastlycomic on


Comments
You don't have pre-existing generated morphs on the item, or you are clearing them? Rigidity mapping helps only with newly generated morphs. Also, are you giving each button a separate rigidity group? If you don't it will average the behaviour, I think - it certainly won't do what you want.
I'm creating the rigidity map after using the transfer utility to fit the item to Genesis. I haven't created any morphs other than the ones the transfer utility creates.
Each button is it's one rigidity group. I've tried making the reference groups for the buttons bigger and it's worked for some buttons but made other buttons worse.
I guess if I just keep tweaking the ratio of reference to participants I'll eventually get something that works.
Essentially, as I understand it, whatever happens to the reference polygon happens to all the polygons in the rigidity group. You can use Edit>Figure>Clear Generated Morphs to clear out the morphs so that you know you have a clean version to test.
SUCCESS!!!
I guess rigidity maps is yet another one of those save and tweak functions. %-P
Did you use the "old" method of creating rigidity, or the "new" method alluded to in the release notes for 4.6.1.17?
There's a new one? I just used the one here
Protecting the Mesh from Morph Distortion
It is the first item mentioned in the 4.6.1.17 announcement http://www.daz3d.com/forums/discussion/29776/
I haven't seen any description of how to use it.
Highlights are:
1) Implemented the concept of a Rigid Follow Node; an Instance derived node whose purpose is to maintain a proportional relationship with specified polygons of a target mesh. Tools for creating a node and establishing reference geometry can be found in the context menu of the Polygon Group Editor viewport tool.
Arrrrgh!
I seriously don't understand rigidity maps. They seem completely random in function. I did everything exactly the same way only this time nothing has changed, nothing is rigid in the least. The maps might as well not even be there.
It took me 5 tries just to fill the selected polygons with the rigidity map. You know how the map is supposed to be blue when it's zero and then red when it's full. Well for some reason the map was just grey and it wouldn't let me fill the selected faces. Then after the 5th attempt it was finally showing up blue and let me fill.
I am literally almost at the point of pure rage with this rigidity map nonsense.
Why is there not simply a "see this thing I selected.... DON'T CHANGE ITS SHAPE" function.
You would THINK it would be something that simple. Just fill it 100% and it won't change shape. But nope. Apparently that would just make too much sense. I don't know why the corset I made has rigidity maps that function but the buttons on the pants I made just seem to completely ignore the rigidity maps and deform.
I'm almost to the point of just saying screw it. No more freaking buttons on anything.
Definitely filled this time. Still deforms.
The mesh underneath where the buttons go has to have lots of mesh there to "support" the buttons.
Also the buttons have to have a lot of mesh to help hold their shape too.
Okay... it looks like the rigidity maps are actually working the same for the corset as they are for the pants. I guess rigidity maps only work with morphs but still deform when the mesh moves. I didn't notice it on the corset because it really only deforms very slightly when the figure moves and only in certain areas where as the pants its much more obvious.
Is there simply no way to have true rigidity on a piece of conforming clothing? If you need something truly rigid do you have to create it as a prop and then parent it to the clothing? This is unbelievably frustrating that something that should be a simple one button click is so ridiculously complicated to implement.
Just give me the damn "DON'T CHANGE SHAPE EVER" button for crying out loud!
The buttons are 500 polys each. How many more do I need?
Arrrgh! Nothing I am trying is getting the rigidity to work. How can this possibly be so difficult? Why would I possibly want something filled with 100% rigidity map to deform? Is there literally no way to make a button that stays a button? Why DAZ? Why is this so complicated? It should NOT be this complicated. 100% ridigity = not change shape. Seriously. WHY?
I've tried that option using what I assume is the logical way to implement it and still no luck. My buttons don't deform when I morph the figure but they do deform when the figure moves.
Is it simply impossible to make conforming clothing with buttons that don't deform when the figure moves? Do you have to create the buttons as a separate geometry and then parent them to the clothing?
I can't believe it. It's been 18 years since I've had a migraine and the stress and frustration of trying to get these buttons to work has actually triggered a migraine. Thanks DAZ! >:(
Can you post a wireframe image of a button?
The buttons are 500 polys each. How many more do I need?
Ha! I was close. 456 polys. The mesh underneath doesn't have that many but there's not much I can do about that because it's a mesh I made with Marvelous Designer so I'm stuck with that.
Providing the back of the button is as detailed mesh-wise as the front, yes that should work AFAIK.
But the mesh for the clothing AFAIK may work better if there was more of it.
I don't have MD, but can you not import the .obj into another modeler and add some mesh?
I know in Hexagon we can choose a few face normals and add lines into them.
I don't have any idea about rigidity (3D), but your clothing mesh seems to be subdivided. Maybe try turning it off while you are editing?
Rigidity maps are for transferred morphs only. To avoid stretching on things like buttons you need to give the button a single weight, presumably matching the point where it attaches to the cloth, so that it moves as a unit. On the bands on the suit, if that's what you want to affect, you will need corrective morphs to avoid at least some directions of stretching since you obviously can't give all the highlighted areas the same weight.
I would import the suit (without buttons if possible) into Studio, apply sub-d to increase the mesh density, export back out (fix / replace buttons if necessary).
Well, it may not be intuitive (I have no idea how the heck they work), but at least they are there as an option. You can always learn an existing feature, if the feature does not exist at all, then that isn't possible. :-)
They are one of those things that sound interesting, but I just haven't had any free time to devote to learning them.
That is so thoroughly ridiculous that rigidity maps only work for transferred morphs and not movement. Who wants stretchy buttons? But thanks for the work around I'll give that a try. It's soooo nice to know it wasn't something I was doing wrong. That was so thoroughly frustrating a feeling.
Adjusting the weight map isn't really a work around, it's the way to do it - a solid object moves as a piece so all its vertices should have the same weight, if they don't it will deform.
Well, it may not be intuitive (I have no idea how the heck they work), but at least they are there as an option. You can always learn an existing feature, if the feature does not exist at all, then that isn't possible. :-)
They are one of those things that sound interesting, but I just haven't had any free time to devote to learning them.
Part of it is I've got stress upon stress right now. A new play I'm in (I'm acting in it and I composed the music for it) is opening tomorrow night and of all the many plays I've been involved in this one is the least prepared to open. Nearly the entire experience of this play has been a headache and the conflicts between me as a composer, the director (who is on my side) and the writer of this play have been many. Normally I do 3D stuff as a form of relaxation from my day to day professional woes but tackling this rigidity map issue has been creating more woes than it alleviated. :LOL:
How do I find out the weight map value of a polygon so I know what percentage to fill it? Is it a matter of guessing and testing or is there a way to get the actual info?
I hope at some point in the future they come up with a rigidity map that actually makes objects rigid.
I've noticed a new problem.
When changing the weight setting of the buttons I noticed on one of the buttons the Z rotation had a hot spot on it. So I tried filling the polys with a zero % and the hot spot remains unchanged. Is this a bug?
WOOT!!!! It's working! It requires a lot of experimentation to get the weights just right but it's working! Two buttons down 4 more to go.
Wow. Who would have ever guessed making buttons on an outfit would be so much work. This is definitely going to change the way I design outfits. VELCRO FOR EVERYONE!
Thank you thank you thank you Richard and everyone else who helped!
Off hand I'm not sure there is a way to sample a weight from one vertex to apply it to another, sorry. I'm also not sure what's happening with the hot spot.