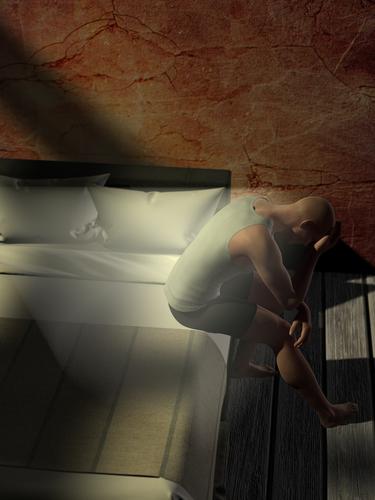
D-Former question
 TobiasG
Posts: 447
In the render below I'd like to use a D-Former so that the bed is slightly dented where the guy is sitting. Alas, I'm missing something: while I can easily distort the whole bed in psychedelic ways, I'm not managing a small, off-center dent.
Any advice on how to use a D-Former? A link to a relevant thread would be perfectly fine, I didn't find anything via the Search function.


morning_after.jpg
960 x 1280 - 694K


Comments
In DS45+ (I think it was different in earlier versions) you attach the D-former at the root node of an object, so the field starts off affecting all of the object. Not always what you want!
What I do (this is a personal thing, there are probaly better and mnore correct ways!) is, before adding the node) select the field bone of the Dformer and scale it down, keeping an eye of the level of effect (red/yellow dots) on the object to be affected. I also use the X, Y and Z translations toshift the 'hot point' (the area with densest red points) toward the area I want affected. The area of affect that you are moving around is, in effect, a sphere so as you scale it down you may see it disappear - just shift it on the appropriate axis to bring it back into view. Once in the general location I'll scale it along the individual axes if I want that soet of effect, add points in the pline (if I want a ripple effect) and then, finally, add the node to the object. I then use the various transform parameters on the D-former (the middle bone of the three) to try out the D-fromr to make sure it is doing the sort of thing that I want. If so I take a bit more care over the positioning and scaling of the field.
Depending on how the bed is made up you might be able to get what you want by giving it a Collision/Smoother against the figure sitting on it - and slowly then lower the seated figure down to see how it goes.
Ah, it makes sense now! No wonder the whole bed got twisted - scaling down the field size was so obvious I didn't see it :) I'll try that out right away. Thank you very much!
This is modern bed 2 and the problem is with the geometry. The method described would be correct if the geometry was in better shape. Dforms work by moving the verts in the selected area and there aren't enough verts properly placed to get the kind of clean deformation you want.
Where your man is sitting would require Dforms for the sheet as well as the duvet. Although with the angle you have you could probably hide the sheet and just use the duvet - but if you look at the scene in wireframe, you will see that you will never be able to get a clean deform because of the way it is made.
The throw looks like it would give a much cleaner deformation but the problem there is that the underside of the throw has the same sort of geometry as the sheet and duvet so won't deform the way you want.
If you ever manage to get a clean deformation, let me know because the only way I've managed to do it is to replace the sheet/duvet with a high poly cube with a fabric shader on it to take the deformation.
Yes, I'm afraid the deformation doesn't look that great. I think a hard, non-deformable bed might look more plausible.
You can see where the render is going...
Still, another thing learned. :)
You may be able to use something like Blender to cut extra loops into the geometry to give you enough detail to play with - the tricky thing is finding something that will do the job without killing the UV mapping (which Hexagon will do). In principle you could also try applying a displacement map, but that would take a lot of trial and error to get right.
Well, I do have Blender downloaded, but I'm afraid I haven't made much progress with the handbook...
I expect what you want would be called Loop Slice or Loop Cut.
Here is a quick example where I turned off the sheet and duvet and used a cube with a fabricator shader instead.
I used a combination of smoothing and a Dformer to get the depression I wanted.
Keeping in mind that I haven't a clue what I am talking about- could you create your own plane and really up the number of divisions, then use a d former? In other words, make your own surface and substitute it? (Are divisions the same as number of polygon section created?) I'm wondering if you could also use the Polygon Editor to make a section, either using the original surface or the one you make, that might help in the illusion of a deeper surface if you can independently do a surface area.
Am I making sense or just "out there?"
Well, I can certainly create a plane or a cube, put a cloth texture on it, and deform away. That's not difficult (now that I know to scale and move the d-field). However, as soon as I have that plane/cube on the bed, the bed becomes visible when the plane is lowered. So I'd need to completely replace the bed (or parts of the bed, as in Gone's example upthread). Which can be done, but I think it's difficult to get a bed made up from primitives which is believable (without a considerable amount of work). Or at least, the workaround Gone has demonstrated is somewhat limited, and I would rather not be limited...
In other words, I do need to start spending time with Blender, so I can make my own beds and whatnot. :) Hey, it can't be that difficult :)
You can just Turn off the parts you replace in the Scene with the eye or in Surfaces with opacity.
Using a plane is just a variation on the cube with the problem Tobias mentioned.
With this model, the polygon editor would not work very well. The model is composed of triangles and the triangles on the flat part of the sheet are much larger than the area you want to deform. You would need to edit the polys to make them smaller.
Divisions are not quite the same as number of polys since it depends on the type of object you are creating. In the case of a cube, the number of divisions is per side so the total polys would be six times the number of divisons.
EDIT: My bad. Number of divisions applies to both directions of a face so a division of 10 would give 100 polys per face or 600 polys total for a cube.
With my example, I turned off the sheet and duvet objects and replaced them with a resized cube with a fabric shader applied. I then used smoothing and a Dformer to make the depression. The whole thing took about 15 minutes. I expect a less limited solution would take a little longer. ;-)
Here's a render at a different angle to better show off the depression.
The bed cube looks like it has beveled edges. How did you do that? A basic cube would seem to end up with sharpish edges, unless I'm mistaken.
The bed cube looks like it has beveled edges. How did you do that? A basic cube would seem to end up with sharpish edges, unless I'm mistaken.
As previously mentioned, the deformation is a combination of smoothing and a Dformer. I always apply Convert to SubD to get better smoothing. The cube is turned to high resolution and beveling is automatically applied.
Thank you. I'll look into that - and likely be back with questions :)