Shaping Rendering Lighting in DAZ3D
Hey all,
I've been using DAZ since they first gave away the forest fairy model. I did not fully understand most of it. I came to DAz because of Bryce5, which I had bought at a now defunct Comp USA store. I came to Bryce because of Terragen, but found Bryce tons easier to do what I wanted. I was eager to put humans and animals and other models in my Bryce landscapes.
A friend of mine has pushed me along the 3d trail by requesting art from me (all free because I don't know what I am doing) and recently has requested a book cover that does not look "toonish" which is apparently how the Bryce renders seem to her. So I am trying to learn the lights, and the rendering, with DAZ v. 4.0. There are reasons why I have not migrated to the next version, mostly space on my machine and my abilities, and the fact that I have nearly a decade of old material, props, models, etc that I don't know if will work.
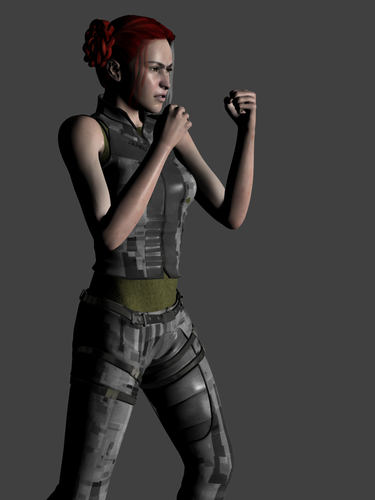
Be that as it may, I am delighted by my recent attempts. I have a wip for a project I've been working on. The default Genesis 1 skins are ok, but I wanted to use a skin purchased elsewhere because it it not as 'perfect'. I've used Pure Hair Darling, and Future Cop. I am so pleased that I figured out (from my Bryce experienceI) how to cover up her navel under the Future cop vest. Yay! I don't understand the fascination with navels, seems vulnerable for a feisty gal. My gal is not a warrior or a soldier. She's been put in a compromising situation, and will not yield. I used the standard M4 boxing pose. Everything else is out of the box, except for the background postwork.
I like her, but I'd like a little more muscular arms. This is Genesis 1 with a v4 skin called "Horizon". She is also a bit on the thin side. I don't want a bulky female like the 'Shemale'. But I'd like to know how to 'strengthen' my gal.
Also, when rendering (I have little understanding of the terminology", I notice if I use Uber Environmental, the complexion becomes heavily pixelated. So it's just a HDr ' Park' under Lighting, linked to Genesis and a point light. It may not be perfect, but I'm pleased at what I could being hampered by a lack of knowing what to do.


Comments
UberEnvironment2's default settings are optimized for speed, not for quality. For better results, load UE2 from your content library (Light Presets>omnifreaker>UberEnvironment2) and...well, I'm going to quote this post from SimonJM which I though explained it very well:
Also note your render settings...adamr001 has some good information on that: http://www.daz3d.com/forums/discussion/16085/ (the download is for DS4.5+, but instead of downloading you can just manually plug in the numbers found in that thread).
For the muscular arms...what morph sets do you have? If you want to dial up some muscles on the arms without affecting the rest of the body, then the Muscularity set is one you might want to consider. Since I don't have that set yet, what I would do is use the Upper Arm Volume and Forearm Volume dials along with Body Tone, Fitness Details, and a little Fitness (possible even Bodybuilder and Bodybuilder Details), all of which I believe can be found in the Genesis Evolution Body Morphs set or are morphs that come with basic Genesis.
@Scott-Livingston
thank you so much for a speedy reply and recommendations that I can grasp. I'm looking forward to testing them out. I have just the basic Genesis 1 set of dials but I'll try them out and see if I can dial up something stronger but not freakish.
Going back to your first post, and the comment about Bryce render looking "Toony" The problem that you have there could be because Gamma correction is turned on by default in Bryce 5.
This is a Bryce 5 render, one with gamma on and one with gamma off, to show you what I maen.
@Chohole
Thank you for posting those examples in Bryce. I see the difference. I never touch the gamma in Bryce, I'm going to try that. Not just for my friend's project but also some other renders I'd like to see a little more dimensional.